
Lambda

The sandbox finally gets its own apartment

There is a particular kind of optimism that appears in architecture diagrams. It is usually represented by a neat rectangle labelled “sandbox”, placed between “user code” and “production systems”, as if malicious input could be discouraged by tidy geometry.

For years, we have treated this rectangle with a level of trust usually reserved for elevators, bridges, and the one person in the meeting who says, “This should be simple.” Inside the box went user scripts, notebook cells, plugin code, CI jobs, vulnerability scanners, browser IDE sessions and, more recently, AI agents with the confidence of a junior developer and the impulse control of a caffeinated raccoon.

The problem was never running code. Computers are embarrassingly eager to do that. The problem was trusting the code not to bite the furniture.

AWS Lambda MicroVMs are interesting because they arrive at the exact moment when everyone is trying to run more untrusted code, more often, with fewer humans staring nervously at terminal output. They are not just another Lambda feature wearing a party hat. They are AWS trying to give each user, job, or agentic session its own small, isolated room, complete with VM-level walls, preserved state, and a serverless landlord who handles the plumbing.

That is worth paying attention to.

The old sandbox had suspicious drywall

Containers made modern platform engineering possible. They package applications beautifully, start quickly and behave well enough that we have built entire civilizations on top of them, some of which even survive Monday mornings.

But containers share the host kernel. That is not a moral failure. It is simply the bargain. You get speed and density, but the isolation boundary is not the same as a virtual machine boundary. For normal workloads, this is often a perfectly reasonable trade. For hostile or unknown code, it becomes a slightly more awkward dinner party.

Running untrusted code in containers usually requires extra hardening. Seccomp profiles, AppArmor or SELinux policies, rootless runtimes, careful filesystem restrictions, capability dropping, network controls, resource limits, image hygiene, and a collection of internal documents with titles like “please do not run customer code as root again”.

This does not mean containers are bad. It means they have spent years being asked to babysit workloads they would probably rather not meet in a dark data center.

Virtual machines have always had a stronger answer. Each workload gets a separate kernel and a more substantial isolation boundary. Security teams like that sort of thing. They sleep better when the boundary is not made entirely of namespace optimism.

The problem is that traditional VMs are heavier. They take longer to boot, require more lifecycle management and make interactive platforms feel like they are starting a small moon every time someone clicks “run”. If you are building a browser IDE, a notebook platform, or an AI coding assistant, waiting minutes for an execution environment is not a product experience. It is a hostage situation with a spinner.

So teams built their own sandboxes. Some used hardened containers. Some orchestrated pools of VMs. Some built elaborate custom schedulers. Many discovered that safely running other people’s code is less a feature and more a lifestyle choice involving pager alerts.

Firecracker was already doing the quiet work

The interesting part is that AWS already had a lightweight virtualization story hiding in plain sight. Firecracker has powered Lambda and Fargate-style isolation patterns for years. It was designed to provide lightweight MicroVMs with fast startup and strong boundaries, without dragging the full emotional luggage of traditional VM management into every request.

Lambda MicroVMs take that idea and expose it as a managed primitive for a very specific class of applications. These are not ordinary Lambda functions that got promoted. They are separate resources with a distinct lifecycle and a different purpose.

Regular Lambda functions are still excellent for event-driven work. A request arrives, a function runs, a result returns, and the function disappears back into the mist like a responsible woodland creature. That model works beautifully for stateless tasks.

Lambda MicroVMs are for the messier cases. A user opens an interactive coding environment. An AI agent needs to inspect files, run code, call tools, and maintain context. A data analytics session installs packages, loads working files, and waits while the human operator goes to lunch, a meeting, or an unexpected argument with Kubernetes.

These sessions need state. They need isolation. They need to start quickly. They need to pause without losing their belongings.

That combination used to be annoying. Now it has a first-class shape.

Lambda functions answer the doorbell, MicroVMs let the guest stay

The lifecycle is the real story.

You create a MicroVM image from a Dockerfile and a code artifact. AWS initializes the environment and captures a Firecracker snapshot of disk and memory. Later, when you launch a MicroVM from that image, it starts from the pre-initialized snapshot instead of beginning from scratch.

This is the difference between cooking dinner from raw ingredients and reheating yesterday’s lasagna. One is noble. The other is faster and, under the correct emotional conditions, superior.

Snapshots matter because many interactive environments spend a surprising amount of time getting ready to do the thing the user actually asked for. Installing packages, loading runtimes, preparing tools, arranging directories, initializing services, warming models, importing dependencies, and opening files. All of this can become part of the prepared environment.

For AI agents, this is especially useful. The environment can already contain the tools, SDKs, interpreters, and supporting processes the agent needs. When a session starts or resumes, it does not have to assemble itself from a cold and resentful universe.

There is a catch, because distributed systems are legally required to have at least one. Snapshotting state means engineers must think carefully about what is safe to preserve and clone. Unique identifiers, network connections, ephemeral credentials, time-sensitive tokens, and initialization-time randomness may all need special handling.

A snapshot is not just a performance trick. It is a memory of a machine. And memories, as anyone who has debugged a stale cache knows, can lie with great confidence.

Eight hours change the serverless conversation

The 8-hour runtime limit is one of the details that make this more than a faster function wrapper.

Traditional serverless thinking has usually pushed us toward short, stateless execution. Do a job, return a result, vanish. This is clean, scalable, and architecturally pleasing, which means real users immediately invent workflows that do not fit it.

Interactive sessions are not short. Vulnerability scans can run for a while. Data analysis can wander. AI agents can start with “inspect this repository” and somehow end up creating four temporary files, two package installs, and a philosophical dispute with a linter.

Lambda MicroVMs support longer-running sessions while preserving memory, disk, and process state. During idle periods, the environment can be suspended and later resumed. That matters because many workloads are not constantly busy. Humans pause. Agents wait. Browsers sleep. Developers get pulled into meetings where someone says “alignment” until the will to compute leaves the room.

Idle suspension changes the economics and the experience. The user can return to a session that still has its working state, but the platform does not have to pay as if the machine were actively sweating the entire time.

This is still serverless, but not the old cartoon version where everything is tiny, stateless, and over before the coffee cools. It is serverless with a memory.

That sentence would have terrified architects ten years ago. Now it may be exactly what agent platforms need.

AI agents need walls, not vibes

Agentic AI has made sandboxing fashionable in the same way kitchen fires make extinguishers fashionable.

An AI agent can generate code, run commands, inspect files, call APIs, and modify state. Sometimes it does this brilliantly. Sometimes it does this like a raccoon found a shell prompt and decided to modernize procurement.

The security model for agents must assume mistakes. It must assume prompt injection. It must assume unexpected tool use. It must assume that the agent is not evil, just helpful in the way a toddler with admin privileges might be helpful.

This is where per-user or per-session MicroVM isolation becomes important. If each agent run gets its own dedicated execution environment, the blast radius becomes easier to reason about. One confused agent should not be able to interfere with another user’s session. One malicious script should not get a friendly wave from a shared kernel and an invitation to explore the neighborhood.

But this is not magic safety dust. VM-level isolation is a stronger primitive, not a complete architecture.

You still need tight IAM roles. You still need network egress controls. You still need to decide whether the MicroVM can reach the internet, internal APIs, metadata services, package repositories or that one ancient endpoint nobody admits owns the business process. You still need secrets management, audit trails, logging, quotas, timeouts and cleanup.

The agent may now have its own padded serverless studio. You still need to check what tools you left in the drawers.

The security story is better, but not finished

The most dangerous sentence in cloud security is “the service handles that”.

Sometimes the service does handle that. Sometimes it handles one very important layer, and everything around it remains your problem, wearing a fake moustache.

Lambda MicroVMs improve the isolation layer. A dedicated MicroVM with no shared kernel between users is a meaningful architectural improvement for untrusted execution. It gives platform teams a stronger foundation than a basic container sandbox. It also reduces the amount of custom virtualization machinery teams need to build themselves.

But the surrounding design still decides whether the result is secure or just expensive theater.

Before production, architects should ask some unfashionable questions.

What can the MicroVM reach on the network?

What credentials exist inside the environment?

Can the workload call internal APIs?

Can it download arbitrary packages?

How is user code authenticated before execution?

How are sessions terminated?

What happens to files after suspension?

What gets written to logs?

How are snapshots built, versioned, and retired?

How are malicious or runaway workloads detected?

What prevents one customer from turning your lovely sandbox platform into a cryptocurrency-themed space heater?

These questions are not reasons to avoid the service. These are the reasons to use it properly. The stronger the primitive, the more tempting it is to stop thinking. Resist this. Architecture diagrams are very good at looking innocent.

The bill is also part of the architecture

Serverless has trained us to associate managed services with financial elegance. Sometimes this is true. Sometimes the invoice arrives carrying a clipboard and asking to speak with the adult who designed the retry policy.

Lambda MicroVMs have a cost model that deserves actual modeling. You pay for baseline resources while a MicroVM is running, and for additional active usage when the workload exceeds that baseline. That is reasonable, but it means usage patterns matter.

A short-lived scan that starts, does work, and terminates has one shape. An interactive coding session that runs, idles, suspends, resumes, and idles again has another. A swarm of AI agents that each receive their own environment has a third shape, one that may require finance to breathe into a paper bag if nobody adds quotas.

The point is not that this will be expensive. The point is that “serverless” does not automatically mean “cheap”. It means the operational model changes. Billing still obeys physics, usage, and the quiet vengeance of concurrency.

If you are building a platform on top of Lambda MicroVMs, model the boring details. Average session duration. Idle time. Resume frequency. Memory size. CPU requirements. Disk usage. Regional availability. Expected concurrency. Abuse scenarios. Free-tier fantasies, if your product team has recently been exposed to those.

Cloud bills are where optimistic architecture diagrams go to receive adult supervision.

Platform engineering gets a new building block

For platform teams, the most promising part of Lambda MicroVMs is not that they make one workload easier. It is that they could simplify a recurring pattern.

Many organizations need a safe way to run untrusted or semi-trusted code. Internal developer platforms need execution sandboxes. AI products need agent workspaces. Security platforms need isolated scanning environments. Data platforms need notebook-like sessions. Education platforms need per-student runtimes. CI systems need disposable workers.

Historically, building this well meant assembling a small private cloud inside your cloud. VM pools, schedulers, cleanup jobs, image builders, network isolation, capacity management, logging pipelines, and emergency scripts named things like final_cleanup_v7_really_final.sh.

Lambda MicroVMs do not remove all platform work. They move the boundary.

You still need golden images. You still need lifecycle policies. You still need guardrails. You still need quotas and tenant mapping. You still need observability. You still need deployment pipelines. You still need to decide how MicroVMs integrate with Lambda functions, S3, CloudWatch, IAM, and whatever control plane runs your product.

But you may not need to own as much of the virtualization substrate yourself. That is not glamorous. It is better. Glamour is what vendors put in keynote slides before someone asks about day two operations.

A sensible pattern might use regular Lambda functions for the event-driven control plane, APIs, and orchestration logic. Lambda MicroVMs handle the isolated execution path, where user code or AI-generated code actually runs. S3 stores build artifacts. CloudWatch captures logs. IAM defines what each environment can do. Network controls define what each environment can reach.

That division feels clean. Not simple, because nothing involving untrusted code is simple. But clean enough to be useful.

The uncomfortable production checklist

Before adopting Lambda MicroVMs, it is worth being deliberately boring. Boring is underrated in architecture. Boring systems sleep through the night.

Ask which workloads actually need VM-level isolation. Some do. Some are perfectly fine as regular Lambda functions, ECS tasks, or containers in Kubernetes. Using a stronger primitive everywhere can become expensive and operationally awkward.

Ask how long sessions really run. Not how long the demo runs. Not how long the product manager hopes they run. How long do users actually keep them alive while opening seven browser tabs and going to lunch?

Ask what state must survive suspension. Then ask what state must never survive suspension. Secrets, temporary credentials, one-time tokens, and sensitive intermediate files need careful treatment.

Ask how images are built and patched. A MicroVM image is still software. It needs supply chain controls, vulnerability scanning, versioning, and retirement. Yesterday’s golden image can become tomorrow’s antique security incident.

Ask what happens when a workload wants more. More CPU. More memory. More disk. GPU acceleration. x86 compatibility. A different region. A longer session. Some requests will fit the service. Some will not. That is not a failure. That is architecture doing its job before production does it for you with alarms.

Ask how abuse is stopped. Per-user quotas, concurrency limits, session expiration, network restrictions, and cost controls should be designed early. Waiting until after the first runaway agent is a traditional learning method, but not a relaxing one.

A better sandbox is not a finished safety plan

Lambda MicroVMs arrive at a useful moment. The industry is asking applications to execute more code that the application developer did not write. Some of that code comes from users. Some comes from AI systems. Some comes from a collaboration between both, which is how you get an incident report with a surprisingly emotional timeline.

The old choices were uncomfortable. Containers were fast but needed serious hardening for hostile workloads. Traditional VMs were safer but heavy. Regular serverless functions were elegant but not designed for long, stateful, interactive sessions.

Lambda MicroVMs offer a new middle ground. VM-level isolation. Fast launch and resume from snapshots. Stateful sessions. Idle suspension. Serverless lifecycle management. A dedicated environment per user, job, or agentic session.

That combination will not remove the need for security architecture. It will not absolve anyone from IAM, networking, secrets, observability, patching, or cost controls. It will not make AI agents safe by virtue of being placed inside a branded rectangle.

But it gives the sandbox real walls.

And that matters. Because the sandbox did not become safer because someone wrote “AI” on the diagram. It became safer because the walls got real.


AWS Lambda SQS provisioned mode is cheaper than therapy

There is a specific flavor of nausea reserved for serverless engineering teams. It usually strikes at 2 a.m., shortly after a major product launch, when someone posts a triumphant screenshot of user traffic in Slack. While the marketing team is virtually high-fiving, CloudWatch quietly begins to draw a perfect, vertical line that looks less like a growth chart and more like a cliff edge.

Your SQS queues swell. Lambda invocations crawl. Suddenly, the phrase “fully managed service” sounds less comforting and more like a cruel punchline delivered by a distant cloud provider.

For years, the relationship between Amazon SQS and AWS Lambda has been the backbone of event-driven architecture. You wire up an event source mapping, let Lambda poll the queue, and trust the system to scale as messages arrive. Most days, this works beautifully. On the wrong day, under the wrong kind of spike, it works “eventually.”

But in the world of high-frequency trading or flash sales, “eventually” is just a polite synonym for “too late.”

With the release of AWS Lambda SQS Provisioned Mode on November 14, Amazon is finally admitting that sometimes magic is too slow. It grants you explicit control over the invisible workers that poll SQS for your function. It ensures they are already awake, caffeinated, and standing in line before the mob shows up. It allows you to trade a bit of extra planning (and money) for the guarantee that your system won’t hit the snooze button while your backlog turns into a towering monument to failure.

The uncomfortable truth about standard SQS polling

To understand why we need Provisioned Mode, we have to look at the somewhat lazy nature of the standard behavior.

Out of the box, Lambda uses an event source mapping to poll SQS on your behalf. You give it a queue and some basic configuration, and Lambda spins up pollers to check for work. You never see these pollers. They are the ghosts in the machine.

The problem with ghosts is that they are not particularly urgent. When a massive spike hits your queue, Lambda realizes it needs more pollers and more concurrent function invocations. However, it does not do this instantly. It ramps up. It adds capacity in increments, like a cautious driver merging onto a freeway.

For a steady workload, you will never notice this ramp-up. But during a viral marketing campaign or a market crash, those minutes of warming up feel like an eternity. You are essentially watching a barista who refuses to start grinding coffee beans until the line of customers has already curled around the block.

Standard SQS polling gives you tools like batch size, but it denies you direct influence over the urgency of the consumption. You cannot tell the system, “I need ten workers ready right now.” You can only stand in line and hope the algorithm notices you are drowning.

This is acceptable for background jobs like resizing images or sending emails. It is decidedly less acceptable for payment processing or fraud detection. In those cases, watching twenty thousand messages pile up while your system “automatically scales” is not an architectural feature. It is a resume-generating event.

Paying for a standing army instead of volunteers

Provisioned Mode flips the script on this reactive behavior. Instead of letting Lambda decide how many pollers to use based purely on demand, you tell it the minimum and maximum number of event pollers you want reserved for that queue.

An event poller is a dedicated worker that reads from SQS and hands batches of messages to your function. In standard mode, these pollers are summoned from a shared pool when needed. In Provisioned Mode, you are paying to keep them on retainer.

Think of it as the difference between calling a ride-share service and hiring a private driver to sit in your driveway with the engine running. One is efficient for the general public; the other is necessary if you need to leave the house in exactly three seconds.

The benefits are stark when translated into human terms.

First, you get speed. AWS advertises significantly faster scaling for SQS event source mappings in Provisioned Mode. We are talking about adding up to one thousand new concurrent invocations per minute.

Second, you get capacity. Provisioned Mode can support massive concurrency per SQS mapping, far higher than the default capabilities.

Third, and perhaps most importantly, you get predictability. A single poller is not just a warm body. It is a unit of throughput (handling up to 1 MB per second or 10 concurrent invokes). By setting a minimum number of pollers, you are mathematically guaranteeing a baseline of throughput. You are no longer hoping the waiters show up; you have paid their salaries in advance.

Configuring this without losing your mind

The good news is that Provisioned Mode is not a new service with its own terrifying learning curve. It is just a configuration toggle on the event source mapping you are already using. You can set it up in the AWS Console, the CLI, or your Infrastructure as Code tool of choice.

The interface asks for two numbers, and this is where the engineering art form comes in.

First, it asks for Minimum Pollers. This is the number of workers you always want ready.

Second, it asks for Maximum Pollers. This is the ceiling, the limit you set to ensure you do not accidentally DDoS your own database.

Choosing these numbers feels a bit like gambling, but there is a logic to it. For the minimum, pick a number that comfortably handles your typical traffic plus a standard spike. Start small. Setting this to 100 when you usually need 2 is the serverless equivalent of buying a school bus to commute to work alone.

For the maximum, look at your downstream systems. There is no point in setting a maximum that allows 5,000 concurrent Lambda functions if your relational database curls into a fetal position at 500 connections.

Once you enable it, you need to watch your metrics. Keep an eye on “Queue Depth” and “Age of Oldest Message.” If the backlog clears too slowly, buy more pollers. If your database administrator starts sending you angry emails in all caps, reduce the maximum. The goal is not perfection on day one; it is to replace guesswork with a feedback loop.

The financial hangover

Nothing in life is free, and this applies doubly to AWS features that solve headaches.

When you enable Provisioned Mode, AWS begins charging you for “Event Poller Units.” You pay for the minimum pollers you configure, regardless of whether there are messages in the queue. You are paying for readiness.

This is a mental shift for serverless purists. The whole promise of serverless was “pay for what you use.” Provisioned Mode is “pay for what you might need.”

You are essentially renting a standing army. Most of the time, they will just stand there, playing cards and eating your budget. But when the enemy (traffic) attacks, they are already in position. Standard SQS polling is cheaper because it relies on volunteers. Volunteers are free, but they take a while to put on their boots.

From a FinOps perspective, or simply from the perspective of explaining the bill to your boss, the question is not “Is this expensive?” The question is “What is the cost of latency?”

For a background report generator, a five-minute delay costs nothing. For a high-frequency trading platform, a five-second delay costs everything. You should not enable Provisioned Mode on every queue in your account. That would be financial malpractice. You reserve it for the critical paths, the workflows where the price of slowness is measured in lost customers rather than just infrastructure dollars.

Why you should care about the fourth dial

Architecturally, Provisioned Mode gives us a new layer of control. Previously, we had three main dials in event-driven systems: how fast we write to the queue, how fast the consumers process messages, and how much concurrency Lambda is allowed.

Provisioned Mode adds a fourth dial: the aggression of the retrieval.

It allows you to reason about your system deterministically. If you know that one poller provides X amount of throughput, you can stack them to meet a specific Service Level Agreement. It turns a “best effort” system into a “calculated guarantee” system.

Serverless was sold to us as freedom from capacity planning. We were told we could just write code and let the cloud handle the undignified details of scaling. For many workloads, that promise holds true.

But as your workloads become more critical, you discover the uncomfortable corners where “just let it scale” is not enough. Latency budgets shrink. Compliance rules tighten. Customers grow less patient.

AWS Lambda SQS Provisioned Mode is a small, targeted answer to that discomfort. It allows you to say, “I want at least this much readiness,” and have the platform respect that wish, even when your traffic behaves like a toddler on a sugar high.

So, pick your most critical queue. The one that keeps you awake at night. Enable Provisioned Mode, set a modest minimum, and watch the metrics. Your future self, staring at a flat latency graph during the next Black Friday, will be grateful you decided to stop trusting in magic and started paying for physics.

When invisible limits beat warm Lambdas

My team had a problem. Or rather, we had a cause. A noble crusade that consumed our sprints, dominated our Slack channels, and haunted our architectural diagrams. We were on a relentless witch hunt for the dreaded Lambda cold start.

We treated those extra milliseconds of spin-up time like a personal insult from Jeff Bezos himself. We became amateur meteorologists, tracking “cold start storms” across regions. We had dashboards so finely tuned they could detect the faint, quantum flutter of an EC2 instance thinking about starting up. We proudly spent over $3,000 a month on provisioned concurrency¹, a financial sacrifice to the gods of AWS to keep our functions perpetually toasty.

We had done it. Cold starts were a solved problem. We celebrated with pizza and self-congratulatory Slack messages. The system was invincible.

Or so we thought.

The 2:37 am wake-up call

It was a Tuesday, of course. The kind of quiet, unassuming Tuesday that precedes all major IT disasters. At 2:37 AM, my phone began its unholy PagerDuty screech. The alert was as simple as it was terrifying: “API timeouts.”

I stumbled to my laptop, heart pounding, expecting to see a battlefield. Instead, I saw a paradox.

The dashboards were an ocean of serene green.

  • Cold starts? 0%. Our $3,000 was working perfectly. Our Lambdas were warm, cozy, and ready for action.
  • Lambda health? 100%. Every function was executing flawlessly, not an error in sight.
  • Database queries? 100% failure rate.

It was like arriving at a restaurant to find the chefs in the kitchen, knives sharpened and stoves hot, but not a single plate of food making it to the dining room. Our Lambdas were warm, our dashboards were green, and our system was dying. It turns out that for $3,000 a month, you can keep your functions perfectly warm while they helplessly watch your database burn to the ground.

We had been playing Jenga with AWS’s invisible limits, and someone had just pulled the wrong block.

Villain one, The great network card famine

Every Lambda function that needs to talk to services within your VPC, like a database, requires a virtual network card, an Elastic Network Interface (ENI). It’s the function’s physical connection to the world. And here’s the fun part that AWS tucks away in its documentation: your account has a default, region-wide limit on these. Usually around 250.

We discovered this footnote from 2018 when the Marketing team, in a brilliant feat of uncoordinated enthusiasm, launched a flash promo.

Our traffic surged. Lambda, doing its job beautifully, began to scale. 100 concurrent executions. 200. Then 300.

The 251st request didn’t fail. Oh no, that would have been too easy. Instead, it just… waited. For fourteen seconds. It was waiting in a silent, invisible line for AWS to slowly hand-carve a new network card from the finest, artisanal silicon.

Our “optimized” system had become a lottery.

  • The winners: Got an existing ENI and a zippy 200ms response.
  • The losers: Waited 14,000ms for a network card to materialize out of thin air, causing their request to time out.

The worst part? This doesn’t show up as a Lambda error. It just looks like your code is suddenly, inexplicably slow. We were hunting for a bug in our application, but the culprit was a bureaucrat in the AWS networking department.

Do this right now. Seriously. Open a terminal and check your limit. Don’t worry, we’ll wait.

# This command reveals the 'Maximum network interfaces per Region' quota.
# You might be surprised at what you find.
aws service-quotas get-service-quota \
  --service-code vpc \
  --quota-code L-F678F1CE

Villain two, The RDS proxy’s velvet rope policy

Having identified the ENI famine, we thought we were geniuses. But fixing that only revealed the next layer of our self-inflicted disaster. Our Lambdas could now get network cards, but they were all arriving at the database party at once, only to be stopped at the door.

We were using RDS Proxy, the service AWS sells as the bouncer for your database, managing connections so your Aurora instance doesn’t get overwhelmed. What we failed to appreciate is that this bouncer has its own… peculiar rules. The proxy itself has CPU limits. When hundreds of Lambdas tried to get a connection simultaneously, the proxy’s CPU spiked to 100%.

It didn’t crash. It just became incredibly, maddeningly slow. It was like a nightclub bouncer enforcing a strict one-in, one-out policy, not because the club was full, but because he could only move his arms so fast. The queue of connections grew longer and longer, each one timing out, while the database inside sat mostly idle, wondering where everybody went.

The humbling road to recovery

The fixes weren’t complex, but they were humbling. They forced us to admit that our beautiful, perfectly-tuned relational database architecture was, for some tasks, the wrong tool for the job.

  1. The great VPC escape
    For any Lambda that only needed to talk to public AWS services like S3 or SQS, we ripped it out of the VPC. This is Lambda 101, but we had put everything in the VPC for “security.” Moving them out meant they no longer needed an ENI to function. We implemented VPC Endpoints², allowing these functions to access AWS services over a private link without the ENI overhead.
  2. RDS proxy triage
    For the databases we couldn’t escape, we treated the proxy like the delicate, overworked bouncer it was. We massively over-provisioned the proxy instances, giving them far more CPU than they should ever need. We also implemented client-side jitter, a small, random delay before retrying a connection, to stop our Lambdas from acting like a synchronized mob storming the gates.
  3. The nuclear option DynamoDB
    For one critical, high-throughput service, we did the unthinkable. We migrated it from Aurora to DynamoDB. The hardest part wasn’t the code; it was the ego. It was admitting that the problem didn’t require a Swiss Army knife when all we needed was a hammer. The team’s reaction after the migration was telling: “Wait… you mean we don’t need to worry about connection pooling at all?” Every developer, after their first taste of NoSQL freedom.

The real lesson we learned

Obsessing over cold starts is like meticulously polishing the chrome on your car’s engine while the highway you’re on is crumbling into a sinkhole. It’s a visible, satisfying metric to chase, but it often distracts from the invisible, systemic limits that will actually kill you.

Yes, optimize your cold starts. Shave off those milliseconds. But only after you’ve pressure-tested your system for the real bottlenecks. The unsexy ones. The ones buried in AWS service quota pages and 5-year-old forum posts.

Stop micro-optimizing the 50ms you can see and start planning for the 14-second delays you can’t. We learned that the hard way, at 2:37 AM on a Tuesday.

¹ The official term for ‘setting a pile of money on fire to keep your functions toasty’.

² A fancy AWS term for ‘a private, secret tunnel to an AWS service so your Lambda doesn’t have to go out into the scary public internet’. It’s like an employee-only hallway in a giant mall.

Serverless without the wait

I once bought a five-minute rice cooker that spent four of those minutes warming up with a pathetic hum. It delivered the goods, eventually, but the promise felt… deceptive. For years, AWS Lambda felt like that gadget. It was the perfect kitchen tool for the odd jobs: a bit of glue code here, a light API there. It was the brilliant, quick-fire microwave of our architecture.

Then our little kitchen grew into a full-blown restaurant. Our “hot path”, the user checkout process, became the star dish on our menu. And our diners, quite rightly, expected it to be served hot and fast every time, not after a polite pause while the oven preheated. That polite pause was our cold start, and it was starting to leave a bad taste.

This isn’t a story about how we fell out of love with Lambda. We still adore it. This is the story of how we moved our main course to an industrial-grade, always-on stove. It’s about what we learned by obsessively timing every step of the process and why we still keep that trusty microwave around for the side dishes it cooks so perfectly. Because when your p95 latency needs to be boringly predictable, keeping the kitchen warm isn’t a preference; it’s a law of physics.

What forced us to remodel the kitchen

No single event pushed us over the edge. It was more of a slow-boiling frog situation, a gradual realization that our ambitions were outgrowing our tools. Three culprits conspired against our sub-300ms dream.

First, our traffic got moody. What used to be a predictable tide of requests evolved into sudden, sharp tsunamis during business hours. We needed a sea wall, not a bucket.

Second, our user expectations tightened. We set a rather tyrannical goal of a sub-300ms p95 for our checkout and search paths. Suddenly, the hundreds of milliseconds Lambda spent stretching and yawning before its first cup of coffee became a debt we couldn’t afford.

Finally, our engineers were getting tired. We found ourselves spending more time performing sacred rituals to appease the cold start gods, fiddling with layers, juggling provisioned concurrency, than we did shipping features our users actually cared about. When your mechanics spend more time warming up the engine than driving the car, you know something’s wrong.

The punchline isn’t that Lambda is “bad.” It’s that our requirements changed. When your performance target drops below the cost of a cold start plus dependency initialization, physics sends you a sternly worded letter.

Numbers don’t lie, but anecdotes do

We don’t ask you to trust our feelings. We ask you to trust the stopwatch. Replicate this experiment, adjust it for your own tech stack, and let the data do the talking. The setup below is what we used to get our own facts straight. All results are our measurements as of September 2025.

The test shape

  • Endpoint: Returns a simple 1 KB JSON payload.
  • Comparable Compute: Lambda set to 512 MB vs. an ECS Fargate container task with 0.5 vCPU and 1 GB of memory.
  • Load Profile: A steady, closed-loop 100 requests per second (RPS) for 10 minutes.
  • Metrics Reported: p50, p90, p95, p99 latency, and the dreaded error rate.

Our trusty tools

  • Load Generator: The ever-reliable k6.
  • Metrics: A cocktail of CloudWatch and Prometheus.
  • Dashboards: Grafana, to make the pretty charts that managers love.

Your numbers will be different. That’s the entire point. Run the tests, get your own data, and then make a decision based on evidence, not a blog post (not even this one).

Where our favorite gadget struggled

Under the harsh lights of our benchmark, Lambda’s quirks on our hot path became impossible to ignore.

  • Cold start spikes: Provisioned Concurrency can tame these, but it’s like hiring a full-time chauffeur to avoid a random 10-minute wait for a taxi. It costs you a constant fee, and during a real rush hour, you might still get stuck in traffic.
  • The startup toll: Initializing SDKs and warming up connections added tens to hundreds of milliseconds. This “entry fee” was simply too high to hide under our 300ms p95 goal.
  • The debugging labyrinth: Iterating was slow. Local emulators helped, but parity was a myth that occasionally bit us. Debugging felt like detective work with half the clues missing.

Lambda continues to be a genius for event glue, sporadic jobs, and edge logic. It just stopped being the right tool to serve our restaurant’s most popular dish at rush hour.

Calling in the heavy artillery

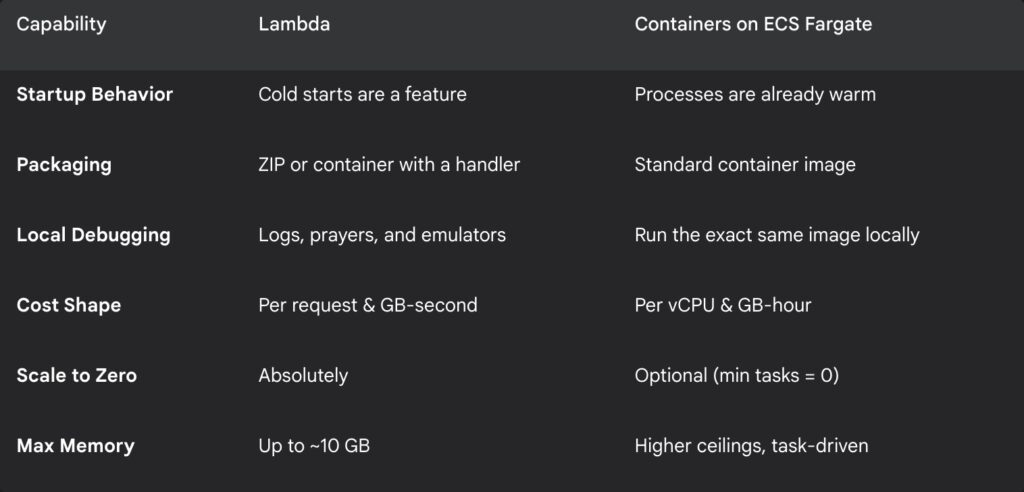
We moved our high-traffic endpoints to container-native services. For us, that meant ECS on Fargate fronted by an Application Load Balancer (ALB). The core idea is simple: keep a few processes warm and ready at all times.

Here’s why it immediately helped:

  • Warm processes: No more cold start roulette. Our application was always awake, connection pools were alive, and everything was ready to go instantly.
  • Standardized packaging: We traded ZIP files for standard Docker images. What we built and tested on our laptops was, byte for byte, what we shipped to production.
  • Civilized debugging: We could run the exact same image locally and attach a real debugger. It was like going from candlelight to a floodlight.
  • Smarter scaling: We could maintain a small cadre of warm tasks as a baseline and then scale out aggressively during peaks.

A quick tale of the tape

Here’s a simplified look at how the two approaches stacked up for our specific needs.

Our surprisingly fast migration plan

We did this in days, not weeks. The key was to be pragmatic, not perfect.

1. Pick your battles: We chose our top three most impactful endpoints with the worst p95 latency.

2. Put it in a box: We converted the function handler into a tiny web service. It’s less dramatic than it sounds.

# Dockerfile (Node.js example)
FROM node:22-slim
WORKDIR /usr/src/app

COPY package*.json ./
RUN npm ci --only=production

COPY . .

ENV NODE_ENV=production PORT=3000
EXPOSE 3000
CMD [ "node", "server.js" ]
// server.js
const http = require('http');
const port = process.env.PORT || 3000;

const server = http.createServer((req, res) => {
  if (req.url === '/health') {
    res.writeHead(200, { 'Content-Type': 'text/plain' });
    return res.end('ok');
  }

  // Your actual business logic would live here
  const body = JSON.stringify({ success: true, timestamp: Date.now() });
  res.writeHead(200, { 'Content-Type': 'application/json' });
  res.end(body);
});

server.listen(port, () => {
  console.log(`Server listening on port ${port}`);
});

3. Set up the traffic cop: We created a new target group for our service and pointed a rule on our Application Load Balancer to it.

{
  "family": "payment-api",
  "networkMode": "awsvpc",
  "cpu": "512",
  "memory": "1024",
  "requiresCompatibilities": ["FARGATE"],
  "executionRoleArn": "arn:aws:iam::987654321098:role/ecsTaskExecutionRole",
  "taskRoleArn": "arn:aws:iam::987654321098:role/paymentTaskRole",
  "containerDefinitions": [
    {
      "name": "app-container",
      "image": "[987654321098.dkr.ecr.us-east-1.amazonaws.com/payment-api:2.1.0](https://987654321098.dkr.ecr.us-east-1.amazonaws.com/payment-api:2.1.0)",
      "portMappings": [{ "containerPort": 3000, "protocol": "tcp" }],
      "environment": [{ "name": "NODE_ENV", "value": "production" }]
    }
  ]
}

4. The canary in the coal mine: We used weighted routing to dip our toes in the water. We started by sending just 5% of traffic to the new container service.

# Terraform Route 53 weighted canary
resource "aws_route53_record" "api_primary_lambda" {
  zone_id = var.zone_id
  name    = "api.yourapp.com"
  type    = "A"

  alias {
    name                   = aws_api_gateway_domain_name.main.cloudfront_domain_name
    zone_id                = aws_api_gateway_domain_name.main.cloudfront_zone_id
    evaluate_target_health = true
  }

  set_identifier = "primary-lambda-path"
  weight         = 95
}

resource "aws_route53_record" "api_canary_container" {
  zone_id = var.zone_id
  name    = "api.yourapp.com"
  type    = "A"

  alias {
    name                   = aws_lb.main_alb.dns_name
    zone_id                = aws_lb.main_alb.zone_id
    evaluate_target_health = true
  }

  set_identifier = "canary-container-path"
  weight         = 5
}

5. Stare at the graphs: For one hour, we watched four numbers like hawks: p95 latency, error rates, CPU/memory headroom on the new service, and our estimated cost per million requests.

6. Go all in (or run away): The graphs stayed beautifully, boringly flat. So we shifted to 50%, then 100%. The whole affair was done in an afternoon.

The benchmark kit you can steal

Don’t just read about it. Run a quick test yourself.

// k6 script (save as test.js)
import http from 'k6/http';
import { check, sleep } from 'k6';

export const options = {
  vus: 100,
  duration: '5m',
  thresholds: {
    'http_req_duration': ['p(95)<250'], // Aim for a 250ms p95
    'checks': ['rate>0.999'],
  },
};

export default function () {
  const url = __ENV.TARGET_URL || '[https://api.yourapp.com/checkout/v2/quote](https://api.yourapp.com/checkout/v2/quote)';
  const res = http.get(url);
  check(res, { 'status is 200': r => r.status === 200 });
  sleep(0.2); // Small pause between requests
}

Run it from your terminal like this:

k6 run -e TARGET_URL=https://your-canary-endpoint.com test.js

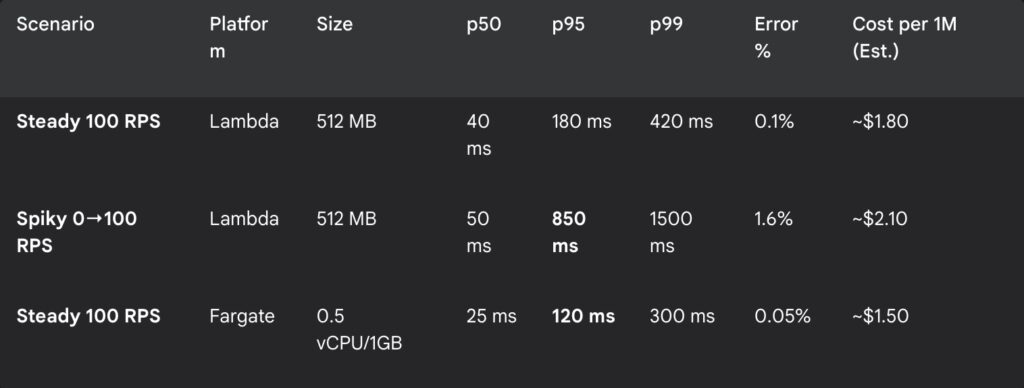
Our results for context

These aren’t universal truths; they are snapshots of our world. Your mileage will vary.

The numbers in bold are what kept us up at night and what finally let us sleep. For our steady traffic, the always-on container was not only faster and more reliable, but it was also shaping up to be cheaper.

Lambda is still in our toolbox

We didn’t throw the microwave out. We just stopped using it to cook the Thanksgiving turkey. Here’s where we still reach for Lambda without a second thought:

  • Sporadic or bursty workloads: Those once-a-day reports or rare event handlers are perfect for scale-to-zero.
  • Event glue: It’s the undisputed champion of transforming S3 puts, reacting to DynamoDB streams, and wiring up EventBridge.
  • Edge logic: For tiny header manipulations or rewrites, Lambda@Edge and CloudFront Functions are magnificent.

Lambda didn’t fail us. We outgrew its default behavior for a very specific, high-stakes workload. We cheated physics by keeping our processes warm, and in return, our p95 stopped stretching like hot taffy.

If your latency targets and traffic shape look anything like ours, please steal our tiny benchmark kit. Run a one-day canary. See what the numbers tell you. The goal isn’t to declare one tool a winner, but to spend less time arguing with physics and more time building things that people love.

AWS Step Functions for absolute beginners

While everyone else is busy wrapping presents and baking cookies, we’re going to unwrap something even more exciting: the world of AWS Step Functions. Now, I know what you might be thinking: “Step Functions? That sounds about as fun as getting socks for Christmas.” But trust me, this is way cooler than it sounds.

Imagine you’re Santa Claus for a second. You’ve got this massive list of kids, a whole bunch of elves, and a sleigh full of presents. How do you make sure everything gets done on time? You need a plan, a workflow. You wouldn’t just tell the elves, “Go do stuff!” and hope for the best, right? No, you’d say, “First, check the list. Then, build the toys. Next, wrap the presents. Finally, load up the sleigh.”

That’s essentially what AWS Step Functions does for your code in the cloud. It’s like a super-organized Santa Claus for your computer programs, ensuring everything happens in the right order, at the right time.

Why use AWS Step Functions? Because even Santa needs a plan

What are Step Functions anyway?

Think of AWS Step Functions as a flowchart on steroids. It’s a service that lets you create visual workflows for your applications. These workflows, called “state machines,” are made up of different steps, or “states,” that tell your application what to do and when to do it. These steps can be anything from simple tasks to complex operations, and they often involve our little helpers called AWS Lambda functions.

A quick chat about AWS Lambda

Before we go further, let’s talk about Lambdas. Imagine you have a tiny robot that’s really good at one specific task, like tying bows on presents. That’s a Lambda function. It’s a small piece of code that does one thing and does it well. You can have lots of these little robots, each doing their own thing, and Step Functions helps you organize them into a productive team. They are like the Christmas elves of the cloud!

Why orchestrate multiple Lambdas?

Now, you might ask, “Why not just have one big, all-knowing Lambda function that does everything?” Well, you could, but it would be like having one giant elf try to build every toy, wrap every present, and load the sleigh all by themselves. It would be chaotic, and hard to manage, and if that elf gets tired (or your code breaks), everything grinds to a halt.

Having specialized elves (or Lambdas) for each task is much better. One is for checking the list, one is for building toys, one is for wrapping, and so on. This way, if one elf needs a break (or a code update), the others can keep working. That’s the beauty of breaking down complex tasks into smaller, manageable steps.

Our scenario Santa’s data dilemma

Let’s imagine Santa has a modern problem. He’s got a big list of kids and their gift requests, but it’s all in a digital file (a JSON file, to be precise) stored in a magical cloud storage called S3 (Simple Storage Service). His goal is to read this list, make sure it’s not corrupted, add some extra Christmas magic to each request (like a “Ho Ho Ho” stamp), and then store the updated list back in S3. Finally, he wants a little notification to make sure everything went smoothly.

Breaking down the task with multiple lambdas

Here’s how we can break down Santa’s task into smaller, Lambda-sized jobs:

  1. Validation Lambda: This little helper checks the list to make sure it’s in the right format and that no naughty kids are trying to sneak extra presents onto the list.
  2. Transformation Lambda: This is where the magic happens. This Lambda adds that special “Ho Ho Ho” to each gift request, making sure every kid gets a personalized touch.
  3. Notification Lambda: This is our town crier. Once everything is done, this Lambda shouts “Success!” (or sends a more sophisticated message) to let Santa know the job is complete.

Step Functions Santa’s master plan

This is where Step Functions comes in. It’s the conductor of our Lambda orchestra. It makes sure each Lambda function runs in the right order, passing the list from one Lambda to the next like a relay race.

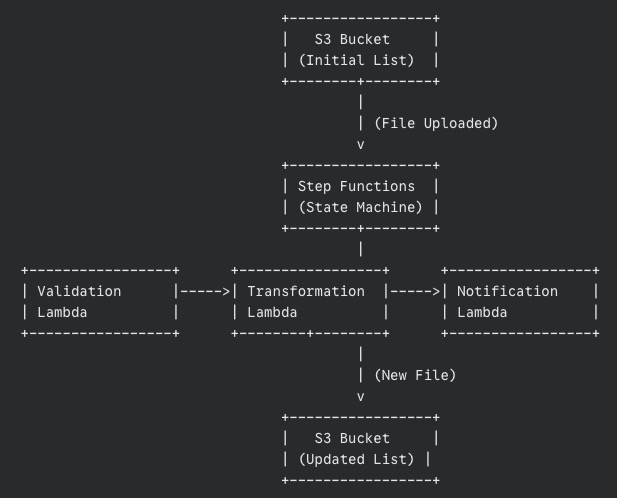
Our High-Level architecture

Let’s draw a simple picture of what’s happening (even Santa loves a good diagram):

The data’s journey

  1. The list (JSON file) lands in an S3 bucket.
  2. This triggers our Step Functions workflow.
  3. The Validation Lambda grabs the list, checks it, and passes the validated list to the Transformation Lambda.
  4. The Transformation Lambda works its magic, adds the “Ho Ho Ho,” and saves the new list to another S3 bucket.
  5. Finally, the Notification Lambda sends out a message confirming success.

The secret sauce passing data between steps

Step Functions automatically passes the output from each step as input to the next. It’s like each elf handing the partially completed present to the next elf in line. This is a crucial part of what makes Step Functions so powerful.

A look at each Lambda function

Let’s peek inside each of our Lambda functions. Don’t worry; we’ll keep it simple.

The list checker validation Lambda

This Lambda, written in Python (a very friendly programming language), does the following:

  1. Downloads the list from S3.
  2. Checks if the list is in the correct format (like making sure it’s actually a list and not a drawing of a reindeer).
  3. If something’s wrong, it raises an error (handled gracefully by Step Functions).
  4. If everything’s good, it returns the validated list.

Adding Christmas magic with the transformation Lambda

This Lambda receives the validated list and:

  1. Adds that special “Ho Ho Ho” to each gift request.
  2. Saves the new, transformed list to a new file in S3.
  3. Returns the location of the newly created file.

Spreading the news with the notification Lambda

This Lambda gets the path to the transformed file and:

  1. Could send a message to Santa’s phone, write “Success!” in the snow, or simply print a message in the cloud logs.
  2. Marks the end of our workflow.

Configuring the state machine

Now, how do we tell Step Functions what to do? We use something called the Amazon States Language (ASL), which is just a fancy way of describing our workflow in a JSON format. Here’s a simplified snippet:

{
  "StartAt": "ValidateData",
  "States": {
    "ValidateData": {
      "Type": "Task",
      "Resource": "arn:aws:lambda:region:123456789012:function:ValidateData",
      "Next": "TransformData"
    },
    "TransformData": {
      "Type": "Task",
      "Resource": "arn:aws:lambda:region:123456789012:function:TransformData",
      "Next": "Notify"
    },
    "Notify": {
      "Type": "Task",
      "Resource": "arn:aws:lambda:region:123456789012:function:Notify",
      "End": true
    }
  }
}

Don’t be scared by the code! It’s just a structured way of saying:

  1. Start with “ValidateData.”
  2. Then go to “TransformData.”
  3. Finally, go to “Notify” and we’re done.

Each “Resource” is the address of our Lambda function in the AWS world.

Error handling for dropped tasks

What happens if an elf drops a present? Step Functions can handle that! We can tell it to retry the step or go to a special “Fix It” state if something goes wrong.

Passing output between steps

Remember how we talked about passing data between steps? Here’s a simplified example of how we tell Step Functions to do that:

"TransformData": {
  "Type": "Task",
  "Resource": "arn:aws:lambda:region:123456789012:function:TransformData",
  "InputPath": "$.validatedData", 
  "OutputPath": "$.transformedData",
  "Next": "Notify"
}

This tells the “TransformData” step to take the “validatedData” from the previous step’s output and put its output in “transformedData.”

Making sure everything works before the big day

Before we unleash our workflow on the world (or Santa’s list), we need to make absolutely sure it works as expected. Testing is like a dress rehearsal for Christmas Eve, ensuring every elf knows their part and Santa’s sleigh is ready to fly.

Two levels of testing

We’ll approach testing in two ways:

  1. Testing each Lambda individually (Local tests):
    • Think of this as quality control for each elf. Before they join the assembly line, we need to make sure each Lambda function does its job correctly in isolation.
    • We can do this right from the AWS Management Console. Simply find your Lambda function, and look for a “Test” tab or button.
    • You’ll be able to create test events, which are like sample inputs for your Lambda. For example, for our Validation Lambda, you could create a test event with a well-formatted JSON and another with a deliberately incorrect JSON to see if the Lambda catches the error.
    • Run the test and check the output. Did the Lambda behave as expected? Did it return the correct data or the proper error message?
    • Alternatively, if you’re comfortable with the command line, you can use the AWS CLI (Command Line Interface) to invoke your Lambdas with test data. This offers more flexibility for advanced testing.
    • It is very important to test each Lambda with different types of inputs to make sure it behaves well under diverse circumstances.
  2. Testing the entire workflow (End-to-End test):
    • This is the grand rehearsal, where we test the whole process from start to finish.
    • First, prepare a sample JSON file that represents a typical Santa’s list. Make it realistic but simple enough for easy testing.
    • Upload this file to your designated S3 bucket. This should automatically trigger your Step Functions workflow.
    • Now, head over to the Step Functions section in the AWS Management Console. Find your state machine and look for the execution history. You should see a new execution that corresponds to your test.
    • Click on the execution. You’ll see a visual diagram of your workflow, with each step highlighted as it’s executed. This is like tracking Santa’s sleigh in real time!
    • Pay close attention to each step. Did it succeed? Did it take roughly the amount of time you expected? If a step fails, the diagram will show you where the problem occurred.
    • Once the workflow is complete, check your output S3 bucket. Is the transformed file there? Is it correctly modified according to your Transformation Lambda’s logic?
    • Finally, verify that your Notification Lambda did its job. Did it log the success message? Did it send a notification if that’s how you configured it?

Why both types of testing matter

You might wonder, “Why do we need both local and end-to-end tests?” Here’s the deal:

  • Local tests help you catch problems early on, at the individual component level. It’s much easier to fix a problem with a single Lambda than to debug a complex workflow with multiple failing parts.
  • End-to-end tests ensure that all the components work together seamlessly. They verify that the data is passed correctly between steps and that the overall workflow produces the desired outcome.

Debugging tips

  • If a step fails during the end-to-end test, click on the failed step in the Step Functions execution diagram. You’ll often see an error message that can help you pinpoint the issue.
  • Check the CloudWatch Logs for your Lambda functions. These logs contain valuable information about what happened during the execution, including any error messages or debug output you’ve added to your code.

Iterate and refine

Testing is not a one-time thing. As you develop your workflow, you’ll likely make changes and improvements. Each time you make a significant change, repeat your tests to ensure everything still works as expected. Remember: a well-tested workflow is a reliable workflow. By thoroughly testing our Step Functions workflow, we’re making sure that Santa’s list (and our application) is in good hands. Now, let’s get testing!

Step Functions or single Lambdas?

Maintainability and visibility

Step Functions makes it super easy to see what’s happening in your workflow. It’s like having a map of Santa’s route on Christmas Eve. This makes it much easier to find and fix problems.

Complexity

For simple tasks, a single Lambda might be enough. But as soon as you have multiple steps that need to happen in a specific order, Step Functions is your best friend.

Beyond Christmas Eve

Key takeaways

Step Functions is a powerful way to chain together Lambda functions in a visual, trackable, and error-tolerant workflow. It’s like having a super-organized Santa Claus for your cloud applications.

Potential improvements

We could add more steps, like extra validation or an automated email to parents. We could use other AWS services like SNS (Simple Notification Service) for more advanced notifications or DynamoDB for storing even more data.

Final words

This was a simple example, but the same ideas apply to much more complex, real-world applications. Step Functions can handle massive workflows with thousands of steps, making it a crucial tool for any aspiring cloud architect.

So, there you have it! You’ve now seen how AWS Step Functions can orchestrate AWS Lambdas to complete a task, just like Santa orchestrates his elves on Christmas Eve. And hopefully, it was a bit more exciting than getting socks for Christmas. 😊

Building a serverless image processor with AWS Step Functions

Let’s build something awesome together, an image-processing application using AWS Step Functions. Don’t worry if that sounds complicated; I’ll break it down step by step, just like explaining how a bicycle works. Ready? Let’s go for it.

1. Introduction

Imagine you’re running a photo gallery website where users upload their precious memories, and you need to process these images automatically, resize them, add filters, and optimize them for the web. That sounds like a lot of work, right? Well, that’s exactly what we’re going to build today.

What We’re building

We’re creating a serverless application that will:

  • Accept image uploads from users.
  • Process these images in various ways.
  • Store the results safely.
  • Notify users when the process is complete.

Here’s a simplified view of the architecture:

User -> S3 Bucket -> Step Functions -> Lambda Functions -> Processed Images

What You’ll need

  • An AWS account (don’t worry, most of this fits in the free tier).
  • Basic understanding of AWS (if you can create an S3 bucket, you’re ready).
  • A cup of coffee (or tea, I won’t judge!).

2. Designing the architecture

Let’s think about this as a building with LEGO blocks. Each AWS service is a different block type, and we’ll connect them to create something awesome.

Our building blocks:

  • S3 Buckets: Think of these as fancy folders where we’ll store the images.
  • Lambda Functions: These are our “workers” that will process the images.
  • Step Functions: This is the “manager” that coordinates everything.
  • DynamoDB: This will act as a notebook to keep track of what we’ve done.

Here’s the workflow:

  1. The user uploads an image to S3.
  2. S3 triggers our Step Function.
  3. Step Function coordinates various Lambda functions to:
    • Validate the image.
    • Resize it.
    • Apply filters.
    • Optimize it.
  4. Finally, the processed image is stored, and the user is notified.

3. Step-by-Step implementation

3.1 Setting Up the S3 Bucket

First, we’ll set up our image storage. Think of this as creating a filing cabinet for our photos.

aws s3 mb s3://my-image-processor-bucket

Next, configure it to trigger the Step Function whenever a file is uploaded. Here’s the event configuration:

{
    "LambdaFunctionConfigurations": [{
        "LambdaFunctionArn": "arn:aws:lambda:region:account:function:trigger-step-function",
        "Events": ["s3:ObjectCreated:*"]
    }]
}

3.2 Creating the Lambda Functions

Now, let’s create the Lambda functions that will process the images. Each one has a specific job:

Image Validator
This function checks if the uploaded image is valid (e.g., correct format, not corrupted).

import boto3
from PIL import Image
import io

def lambda_handler(event, context):
    s3 = boto3.client('s3')
    
    bucket = event['bucket']
    key = event['key']
    
    try:
        image_data = s3.get_object(Bucket=bucket, Key=key)['Body'].read()
        image = Image.open(io.BytesIO(image_data))
        
        return {
            'statusCode': 200,
            'isValid': True,
            'metadata': {
                'format': image.format,
                'size': image.size
            }
        }
    except Exception as e:
        return {
            'statusCode': 400,
            'isValid': False,
            'error': str(e)
        }

Image Resizer
This function resizes the image to a specific target size.

from PIL import Image
import boto3
import io

def lambda_handler(event, context):
    s3 = boto3.client('s3')
    
    bucket = event['bucket']
    key = event['key']
    target_size = (800, 600)  # Example size
    
    try:
        image_data = s3.get_object(Bucket=bucket, Key=key)['Body'].read()
        image = Image.open(io.BytesIO(image_data))
        resized_image = image.resize(target_size, Image.LANCZOS)
        
        buffer = io.BytesIO()
        resized_image.save(buffer, format=image.format)
        s3.put_object(
            Bucket=bucket,
            Key=f"resized/{key}",
            Body=buffer.getvalue()
        )
        
        return {
            'statusCode': 200,
            'resizedImage': f"resized/{key}"
        }
    except Exception as e:
        return {
            'statusCode': 500,
            'error': str(e)
        }

3.3 Setting Up Step Functions

Now comes the fun part, setting up our workflow coordinator. Step Functions will manage the flow, ensuring each image goes through the right steps.

{
  "Comment": "Image Processing Workflow",
  "StartAt": "ValidateImage",
  "States": {
    "ValidateImage": {
      "Type": "Task",
      "Resource": "arn:aws:lambda:region:account:function:validate-image",
      "Next": "ImageValid",
      "Catch": [{
        "ErrorEquals": ["States.ALL"],
        "Next": "NotifyError"
      }]
    },
    "ImageValid": {
      "Type": "Choice",
      "Choices": [
        {
          "Variable": "$.isValid",
          "BooleanEquals": true,
          "Next": "ProcessImage"
        }
      ],
      "Default": "NotifyError"
    },
    "ProcessImage": {
      "Type": "Parallel",
      "Branches": [
        {
          "StartAt": "ResizeImage",
          "States": {
            "ResizeImage": {
              "Type": "Task",
              "Resource": "arn:aws:lambda:region:account:function:resize-image",
              "End": true
            }
          }
        },
        {
          "StartAt": "ApplyFilters",
          "States": {
            "ApplyFilters": {
              "Type": "Task",
              "Resource": "arn:aws:lambda:region:account:function:apply-filters",
              "End": true
            }
          }
        }
      ],
      "Next": "OptimizeImage"
    },
    "OptimizeImage": {
      "Type": "Task",
      "Resource": "arn:aws:lambda:region:account:function:optimize-image",
      "Next": "NotifySuccess"
    },
    "NotifySuccess": {
      "Type": "Task",
      "Resource": "arn:aws:lambda:region:account:function:notify-success",
      "End": true
    },
    "NotifyError": {
      "Type": "Task",
      "Resource": "arn:aws:lambda:region:account:function:notify-error",
      "End": true
    }
  }
}

4. Error Handling and Resilience

Let’s make our application resilient to errors.

Retry Policies

For each Lambda invocation, we can add retry policies to handle transient errors:

{
  "Retry": [{
    "ErrorEquals": ["States.TaskFailed"],
    "IntervalSeconds": 3,
    "MaxAttempts": 2,
    "BackoffRate": 1.5
  }]
}

Error Notifications

If something goes wrong, we’ll want to be notified:

import boto3

def notify_error(event, context):
    sns = boto3.client('sns')
    
    error_message = f"Error processing image: {event['error']}"
    
    sns.publish(
        TopicArn='arn:aws:sns:region:account:image-processing-errors',
        Message=error_message,
        Subject='Image Processing Error'
    )

5. Optimizations and Best Practices

Lambda Configuration

  • Memory: Set memory based on image size. 1024MB is a good starting point.
  • Timeout: Set reasonable timeout values, like 30 seconds for image processing.
  • Environment Variables: Use these to configure Lambda functions dynamically.

Cost Optimization

  • Use Step Functions Express Workflows for high-volume processing.
  • Implement caching for frequently accessed images.
  • Clean up temporary files in /tmp to avoid running out of space.

Security

Use IAM policies to ensure only necessary access is granted to S3:

{
    "Version": "2012-10-17",
    "Statement": [
        {
            "Effect": "Allow",
            "Action": [
                "s3:GetObject",
                "s3:PutObject"
            ],
            "Resource": "arn:aws:s3:::my-image-processor-bucket/*"
        }
    ]
}

6. Deployment

Finally, let’s deploy everything using AWS SAM, which simplifies the deployment process.

Project Structure

image-processor/
├── template.yaml
├── functions/
│   ├── validate/
│   │   └── app.py
│   ├── resize/
│   │   └── app.py
└── statemachine/
    └── definition.asl.json

SAM Template

AWSTemplateFormatVersion: '2010-09-09'
Transform: AWS::Serverless-2016-10-31

Resources:
  ImageProcessorStateMachine:
    Type: AWS::Serverless::StateMachine
    Properties:
      DefinitionUri: statemachine/definition.asl.json
      Policies:
        - LambdaInvokePolicy:
            FunctionName: !Ref ValidateFunction
        - LambdaInvokePolicy:
            FunctionName: !Ref ResizeFunction

  ValidateFunction:
    Type: AWS::Serverless::Function
    Properties:
      CodeUri: functions/validate/
      Handler: app.lambda_handler
      Runtime: python3.9
      MemorySize: 1024
      Timeout: 30

  ResizeFunction:
    Type: AWS::Serverless::Function
    Properties:
      CodeUri: functions/resize/
      Handler: app.lambda_handler
      Runtime: python3.9
      MemorySize: 1024
      Timeout: 30

Deployment Commands

# Build the application
sam build

# Deploy (first time)
sam deploy --guided

# Subsequent deployments
sam deploy

After deployment, test your application by uploading an image to your S3 bucket:

aws s3 cp test-image.jpg s3://my-image-processor-bucket/raw/

Yeah, You have built a robust, serverless image-processing application. The beauty of this setup is its scalability, from a handful of images to thousands, it can handle them all seamlessly.

And like any good recipe, feel free to tweak the process to fit your needs. Maybe you want to add extra processing steps or fine-tune the Lambda configurations, there’s always room for experimentation.

Scaling for Success. Cost-Effective Cloud Architectures on AWS

One of the most exciting aspects of cloud computing is the promise of scalability, the ability to expand or contract resources to meet demand. But how do you design an architecture that can handle unexpected traffic spikes without breaking the bank during quieter periods? This question often comes up in AWS Solution Architect interviews, and for good reason. It’s a core challenge that many businesses face when moving to the cloud. Let’s explore some AWS services and strategies that can help you achieve both scalability and cost efficiency.

Building a Dynamic and Cost-Aware AWS Architecture

Imagine your application is like a bustling restaurant. During peak hours, you need a full staff and all tables ready. But during off-peak times, you don’t want to be paying for idle resources. Here’s how we can translate this concept into a scalable AWS architecture:

  1. Auto Scaling Groups (ASGs): Think of ASGs as your restaurant’s staffing manager. They automatically adjust the number of EC2 instances (your servers) based on predefined rules. If your website traffic suddenly spikes, ASGs will spin up additional instances to handle the load. When traffic dies down, they’ll scale back, saving you money. You can even combine ASGs with Spot Instances for even greater cost savings.
  2. Amazon EC2 Spot Instances: These are like the temporary staff you might hire during a particularly busy event. Spot Instances let you take advantage of unused EC2 capacity at a much lower cost. If your demand is unpredictable, Spot Instances can be a great way to save money while ensuring you have enough resources to handle peak loads.
  3. Amazon Lambda: Lambda is your kitchen staff that only gets paid when they’re cooking, and they’re really good at their job, they can whip up a dish in under 15 minutes! It’s a serverless compute service that runs your code in response to events (like a new file being uploaded or a database change). You only pay for the compute time you actually use, making it ideal for sporadic or unpredictable workloads.
  4. AWS Fargate: Fargate is like having a catering service handle your entire kitchen operation. It’s a serverless compute engine for containers, meaning you don’t have to worry about managing the underlying servers. Fargate automatically scales your containerized applications based on demand, and you only pay for the resources your containers consume.

How the Pieces Fit Together

Now, let’s see how these services can work together in harmony:

  • Core Application on EC2 with Auto Scaling: Your main application might run on EC2 instances within an Auto Scaling Group. You can configure this group to monitor the CPU utilization of your servers and automatically launch new instances if the average CPU usage reaches a threshold, such as 75% (this is known as a Target Tracking Scaling Policy). This ensures you always have enough servers running to handle the current load, even during unexpected traffic spikes.
  • Spot Instances for Cost Optimization: To save costs, you could configure your Auto Scaling Group to use Spot Instances whenever possible. This allows you to take advantage of lower prices while still scaling up when needed. Importantly, you’ll also want to set up a recovery policy within your Auto Scaling Group. This policy ensures that if Spot Instances are not available (due to high demand or price fluctuations), your Auto Scaling Group will automatically launch On-Demand Instances instead. This way, you can reliably meet your application’s resource needs even when Spot Instances are unavailable.
  • Lambda for Event-Driven Tasks: Lambda functions excel at handling event-driven tasks that don’t require a constantly running server. For example, when a new image is uploaded to your S3 bucket, you can trigger a Lambda function to automatically resize it or convert it to a different format. Similarly, Lambda can be used to send notifications to users when certain events occur in your application, such as a new order being placed or a payment being processed. Since Lambda functions are only active when triggered, they can significantly reduce your costs compared to running dedicated EC2 instances for these tasks.
  • Fargate for Containerized Microservices:  If your application is built using microservices, you can run them in containers on Fargate. This eliminates the need to manage servers and allows you to scale each microservice independently. By decoupling your microservices and using Amazon Simple Queue Service (SQS) queues for communication, you can ensure that even under heavy load, all requests will be handled and none will be lost. For applications where the order of operations is critical, such as financial transactions or order processing, you can use FIFO (First-In-First-Out) SQS queues to maintain the exact order of messages.
  1. Monitoring and Optimization:  Imagine having a restaurant manager who constantly monitors how busy the restaurant is, how much food is being wasted, and how satisfied the customers are. This is what Amazon CloudWatch does for your AWS environment. It provides detailed metrics and alarms, allowing you to fine-tune your scaling policies and optimize your resource usage. With CloudWatch, you can visualize the health and performance of your entire AWS infrastructure at a glance through intuitive dashboards and graphs. These visualizations make it easy to identify trends, spot potential issues, and make informed decisions about resource allocation and optimization.

The Outcome, A Satisfied Customer and a Healthy Bottom Line

By combining these AWS services and strategies, you can build a cloud architecture that is both scalable and cost-effective. This means your application can gracefully handle unexpected traffic spikes, ensuring a smooth user experience even during peak demand. At the same time, you won’t be paying for idle resources during quieter periods, keeping your cloud costs under control.

Final Analysis

Designing for scalability and cost efficiency is a fundamental aspect of cloud architecture. By leveraging AWS services like Auto Scaling, EC2 Spot Instances, Lambda, and Fargate, you can create a dynamic and responsive environment that adapts to your application’s needs. Remember, the key is to understand your workload patterns and choose the right tools for the job. With careful planning and the right AWS services, you can build a cloud architecture that is both powerful and cost-effective, setting your business up for success in the cloud and in the restaurant. 😉