First up, let’s shine a spotlight on these two powerhouses:
AWS IAM (Identity and Access Management): Picture this as the ultimate bouncer at the hottest club in town; let’s call it Club AWS. AWS IAM is all about who gets into the VIP section: those precious AWS resources like EC2 instances, S3 buckets, and Lambda functions. It’s your tool to create users, assemble groups, and wield permissions with the precision of a laser beam, deciding who can enter and what they can touch.
Azure AD (Active Directory): Now, imagine a super-bouncer with a clipboard that covers not just one club but an entire network of venues. Azure AD is Microsoft’s cloud-based identity maestro, managing access across a sprawling galaxy of services, think Office 365, Azure itself, and even thousands of third-party apps. It’s the Swiss Army knife of identity management, juggling credentials like a cosmic DJ spinning tracks for the multiverse.
The cosmic differences
So, what sets these two apart? Let’s break it down into bite-sized, star-sized chunks:
Scope: AWS IAM is a specialist honed in on the AWS ecosystem, as if it were a hawk guarding its nest. Azure AD? It’s the broad-visioned explorer, managing identities across Microsoft’s empire and beyond, easily reaching into third-party territories.
Features: Both bring heavy-hitting security—multi-factor authentication is their shared superpower. But Azure AD ups the ante with conditional access policies, letting you say, “Only let them in if they’re calling from a trusted galaxy or wielding the right device.”
Integration: AWS IAM is the loyal sidekick to AWS services, meshing seamlessly with its kin. Azure AD, though, is the extroverted networker, linking up with Microsoft 365, Azure, and a constellation of SaaS apps—think of it as the life of the cloud party.
User Management: AWS IAM keeps it tight, handling users and roles within the AWS kingdom. Azure AD goes wide, overseeing users and groups across your entire organization—cloud, on-premises, you name it.
Authentication and Authorization: Both are fortress-strong, but Azure AD flexes extra muscle with advanced features that adapt to the chaos of the digital cosmos.
Which reigns supreme?
Now, here comes the supernova query: Which one is better? Hold onto your hats because this isn’t a one-size-fits-all answer; it’s more like choosing between a lightsaber and a sonic screwdriver. Context is everything!
Team AWS IAM: If your universe revolves around AWS, IAM is your trusty guide. It’s deeply woven into the AWS fabric, offering pinpoint control over your resources. It’s the master key to your AWS kingdom.
Team Azure AD: If you’re dreaming of a broader empire, one that spans Microsoft services and a galaxy of apps, Azure AD is your universal remote. It shines brightest in Microsoft-centric worlds or when you need versatility across platforms.
Here’s a mind-blowing nugget to ponder: Azure AD keeps the gates for over 200,000 organizations worldwide. That’s like being the bouncer for every club in a sprawling, intergalactic mega-city!
The verdict (with a twist)
So, who wins this cosmic clash? AWS IAM is a champ in its domain, unrivaled for AWS loyalists. But Azure AD? It’s the disruptor, the game-changer, edging ahead with its flexibility and integration prowess. It’s not just a tool; it’s a bridge to the future of identity management.
But here’s the kicker: the “better” choice is the one that fits your orbit. Are you locked into AWS, or are you roaming the wilds of a multi-cloud universe? That’s the real question.
What’s your take, cosmic travelers? Are you Team AWS IAM, guarding the VIP lounge, or Team Azure AD, rewriting the rules of the cloud? Drop your thoughts below, I’m all ears for this interstellar debate!
Managing cloud networks can often feel like navigating through dense fog. You’re in control of your applications and services, guiding them forward, yet the full picture of what’s happening on the network road ahead, particularly concerning security and performance, remains obscured. Without proper visibility, understanding the intricacies of your cloud network becomes a significant challenge.
Think about it: your cloud network is buzzing with activity. Data packets are constantly zipping around, like tiny digital messengers, carrying instructions and information. But how do you keep track of all this chatter? How do you know who’s talking to whom, what they’re saying, and if everything is running smoothly?
This is where VPC Flow Logs come to the rescue. Imagine them as your network’s trusty detectives, diligently taking notes on every conversation happening within your Amazon Virtual Private Cloud (VPC). They provide a detailed record of the network traffic flowing through your cloud environment, making them an indispensable tool for DevOps and cloud teams.
In this article, we’ll explore the world of VPC Flow Logs, exploring what they are, how to use them, and how they can help you become a master of your AWS network. Let’s get started and shed some light on your network’s hidden stories!
What are VPC Flow Logs?
Alright, so what exactly are VPC Flow Logs? Think of them as detailed записные книжки (notebooks – just adding a touch of fun!) for your network traffic. They capture information about the IP traffic going to and from network interfaces in your VPC.
But what kind of information? Well, they note down things like:
Source and Destination IPs: Who’s sending the message and who’s receiving it?
Ports: Which “doors” are being used for communication?
Protocols: What language are they speaking (TCP, UDP)?
Traffic Decision: Was the traffic accepted or rejected by your security rules?
It’s like having a super-detailed receipt for every network transaction. But why is this useful? Loads of reasons!
Security Auditing: Want to know who’s been knocking on your network’s doors? Flow Logs can tell you, helping you spot suspicious activity.
Performance Optimization: Is your application running slow? Flow Logs can help you pinpoint network bottlenecks and optimize traffic flow.
Compliance: Need to prove you’re keeping a close eye on your network for regulatory reasons? Flow Logs provide the audit trail you need.
Now, there’s a little catch to be aware of, especially if you’re running a hybrid environment, mixing cloud and on-premises infrastructure. VPC Flow Logs are fantastic, but they only see what’s happening inside your AWS VPC. They don’t directly monitor your on-premises networks.
So, what do you do if you need visibility across both worlds? Don’t worry, there are clever workarounds:
AWS Site-to-Site VPN + CloudWatch Logs: If you’re using AWS VPN to connect your on-premises network to AWS, you can monitor the traffic flowing through that VPN tunnel using CloudWatch Logs. It’s like having a special log just for the bridge connecting your two worlds.
External Tools: Think of tools like Security Lake. It’s like a central hub that can gather logs from different environments, including on-premises and multiple clouds, giving you a unified view. Or, you could use open-source tools like Zeek or Suricata directly on your on-premises servers to monitor traffic there. These are like setting up your independent network detectives in your local office!
Configuring VPC Flow Logs
Ready to turn on your network detectives? Configuring VPC Flow Logs is pretty straightforward. You have a few choices about where you want to enable them:
VPC-level: This is like casting a wide net, logging all traffic in your entire VPC.
Subnet-level: Want to focus on a specific neighborhood within your VPC? Subnet-level logs are for you.
ENI-level (Elastic Network Interface): Need to zoom in on a single server or instance? ENI-level logs track traffic for a specific network interface.
You also get to choose what kind of traffic you want to log with filters:
ACCEPT: Only log traffic that was allowed by your security rules.
REJECT: Only log traffic that was blocked. Super useful for security troubleshooting!
ALL: Log everything – the full story, both accepted and rejected traffic.
Finally, you decide where you want to send your detective’s notes, and the destinations:
S3: Store your logs in Amazon S3 for long-term storage and later analysis. Think of it as archiving your detective notebooks.
CloudWatch Logs: Send logs to CloudWatch Logs for real-time monitoring, alerting, and quick insights. Like having your detective radioing in live reports.
Third-party tools: Want to use your favorite analysis tool? You can send Flow Logs to tools like Splunk or Datadog for advanced analysis and visualization.
Want to get your hands dirty quickly? Here’s a little AWS CLI snippet to enable Flow Logs at the VPC level, sending logs to CloudWatch Logs, and logging all traffic:
Just replace vpc-xxxxxxxx with your actual VPC ID and my-flow-logs with your desired CloudWatch Logs log group name. Boom! You’ve just turned on your network visibility.
Tools and techniques for analyzing Flow Logs
Okay, you’ve got your Flow Logs flowing. Now, how do you read these detective notes and make sense of them? AWS gives you some great built-in tools, and there are plenty of third-party options too.
Built-in AWS Tools:
Athena: Think of Athena as a super-powered search engine for your logs stored in S3. It lets you use standard SQL queries to sift through massive amounts of Flow Log data. Want to find all blocked SSH traffic? Athena is your friend.
CloudWatch Logs Insights: For logs sent to CloudWatch Logs, Insights lets you run powerful queries and create visualizations directly within CloudWatch. It’s fantastic for quick analysis and dashboards.
Third-Party tools:
Splunk, Datadog, etc.: These are like professional-grade detective toolkits. They offer advanced features for log management, analysis, visualization, and alerting, often integrating seamlessly with Flow Logs.
Open-source options: Tools like the ELK stack (Elasticsearch, Logstash, Kibana) give you powerful log analysis capabilities without the commercial price tag.
Let’s see a quick example. Imagine you want to use Athena to identify blocked traffic (REJECT traffic). Here’s a sample Athena query to get you started:
SELECT
vpc_id,
srcaddr,
dstaddr,
dstport,
protocol,
action
FROM
aws_flow_logs_s3_db.your_flow_logs_table -- Replace with your Athena table name
WHERE
action = 'REJECT'
AND start_time >= timestamp '2024-07-20 00:00:00' -- Adjust time range as needed
LIMIT 100
Just replace aws_flow_logs_s3_db.your_flow_logs_table with the actual name of your Athena table, adjust the time range, and run the query. Athena will return the first 100 log entries showing rejected traffic, giving you a starting point for your investigation.
Troubleshooting common connectivity issues
This is where Flow Logs shine! They can be your best friend when you’re scratching your head trying to figure out why something isn’t connecting in your cloud network. Let’s look at a few common scenarios:
Scenario 1: Diagnosing SSH/RDP connection failures. Can’t SSH into your EC2 instance? Check your Flow Logs! Filter for REJECTED traffic, and look for entries where the destination port is 22 (for SSH) or 3389 (for RDP) and the destination IP is your instance’s IP. If you see rejected traffic, it likely means a security group or NACL is blocking the connection. Flow Logs pinpoint the problem immediately.
Scenario 2: Identifying misconfigured security groups or NACLs. Imagine you’ve set up security rules, but something still isn’t working as expected. Flow Logs help you verify if your rules are actually behaving the way you intended. By examining ACCEPT and REJECT traffic, you can quickly spot rules that are too restrictive or not restrictive enough.
Scenario 3: Detecting asymmetric routing problems. Sometimes, network traffic can take different paths in and out of your VPC, leading to connectivity issues. Flow Logs can help you spot these asymmetric routes by showing you the path traffic is taking, revealing unexpected detours.
Security threat detection with Flow Logs
Beyond troubleshooting connectivity, Flow Logs are also powerful security tools. They can help you detect malicious activity in your network.
Detecting port scanning or brute-force attacks. Imagine someone is trying to break into your servers by rapidly trying different passwords or probing open ports. Flow Logs can reveal these attacks by showing spikes in REJECTED traffic to specific ports. A sudden surge of rejected connections to port 22 (SSH) might indicate a brute-force attack attempt.
Identifying data exfiltration. Worried about data leaving your network without your knowledge? Flow Logs can help you spot unusual outbound traffic patterns. Look for unusual spikes in outbound traffic to unfamiliar destinations or ports. For example, a sudden increase in traffic to a strange IP address on port 443 (HTTPS) might be worth investigating.
You can even use CloudWatch Metrics to automate security monitoring. For example, you can set up a metric filter in CloudWatch Logs to count the number of REJECT events per minute. Then, you can create a CloudWatch alarm that triggers if this count exceeds a certain threshold, alerting you to potential port scanning or attack activity in real time. It’s like setting up an automatic alarm system for your network!
Best practices for effective Flow Log monitoring
To get the most out of your Flow Logs, here are a few best practices:
Filter aggressively to reduce noise. Flow Logs can generate a lot of data, especially at high traffic volumes. Filter out unnecessary traffic, like health checks or very frequent, low-importance communications. This keeps your logs focused on what truly matters.
Automate log analysis with Lambda or Step Functions. Don’t rely on manual analysis for everything. Use AWS Lambda or Step Functions to automate common analysis tasks, like summarizing traffic patterns, identifying anomalies, or triggering alerts based on specific events in your Flow Logs. Let robots do the routine detective work!
Set retention policies and cross-account logging for audits. Decide how long you need to keep your Flow Logs based on your compliance and audit requirements. Store them in S3 for long-term retention. For centralized security monitoring, consider setting up cross-account logging to aggregate Flow Logs from multiple AWS accounts into a central security account. Think of it as building a central security command center for all your AWS environments.
Some takeaways
So, your network is an invaluable audit trail. They provide detailed visibility to understand, troubleshoot, secure, and optimize your AWS cloud networks. From diagnosing simple connection problems to detecting sophisticated security threats, Flow Logs empower DevOps, SRE, and Security teams to master their cloud environments truly. Turn them on, explore their insights, and unlock the hidden stories within your network traffic.
In AWS, Security Groups and Network ACLs (NACLs) are the core tools for controlling inbound and outbound traffic within Virtual Private Clouds (VPCs). Think of them as layers of security that, together, help keep your resources safe by blocking unwanted traffic. While they serve a similar purpose, each works at a different level and has distinct features that make them effective when combined.
1. Security Groups as room-level locks
Imagine each instance or resource within your VPC is like a room in a house. A Security Group acts as the lock on each of those doors. It controls who can get in and who can leave and remembers who it lets through so it doesn’t need to keep asking. Security Groups are stateful, meaning they keep track of allowed traffic, both inbound and outbound.
Key Features
Stateful behavior: If traffic is allowed in one direction (e.g., HTTP on port 80), it automatically allows the response in the other direction, without extra rules.
Instance-Level application: Security Groups apply directly to individual instances, load balancers, or specific AWS services (like RDS).
Allow-Only rules: Security Groups only have “allow” rules. If a rule doesn’t permit traffic, it’s blocked by default.
Example
For a database instance on RDS, you might configure a Security Group that allows incoming traffic only on port 3306 (the default port for MySQL) and only from instances within your backend Security Group. This setup keeps the database shielded from any other traffic.
2. Network ACLs as property-level gates
If Security Groups are like room locks, NACLs are more like the gates around a property. They filter traffic at the subnet level, screening everything that tries to get in or out of that part of the network. NACLs are stateless, so they don’t keep track of traffic. If you allow inbound traffic, you’ll need a separate rule to permit outbound responses.
Key Features
Stateless behavior: Traffic allowed in one direction doesn’t mean it’s automatically allowed in the other. Each direction needs explicit permission.
Subnet-Level application: NACLs apply to entire subnets, meaning they cover all resources within that network layer.
Allow and Deny rules: Unlike Security Groups, NACLs allow both “allow” and “deny” rules, giving you more granular control over what traffic is permitted or blocked.
Example
For a public-facing web application, you might configure a NACL to block any IPs outside a specific range or region, adding a layer of protection before traffic even reaches individual instances.
Best practices for using security groups and NACLs together
Combining Security Groups and NACLs creates a multi-layered security setup known as defense in depth. This way, if one layer misconfigures, the other provides a safety net.
Use security groups as your first line of defense
Since Security Groups are stateful and work at the instance level, they should define specific rules tailored to each resource. For example, allow only HTTP/HTTPS traffic for frontend instances, while backend instances only accept requests from the frontend Security Group.
Reinforce with NACLs for subnet-level control
NACLs are stateless and ideal for high-level filtering, such as blocking unwanted IP ranges. For example, you might use a NACL to block all traffic from certain geographic locations, enhancing protection before traffic even reaches your Security Groups.
Apply NACLs for public traffic control
If your application receives public traffic, use NACLs at the subnet level to segment untrusted traffic, keeping unwanted visitors at bay. For example, you could configure NACLs to block all ports except those explicitly needed for public access.
Manage NACL rule order carefully
Remember that NACLs evaluate traffic based on rule order. Rules with lower numbers are prioritized, so keep your most restrictive rules first to ensure they’re applied before others.
Applying layered security in a Three-Tier architecture
Imagine a three-tier application with frontend, backend, and database layers, each in its subnet within a VPC. Here’s how you could use Security Groups and NACLs:
Security Groups
Frontend: Security Group allows inbound traffic on ports 80 and 443 from any IP.
Backend: Security Group allows traffic only from the frontend Security Group, for example, on port 8080.
Database: Security Group allows traffic only from the backend Security Group, on port 3306 (for MySQL).
NACLs
Frontend Subnet: NACL allows inbound traffic only on ports 80 and 443, blocking everything else.
Backend Subnet: NACL allows inbound traffic only from the frontend subnet and blocks all other traffic.
Database Subnet: NACL allows inbound traffic only from the backend subnet and blocks all other traffic.
In a few words
Security Groups: Act at the instance level, are stateful, and only permit “allow” rules.
NACLs: Act at the subnet level, are stateless, and allow both “allow” and “deny” rules.
Combining Security Groups and NACLs: This approach gives you a layered “defense in depth” strategy, securing traffic control across every layer of your VPC.
In today’s digital world, cybersecurity isn’t just a buzzword, it’s a necessity. We constantly hear about ransomware attacks and data breaches, and it’s easy to feel overwhelmed. But don’t worry, think of it as building a strong safety net for your digital life, so that even when things go wrong, you can bounce back quickly and with confidence.
Understanding the NIST Cybersecurity Framework
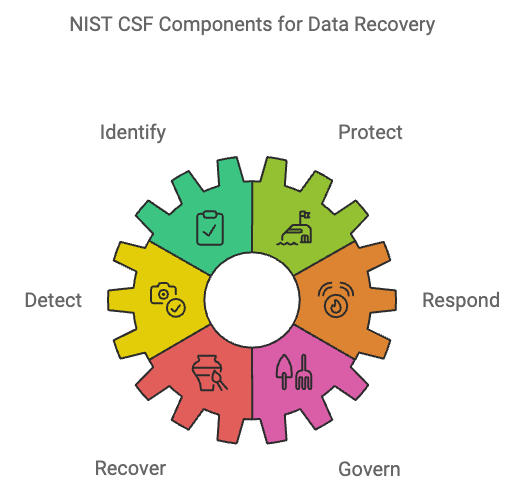
Let’s start by thinking of the NIST Cybersecurity Framework (CSF) as a roadmap. Not just any roadmap, but one that guides you through the twists and turns of keeping your data safe. Imagine you’re driving down a long, winding road, if you know where the tricky turns are, you can navigate better and avoid falling off a cliff. The NIST CSF gives you six key “directions” to follow: Identify, Protect, Detect, Respond, Recover, and Govern. So let’s break them down in simple terms.
Identify: This is like taking stock of everything in your digital house. You need to know what you have, where it’s stored, and its importance. If you don’t know what you own, how can you protect it?
Protect: Now that you know what’s in your house, it’s time to build some walls around it. Strong passwords, access controls, and encryption are your brick-and-mortar.
Detect: Think of this as setting up motion sensors or security cameras around your fortress. You want to know if anything unusual happens as soon as it does.
Respond: Even if an intruder sneaks in, you need a plan to fight back. This means having a strategy to contain the damage and communicate with the right people.
Recover: Let’s say things do go south, and your defenses are breached. What’s your recovery plan? Backup systems and processes are your way of hitting the reset button.
Govern: This is the overseer of your digital kingdom. Think of it like the gardener who tends to the plants, ensuring they thrive and that weeds (aka threats) are quickly dealt with. It’s about having rules, ensuring everyone follows them, and staying vigilant.
Building Your Data Recovery Strategy
Alright, now let’s jump into constructing your data recovery strategy. Imagine it like building a house, a house that can weather any storm. Here’s how you make it sturdy:
1. Laying the Foundation: The 3-2-1-1-0 Rule
The 3-2-1-1-0 rule is like the blueprint for your data recovery house. It’s simple but solid. Here’s what it means:
3: Keep at least three copies of your data.
2: Store your data on two different media types (e.g., hard drive and cloud storage).
1: Keep one copy offsite, away from your primary location.
1: Have one copy that’s offline or immutable (that’s just a fancy word for “unchangeable”).
0: Ensure you have zero errors in your backups.
Imagine your data is like a valuable jewel. Would you keep all your jewels in one drawer at home? No way! You’d store some in a safe, maybe even send a copy to a vault far away. That’s exactly what this rule does, it ensures that if one or two copies get damaged, you’ve always got a backup ready.
2. Protecting Your Backup Infrastructure
Your backups are like the beating heart of your data recovery plan. And just like you protect your heart with a healthy diet, exercise, and a good security system, you need to do the same for your backup infrastructure. Use things like multi-factor authentication, network segmentation, and least-privilege access to ensure that only the right people have access, and nothing funny happens to your backups.
3. Detecting Threats Early
You don’t want to wait until the storm is tearing the roof off your house to notice something’s wrong, right? The same goes for your data. Early detection is crucial. You want to spot anything fishy as soon as possible, whether it’s unusual file activity, unauthorized access, or changes to your backup configurations. It’s like noticing the dark clouds before the rain starts pouring.
4. Responding Swiftly and Decisively
Let’s say the worst happens, a cyberattack hits. What now? You need to act fast, like a firefighter responding to an alarm. Isolate infected systems, identify where the attack came from, and restore clean data from your backups. It’s like grabbing the hose and putting out the fire before it spreads further.
5. Recovering with Confidence
Your backups are your safety net, your life raft in a storm. But to trust that raft, you need to know it’s reliable and ready. Make sure your backups are regularly tested, up to date, and free of malware. Test your recovery process often, so when the time comes, you know you can bounce back, and fast.
6. Governing Your Cybersecurity Kingdom
Effective cybersecurity isn’t a one-time deal; it’s an ongoing process. You need governance. Think of it as maintaining the health of your kingdom. Establish clear policies, assign responsibilities, and regularly review your security posture. You wouldn’t let a garden grow unattended, right? You need to pull out the weeds (vulnerabilities) regularly and make sure everything is running smoothly.
Bringing it All Together
Cybersecurity, like gardening or building a sturdy house, is something you tend to do over time. You can’t plant a seed and expect it to flourish without constant care. By following these guidelines, and keeping your data recovery strategy up-to-date with the ever-changing world of cyber threats, you can build a resilient system that’ll help you recover from any attack. The NIST CSF is your roadmap, and with a bit of planning, you’ll be back on your feet in no time if the unexpected happens.
The trick isn’t just building strong defenses. It’s building a strategy that ensures you can recover confidently, no matter what life throws at you.
Let’s suppose you’re living in a castle. The walls are high, the moat is deep, and the drawbridge is up. Everything inside is safe, or so you think. This has been how we approached cybersecurity for a long time. We built our digital fortresses and figured we’d be safe inside as long as we kept the bad guys out.
But here’s the thing, what if someone sneaks in? Maybe they’ve got a convincing disguise, or maybe they’ve got a secret tunnel. Suddenly, all that trust we placed in our walls and moats doesn’t seem so secure, does it?
This is where the idea of Zero Trust comes in. Instead of assuming everything inside your castle is trustworthy, Zero Trust says, “Hold on, let’s not assume anything. Let’s check, double-check, and verify everything, every time.”
The Fall of the Castle. Why We Need Zero Trust
Back in the day, the castle-and-moat approach worked because all the important stuff was inside, your data, your applications, your users. But today, the world’s a lot bigger. People are working from coffee shops, data is flying around in the cloud, and your applications are living in all sorts of places. The old moat just doesn’t cut it anymore. It’s like trying to guard a city with just a wooden fence.
So, we flip the script. Instead of trusting what’s inside by default, Zero Trust tells us to start with the assumption that nothing is safe, no matter where it is or who it is. It’s a bit like being a good scientist: question everything, test your hypotheses, and never take anything at face value.
Breaking Down Zero Trust. The Basic Ingredients
Zero Trust isn’t just one thing, it’s more like a recipe. Here are the main ingredients:
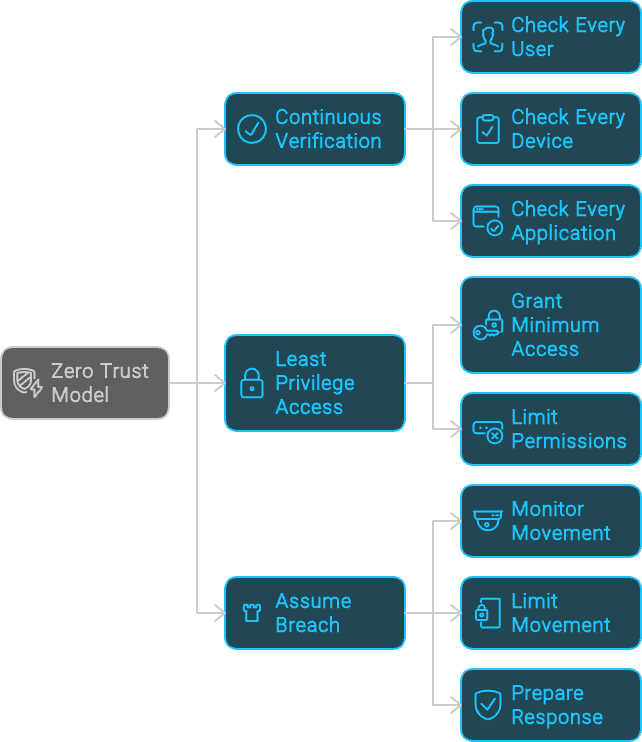
Verify Everything, All the Time: Imagine you’re a bouncer at a club. Every time someone wants to come in, you check their ID, every time, even if you’ve seen them before. That’s what Zero Trust does. It checks and rechecks every user, device, and application, making sure they are who they say they are.
Give Out the Minimum Keys: Remember when you were a kid, and your parents only let you have the key to your room? They didn’t give you the key to the whole house. In Zero Trust, we do the same thing. We give users just enough access to do their jobs, nothing more.
Assume Someone’s Already Inside: This might sound a bit paranoid, but it’s practical. Imagine that someone’s already snuck into your castle. Instead of panicking, you calmly limit their movement, monitor them, and prepare to kick them out if they step out of line.
Cooking Up a Zero Trust Strategy
So how do you put Zero Trust into practice? It’s not like flipping a switch, it’s more like renovating a house. You start with the foundation and work your way up.
1. Know What You’re Protecting
First things first, figure out what’s most important. Is it your customer data? Your intellectual property? These are your crown jewels, and they need the most protection. Once you know what you’re guarding, you can start building defenses around it.
2. Divide and Conquer
Next, break your network into smaller chunks. Imagine your castle has many rooms, each with its own lock and key. This way, even if someone sneaks into one room, they can’t just wander into the others. This is called segmentation, and it’s a big part of Zero Trust.
3. Be Picky About Who Gets In
In Zero Trust, you’re like a very picky host. You only let in guests who prove they’re trustworthy, every time. This is where strong identity checks, like multi-factor authentication, come in. It’s like asking someone to show their ID and confirm their invitation before they enter every room.
4. Keep an Eye on Everything
Do you know how detectives are always watching for clues? That’s what you need to do. Keep an eye on all your digital traffic, and look for anything suspicious. Tools like SIEM and EDR are your magnifying glasses, they help you spot trouble before it gets out of hand.
5. Lock Down Your Secrets
Finally, make sure your most important data is locked up tight. Encrypt it so that even if someone gets their hands on it, they can’t make sense of it. And use tools to track where it’s going and who’s accessing it.
The Ups and Downs of Zero Trust
Now, I’m not going to sugarcoat it, setting up Zero Trust isn’t easy. It takes time, effort, and a lot of buy-in from your team. You’re asking everyone to change how they think about security, and that’s no small task.
But here’s the payoff: once you’ve got Zero Trust in place, your castle is a lot harder to breach. You’ve got eyes everywhere, locks on every door, and a plan for what to do if someone sneaks in. It’s like turning your castle into a modern fortress, stronger, smarter, and ready for whatever comes next.
Wrapping It Up. Why Zero Trust is the Future
In a world where threats can come from anywhere, inside, outside, and all around, Zero Trust is the smart, scientific approach to security. It’s not about being paranoid; it’s about being prepared. By questioning everything, verifying everyone, and never taking safety for granted, Zero Trust helps you stay ahead of the game.
Zero Trust isn’t a one-time project, it’s a mindset, a way of thinking about security that evolves as the world around you changes. Start small, build it up, and before you know it, you’ll have a security system that’s as resilient as it is reliable. And in today’s world, that’s something worth striving for.
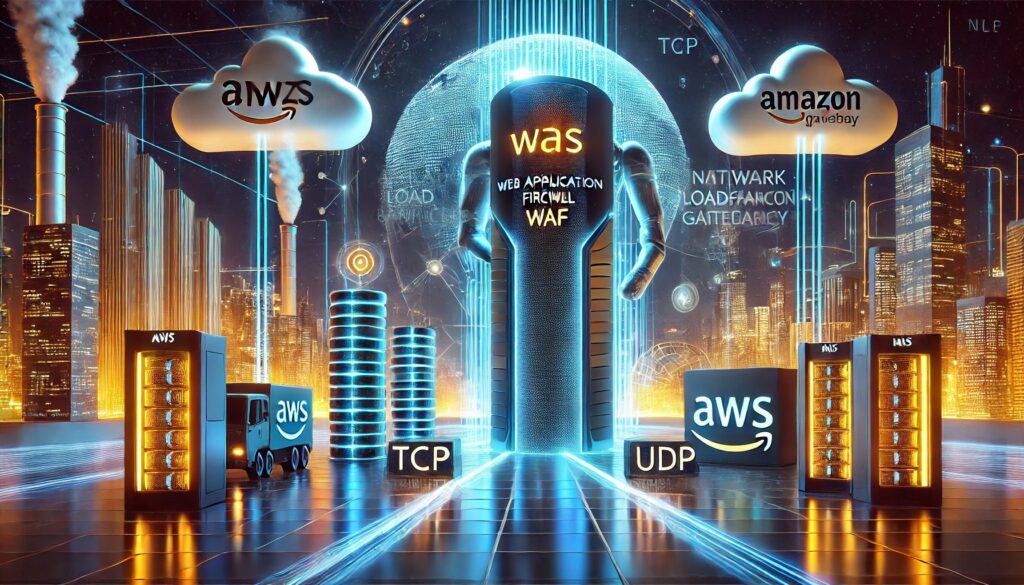
In AWS, the Web Application Firewall (WAF) stands as a sentinel, guarding your web applications against malicious traffic. It’s a powerful tool, but its integration is somewhat selective. WAF plays best with services that handle HTTP/HTTPS traffic: your Application Load Balancers, CloudFront distributions, and even Amazon API Gateway. Think of it as a specialized bodyguard, adept at recognizing and blocking threats specific to web-based communication.
Now, here’s where things get interesting. Imagine you’re running a high-performance, low-latency application, perhaps a multiplayer game, that relies heavily on the User Datagram Protocol (UDP). You’d likely choose the AWS Network Load Balancer (NLB) for this. It’s built for speed and handles TCP and UDP traffic like a champ.
But wait… WAF doesn’t integrate with NLB. It’s like having a world-class lock for a door that doesn’t exist.
So, the question arises, how do we protect an application running behind an NLB?
Let’s explore some strategies and break down the concepts.
The NLB Conundrum. A Different Kind of Traffic
To understand the challenge, we need to appreciate the fundamental difference between WAF and NLB. WAF operates at the application layer, inspecting the content of HTTP/HTTPS requests. It’s like a meticulous customs officer, examining each package for contraband.
NLB, on the other hand, works at the transport layer. It’s more like an air traffic controller, ensuring packets reach their destination swiftly and efficiently, without getting too involved in their contents.
This mismatch creates our puzzle. We need security, but the traditional WAF approach doesn’t fit.
Building a Fortress. Security Strategies for NLB Architectures
No problem, for there are ways to fortify your NLB-based applications. Let’s explore a few:
Instance-Level Security: Think of this as building a moat around each castle. Implement firewalls directly on your instances or use security groups to filter traffic based on ports and protocols. It’s a basic but effective defense.
AWS Shield: When the enemy attacks en masse, you need a shield wall. AWS Shield protects against Distributed Denial of Service (DDoS) attacks, a common threat for online games and other high-profile services.
Third-Party Integrations: Sometimes, you need a specialist. Several third-party security solutions offer WAF-like capabilities that can work with NLB or directly on your instances. For instance, Fortinet’s FortiWeb Cloud WAF is known for its compatibility with various cloud environments, including AWS NLB, offering advanced protection against web application threats. It’s like hiring a mercenary band with unique skills, tailored to bolster your defenses where AWS WAF might fall short.
AWS Firewall Manager: While primarily focused on managing WAF and Shield rules, Firewall Manager can also help centralize your security policies across AWS resources. It’s akin to having a grand strategist overseeing the entire defense.
Putting It Together: A Multi-Layered Defense
Imagine your Network Load Balancer (NLB) as the robust outer gates of a grand fortress. This gate directs the relentless stream of packets, be they allies or adversaries, toward the appropriate internal bastions, your instances. Once these packets arrive, they encounter the inner defenses: firewalls and security groups. These are akin to vigilant gatekeepers, scrutinizing every visitor with a discerning eye, allowing only the legitimate traffic to pass through. This first line of defense is crucial, forming a barrier that reacts to intruders based on predefined rules of engagement.
Beyond these individual defenses, AWS Shield acts like an elite guard trained to defend against the most fearsome of foes: the Distributed Denial of Service (DDoS) attacks. These are the siege engines of the digital world, designed to overwhelm and incapacitate. AWS Shield provides the necessary reinforcements, fortifying your defenses, and ensuring that your services remain uninterrupted, regardless of the onslaught they face.
For those seeking even greater fortification, turning to the mercenaries of the cybersecurity world, third-party security services, might be the key. These specialists bring tools and tactics not natively found in AWS’s armory. For instance, integrating a solution like Fortinet’s FortiWeb offers a layer of intelligence that adapts and responds to threats dynamically, much like a cunning war advisor who understands the ever-evolving landscape of cyber warfare.
Security is a Journey, Not a Destination
Each new day can bring new vulnerabilities and threats. Thus, securing a digital infrastructure, especially one as dynamic and exposed as an application behind an NLB, is not a one-time effort but a continuous crusade. AWS Firewall Manager serves as the grand strategist in this ongoing battle, offering a bird’s-eye view of the battlefield. It allows you to orchestrate your defenses across different fronts, be it WAF, Shield, or third-party services, ensuring that all units are working in concert.
This centralized command ensures that your security policies are not only implemented but also consistently enforced, adapted, and updated in response to new intelligence. It’s like maintaining a dynamic war room, where strategies are perpetually refined and tactics are adjusted to counter new threats. This holistic approach not only enhances your security posture but also builds resilience into the very fabric of your digital operations.
In conclusion, securing your applications behind an NLB is akin to fortifying a city in anticipation of both siege and sabotage. By layering your defenses, from the gates of the NLB to the inner sanctums of instance-level security, supported by the vigilant watch of AWS Shield, and augmented by the strategic acumen of third-party integrations and AWS Firewall Manager, you prepare your digital fortress not just for the threats of today, but for the evolving challenges of tomorrow.
Imagine, if you will, that you’re building a magnificent structure. Not just any structure, mind you, but a towering skyscraper that reaches towards the heavens. Now, this skyscraper isn’t made of concrete and steel, but of code, lines upon lines of intricate, interconnected code. Welcome to the world of modern software development, where our digital skyscrapers are only as strong as their foundations and the materials we use to build them.
In this situation, we face a challenge that would make even the most seasoned architect scratch their head: managing dependencies and identifying vulnerabilities. It’s like trying to ensure that every brick in our skyscraper is not only the right shape and size but also free from hidden cracks that could bring the whole structure tumbling down.
The Dependency Dilemma
Let’s start with dependencies. In the field of software, dependencies are like the prefabricated components we use to build our digital skyscraper. They’re chunks of code that others have written, tested, and (hopefully) perfected. We use these to avoid reinventing the wheel every time we start a new project.
But here’s the rub: as we add more and more of these components to our project, we’re not just building upwards; we’re creating a complex web of interconnections. Each dependency might have its own set of dependencies, and those might have even more. Before you know it, you’re juggling hundreds, if not thousands, of these components.
Now, imagine trying to keep all of these components up-to-date. It’s like trying to change the tires on a car while it’s speeding down the highway. One wrong move, and you could bring the whole system crashing down.
The Vulnerability Vortex
But wait, there’s more. Not only do we need to manage these dependencies, but we also need to ensure they’re secure. In our skyscraper analogy, this is like making sure none of the bricks we’re using have hidden weaknesses that could compromise the integrity of the entire building.
Vulnerabilities in code can be subtle. They might be a small oversight in a function, an outdated encryption method, or a poorly implemented security check. These vulnerabilities are like tiny cracks in our bricks. On their own, they might seem insignificant, but in the hands of a malicious actor, they could be exploited to bring down our entire digital edifice.
Dependabot, Snyk, and OWASP Dependency-Check
Now, you might be thinking, “This sounds like an impossible task” And you’d be right, if we were trying to do all this manually. But fear not, for in the world of DevOps, we have tools that act like super-powered inspectors, constantly checking our digital skyscraper for weak points and outdated components.
Let’s meet our heroes:
Dependabot: Think of Dependabot as your tireless assistant, always on the lookout for newer versions of the components you’re using. It’s like having someone who constantly checks if there are stronger, more efficient bricks available for your skyscraper.
Snyk: Snyk is your security expert. It doesn’t just look for newer versions; it specifically hunts for known vulnerabilities in your dependencies. It’s like having a team of structural engineers constantly testing each brick for hidden weaknesses.
OWASP Dependency-Check: This is your comprehensive inspector. It looks at your entire project, checking not just your direct dependencies but also the dependencies of your dependencies. It’s like having an X-ray machine for your entire skyscraper, revealing issues that might be hidden deep within its structure.
Automating the Process. Building a Self-Healing Skyscraper
Now, here’s where the magic of DevOps shines. We don’t just use these tools once and call it a day. No, we integrate them into our continuous integration and continuous deployment (CI/CD) pipelines. It’s like building a skyscraper that can inspect and repair itself.
Here’s how we might set this up:
Continuous Dependency Checking: We configure Dependabot to regularly check for updates to our dependencies. When it finds an update, it automatically creates a pull request. This is like having a system that automatically orders new, improved bricks whenever they become available.
Automated Security Scans: We integrate Snyk into our CI/CD pipeline. Every time we make a change to our code, Snyk runs a security scan. If it finds a vulnerability, it alerts us immediately. This is like having a security system that constantly patrols our skyscraper, raising an alarm at the first sign of trouble.
Comprehensive Vulnerability Analysis: We schedule regular scans with OWASP Dependency-Check. This tool digs deep, checking not just our code but also the documentation and configuration files associated with our project. It’s like having a full structural survey of our skyscraper regularly.
Automated Updates and Patches: When our tools identify an issue, we can set up automated processes to apply updates or security patches. Of course, we still need to test these changes, but automating the initial response saves valuable time.
You Can’t Automate Everything
Now, I know what you’re thinking. “This sounds fantastic. We can just set up these tools and forget about dependencies and vulnerabilities forever, right?” Well, not quite. While these tools are incredibly powerful, they’re not infallible. They’re more like highly advanced assistants than all-knowing oracles.
We, as developers and DevOps engineers, still need to be involved in the process. We need to review the updates suggested by Dependabot, analyze the vulnerabilities reported by Snyk, and interpret the comprehensive reports from OWASP Dependency-Check. It’s like being the chief architect of our skyscraper, we might have amazing tools and assistants, but the final decisions still rest with us.
Moreover, we need to understand the context of our project. Sometimes, updating a dependency might fix one issue but create another. Or a reported vulnerability might not be applicable to the way we’re using a particular component. This is where our expertise and judgment come into play.
Building Stronger, Safer Digital Skyscrapers
Managing dependencies and vulnerabilities in DevOps projects is a complex challenge, but it’s also an exciting opportunity. By leveraging tools like Dependabot, Snyk, and OWASP Dependency-Check, and integrating them into our automated processes, we can build digital structures that are not just tall and impressive, but also strong and secure.
In the world of software development, our work is never truly done. Our digital skyscrapers are living, breathing entities that require constant care and attention. But with the right tools and practices, we can create systems that are resilient, adaptable, and secure.
So, the next time you’re working on a project, take a moment to think about the complex web of dependencies you’re weaving and the potential vulnerabilities lurking in the shadows. And then, armed with your DevOps tools and your expertise, stride confidently forward, ready to build and maintain digital structures that can stand the test of time.
After all, in the ever-evolving landscape of technology, we’re not just developers or engineers. We’re the architects of the digital future, and the skyscrapers we build today will shape the skyline of tomorrow’s technological landscape.
In the field of software development and IT operations, two methodologies have emerged as pivotal players: DevOps and DevSecOps. While they share common roots, their approaches and focuses differ significantly. As organizations strive to balance speed, efficiency, and security in their development processes, understanding the nuances between these two practices becomes crucial.
The Coexistence of DevOps and DevSecOps
The digital age has ushered in an era where software development and deployment need to be faster, more efficient, and increasingly secure. DevOps emerged as a revolutionary approach, breaking down silos between development and operations teams. However, as cyber threats became more sophisticated, the need for integrated security practices gave rise to DevSecOps.
Both methodologies coexist in the modern tech ecosystem, each serving distinct yet complementary purposes. DevOps focuses on streamlining development and operations, while DevSecOps takes this a step further by embedding security into every phase of the software development lifecycle. Let’s delve into the key differences between these two approaches.
Speed vs. Security
The primary distinction between DevOps and DevSecOps lies in their core focus.
DevOps primarily aims to accelerate software delivery and improve IT service agility. It emphasizes collaboration between development and operations teams to streamline processes, reduce time-to-market, and enhance overall efficiency. The mantra of DevOps is “fail fast, fail often,” encouraging rapid iterations and continuous improvement.
DevSecOps, on the other hand, places security at the forefront without compromising on speed. While it maintains the agility principles of DevOps, DevSecOps integrates security practices throughout the development pipeline. Its goal is to create a “security as code” culture, where security considerations are baked into every stage of software development.
Reactive vs. Proactive
The approach to security marks another significant difference between these methodologies.
In a DevOps environment, security is often treated as a separate phase, sometimes even an afterthought. Security checks and measures are typically implemented towards the end of the development cycle or after deployment. This can lead to a reactive approach to security, where vulnerabilities are addressed only after they’re discovered in production.
DevSecOps takes a proactive stance on security. It integrates security practices and tools from the very beginning of the software development lifecycle. This “shift-left” approach to security means that potential vulnerabilities are identified and addressed early in the development process, reducing the risk and cost associated with late-stage security fixes.
Dual vs. Triad
Both DevOps and DevSecOps emphasize collaboration, but the scope of this collaboration differs.
DevOps focuses on bridging the gap between development and operations teams. It fosters a culture of shared responsibility, where developers and operations personnel work together throughout the software lifecycle. This collaboration aims to break down traditional silos and create a more efficient, streamlined workflow.
DevSecOps expands this collaborative model to include security teams. It creates a triad of development, operations, and security, working in unison from the outset of a project. This approach cultivates a culture where security is everyone’s responsibility, not just that of a dedicated security team.
Efficiency vs. Comprehensive Security
While both methodologies leverage automation, their focus and toolsets differ.
DevOps automation primarily targets efficiency and speed. Tools in a DevOps environment focus on continuous integration and continuous delivery (CI/CD), configuration management, and infrastructure as code. These tools aim to automate build, test, and deployment processes to accelerate software delivery.
DevSecOps extends this automation to include security tools and practices. In addition to DevOps tools, DevSecOps incorporates security automation tools such as static and dynamic application security testing (SAST/DAST), vulnerability scanners, and compliance monitoring tools. The goal is to automate security checks and integrate them seamlessly into the CI/CD pipeline.
Agility vs. Secure by Design
The underlying design principles of these methodologies reflect their different priorities.
DevOps principles revolve around agility, flexibility, and rapid iteration. It emphasizes practices like microservices architecture, containerization, and infrastructure as code. These principles aim to create systems that are easy to update, scale, and maintain.
DevSecOps builds on these principles but adds a “secure by design” approach. It incorporates security considerations into architectural decisions from the start. This might include principles like least privilege access, defense in depth, and secure defaults. The goal is to create systems that are not only agile but inherently secure.
Performance vs. Risk
The metrics used to measure success in DevOps and DevSecOps reflect their different focuses.
DevOps typically measures success through metrics related to speed and efficiency. These might include deployment frequency, lead time for changes, mean time to recovery (MTTR), and change failure rate. These metrics focus on how quickly and reliably teams can deliver software.
DevSecOps incorporates additional security-focused metrics. While it still considers DevOps metrics, it also tracks measures like the number of vulnerabilities detected, time to remediate security issues, and compliance with security standards. These metrics provide a more holistic view of both performance and security posture.
Illustrating the Difference
Let’s consider a scenario where a team is developing a new e-commerce platform:
In a DevOps approach, the team might focus on rapidly developing features and deploying them quickly. They would use CI/CD pipelines to automate testing and deployment, allowing for frequent updates. Security checks might be performed at the end of each sprint or before major releases.
In a DevSecOps approach, the team would integrate security from the start. They might begin by conducting threat modeling to identify potential vulnerabilities. Security tools would be integrated into the CI/CD pipeline, automatically scanning code for vulnerabilities with each commit. The team would also implement secure coding practices and conduct regular security training. When deploying, they would use infrastructure as code with built-in security configurations (SIaC).
Complementary Approaches for Modern Software Development
While DevOps and DevSecOps have distinct focuses and approaches, they are not mutually exclusive. In fact, many organizations are finding that a combination of both methodologies provides the best balance of speed, efficiency, and security.
DevOps laid the groundwork for faster, more collaborative software development. DevSecOps builds on this foundation, recognizing that in today’s threat landscape, security cannot be an afterthought. By integrating security practices throughout the development lifecycle, DevSecOps aims to create software that is not only delivered rapidly but is also inherently secure.
As cyber threats continue to evolve, we can expect the principles of DevSecOps to become increasingly important. However, this doesn’t mean DevOps will become obsolete. Instead, we’re likely to see a continued evolution where the speed and efficiency of DevOps are combined with the security-first mindset of DevSecOps.
Ultimately, whether an organization leans more towards DevOps or DevSecOps should depend on their specific needs, risk profile, and regulatory environment. The key is to foster a culture of continuous improvement, collaboration, and shared responsibility, principles that are at the heart of both DevOps and DevSecOps.
Without a doubt, ensuring the security of your data and applications is paramount. Amazon Web Services (AWS) recently introduced a new service designed to simplify and enhance security data management: Amazon Security Lake. This article will look into its main features, use cases, and how it improves upon previous methods of security data collection in AWS.
How Security Data Collection Worked Before Amazon Security Lake
Before the launch of Amazon Security Lake, organizations faced several challenges in collecting and managing security data in AWS. Users relied on services like AWS CloudTrail, Amazon GuardDuty, AWS Config, and Amazon VPC Flow Logs to collect different types of security data. While these services are powerful, they generated data in disparate formats and locations.
To analyze and correlate security events, many organizations turned to third-party SIEM (Security Information and Event Management) tools such as Splunk, ELK Stack, or IBM QRadar. These tools are adept at aggregating and analyzing security data, but the lack of a standardized format and centralized location for AWS security data posed significant hurdles. This often resulted in time-consuming and error-prone processes for integrating and correlating data from various sources.
The Amazon Security Lake Advantage
Amazon Security Lake addresses these challenges by providing a unified and standardized approach to security data collection and management. Its centralized repository, automated data ingestion, and seamless integration with SIEM tools make it easier for organizations to enhance their security operations. By normalizing data into a common schema, Security Lake simplifies the analysis and correlation of security events, leading to faster and more accurate threat detection and response.
Key Features of Amazon Security Lake
Amazon Security Lake offers several standout features that make it an attractive option for organizations looking to bolster their security posture:
Centralized Security Data Repository: Security Lake consolidates security data from various AWS services and third-party sources into a single, centralized repository. This makes it easier to manage, analyze, and secure your data.
Standardized Data Format: One of the significant challenges in security data management has been the lack of a standardized format. Security Lake addresses this by normalizing the data into a common schema, facilitating easier analysis and correlation.
Automated Data Ingestion: The service automatically ingests data from AWS services such as AWS CloudTrail, Amazon GuardDuty, AWS Config, and Amazon VPC Flow Logs. This automation reduces the manual effort required to gather security data.
Integration with Third-Party Tools: Security Lake supports integration with popular Security Information and Event Management (SIEM) tools like Splunk, ELK Stack (Elasticsearch, Logstash, Kibana), and IBM QRadar. This enables organizations to leverage their existing security tools and workflows.
Scalability and Performance: Built on AWS’s scalable infrastructure, Security Lake can handle vast amounts of data, ensuring that your security operations are not hindered by performance bottlenecks.
Cost-Effective Storage: Security Lake utilizes Amazon S3 for data storage, offering a cost-effective solution that scales with your needs.
Use Cases for Amazon Security Lake
Amazon Security Lake is designed to meet a variety of security needs across different industries. Here are some common use cases:
Unified Threat Detection and Response: By consolidating data from multiple sources, Security Lake enables more effective threat detection and response. Security teams can identify and mitigate threats faster by having a holistic view of security events.
Compliance and Auditing: Security Lake’s centralized data repository simplifies compliance reporting and auditing. Organizations can easily access and analyze historical security data to demonstrate compliance with regulatory requirements.
Security Analytics: With standardized data and seamless integration with analytics tools, Security Lake empowers organizations to perform advanced security analytics. This can lead to deeper insights and better-informed security strategies.
Incident Investigation: In the event of a security incident, having all relevant data in one place speeds up the investigation process. Security Lake’s centralized and normalized data makes it easier to trace the origin and impact of an incident.
Amazon Security Lake represents a significant step forward in the field of cloud security. By centralizing and standardizing security data, it empowers organizations to manage their security posture more effectively and efficiently. Whether you are looking to improve threat detection, streamline compliance efforts, or enhance your overall security analytics, Amazon Security Lake offers a robust solution tailored to meet your needs.
When working within AWS (Amazon Web Services), managing how your resources connect to the internet and interact with other services is crucial. Enter the concept of NAT (Network Address Translation), which plays a significant role in this process. There are two primary NAT services offered by AWS: the NAT Gateway and the NAT Instance. But what are they, and how do they differ?
What is a NAT Gateway?
A NAT Gateway is a highly available service that allows resources within a private subnet to access the internet or other AWS services while preventing the internet from initiating a connection with those resources. It’s managed by AWS and automatically scales its bandwidth up to 45 Gbps, ensuring that it can handle high-traffic loads without any intervention.
Here’s why NAT Gateways are an integral part of your AWS architecture:
High Availability: AWS ensures that NAT Gateways are always available by implementing them in each Availability Zone with redundancy.
Maintenance-Free: AWS manages all aspects of a NAT Gateway, so you don’t need to worry about operational maintenance.
Performance: AWS has optimized the NAT Gateway for handling NAT traffic efficiently.
Security: NAT Gateways are not associated with security groups, meaning they provide a layer of security by default.
NAT Gateway vs. NAT Instance
While both services allow private subnets to connect to the internet, there are several key differences:
Management: A NAT Gateway is fully managed by AWS, whereas a NAT Instance requires manual management, including software updates and failover scripts.
Bandwidth: NAT Gateways can scale up to 45 Gbps, while the bandwidth for NAT Instances depends on the instance type you choose.
Cost: The cost model for NAT Gateways is based on the number of gateways, the duration of usage, and data transfer, while NAT Instances are charged by the type of instance and its usage.
Elastic IP Addresses: Both services allow the association of Elastic IP addresses, but the NAT Gateway does so at creation, and the NAT Instance can change the IP address at any time.
Security Groups and ACLs: NAT Instances can be associated with security groups to control inbound and outbound traffic, while NAT Gateways use Network ACLs to manage traffic.
It’s also important to note that NAT Instances allow port forwarding and can be used as bastion servers, which are not supported by NAT Gateways.
Final Thoughts
Choosing between a NAT Gateway and a NAT Instance will depend on your specific AWS needs. If you’re looking for a hands-off, robust, and scalable solution, the NAT Gateway is your best bet. On the other hand, if you need more control over your NAT device and are willing to manage it yourself, a NAT Instance may be more appropriate.
Understanding these components and their differences can significantly impact the efficiency and security of your AWS environment. It’s essential to assess your requirements carefully to make the most informed decision for your network architecture within AWS.