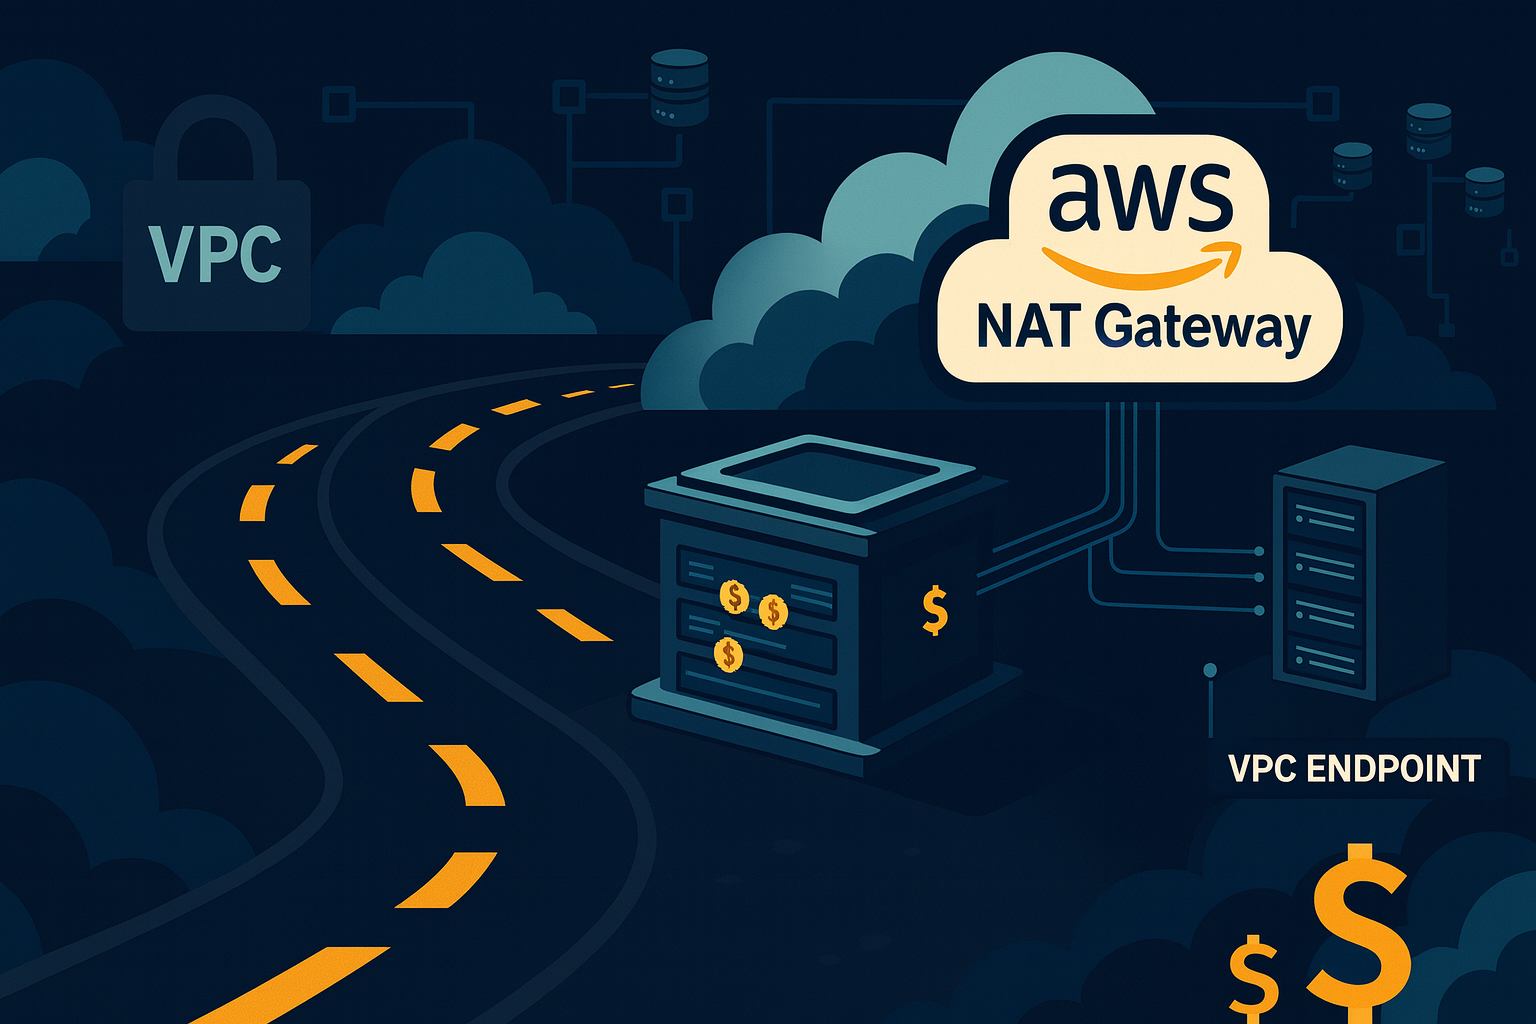
My coffee went cold. I was staring at my AWS bill, and one line item was staring back at me with a judgmental smirk: NAT Gateway: 33,01 €.
This wasn’t for compute. This wasn’t for storing terabytes of crucial data. This was for the simple, mundane privilege of letting my Lambda functions send emails and tell Stripe to charge a credit card.
Let’s talk about NAT Gateway pricing. It’s a special kind of pain.
- $0.045 per hour (That’s roughly $33 a month, just for existing).
- $0.045 per GB processed (You get charged for your own data).
- …and that’s per Availability Zone. For High Availability, you multiply by two or three.
I was suddenly paying more for a digital toll booth operator than I was for the actual application logic running my startup. That’s when I started asking questions. Did I really need this? What was I actually paying for? And more importantly, was there another way?
This is the story of how I hunted down that 33€ line item. By the end, you’ll know exactly if you need a NAT Gateway, or if you’re just burning money to keep the AWS machine fed.
The great NAT lie
Every AWS tutorial, every Stack Overflow answer, every “serverless best practice” blog post chants the same mantra: “If your Lambda needs to access the internet, and it’s in a VPC, you need a NAT Gateway.”
It’s presented as a law of physics. Like gravity, or the fact that DNS will always be the problem. And I, like a good, obedient engineer, followed the instructions. I clicked the button. I added the NAT. And then the bill came.
It turns out that obedience is expensive.
The gilded cage we call a VPC
Before we storm the castle, we have to understand why we built the castle in the first place. Why are our Lambdas in this mess? The answer is the Virtual Private Cloud (VPC).
By default, a Lambda function is a free spirit. It’s born with a magical, AWS-managed connection to the outside world. It can call any API it wants. It’s a social butterfly.
But then, security happens.
We have a managed database, like MongoDB Atlas. We absolutely, positively do not want this database exposed to the public internet. That’s like shouting your bank details across a crowded shopping mall. So, we rightly configure it to only accept private connections.
To let our Lambda talk to this database, we have to build a “gated community” for it. That’s our VPC. We move the Lambda inside this community and set up a “VPC Peering” connection, which is like a private, guarded footpath between our VPC and the MongoDB VPC.
Our Lambda can now securely whisper secrets to the database. The traffic never touches the public internet. We are secure. We are compliant. We are… trapped.
House arrest
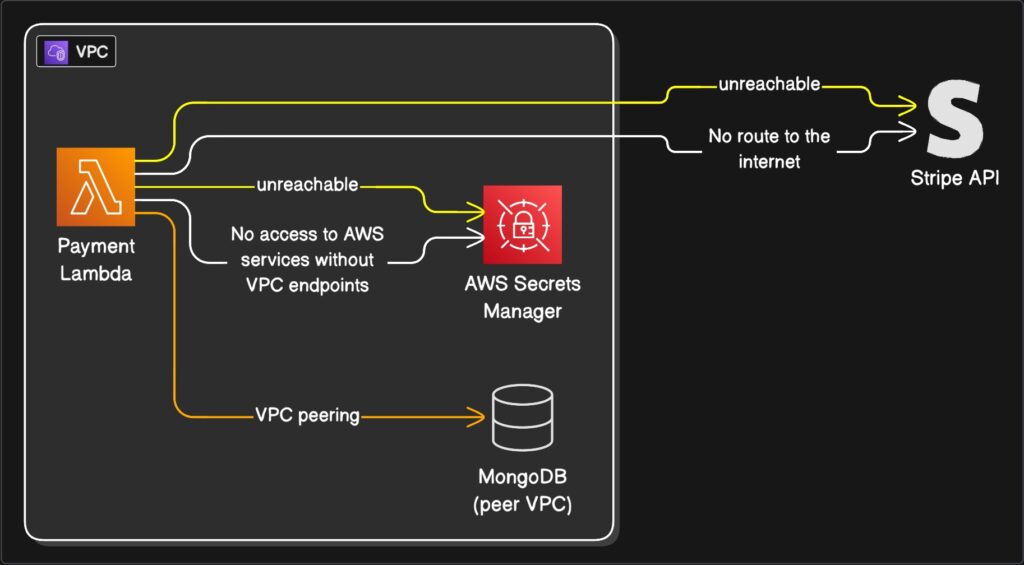
We solved one problem but created a massive new one. In building this fortress to protect our database, we built it with no doors to the outside world.
Our Lambda is now on house arrest.
Sure, it can talk to the database in the adjoining room. But it can no longer call the Stripe API to process a payment. It can’t call an email service. It can’t even phone its own cousins in the AWS family, like AWS Secrets Manager or S3 (not without extra work, anyway). Any attempt to reach the internet just… times out. It’s the sound of silence.
This is the dilemma. To be secure, our Lambda must be in a VPC. But once in a VPC, it’s useless for half its job.
Enter the expensive chaperone
This is where the AWS Gospel presents its solution: the NAT Gateway.
The NAT (Network Address Translation) Gateway is, in our analogy, an extremely expensive, bonded chaperone.
You place this chaperone in a “public” part of your gated community (a public subnet). When your Lambda on house arrest needs to send a letter to the outside world (like an API call to Stripe), it gives the letter to the chaperone.
The chaperone (the NAT) takes the letter, walks it to the main gate, puts its own public return address on it, and sends it. When the reply comes back, the chaperone receives it, verifies it’s for the Lambda, and delivers it.
This works. It’s secure. The Lambda’s private address is never exposed.
But this chaperone charges you. It charges you by the hour just to be on call. It charges you for every letter it carries (data processed). And as we established, you need three of them if you want to be properly redundant.
This is a racket.
The “Split Personality” solution
I refused to pay the toll. There had to be another way. The solution came from realizing I was trying to make one Lambda do two completely opposite jobs.
What if, instead of one “do-it-all” Lambda, I created two specialists?
- The hermit: This Lambda lives inside the VPC. Its one and only job is to talk to the database. It is antisocial, secure, and has no idea the internet exists.
- The messenger: This Lambda lives outside the VPC. It’s a “free-range” Lambda. Because it’s not attached to any VPC, AWS magically gives it that default internet access. It cannot talk to the database (which is good!), but it can talk to Stripe all day long.
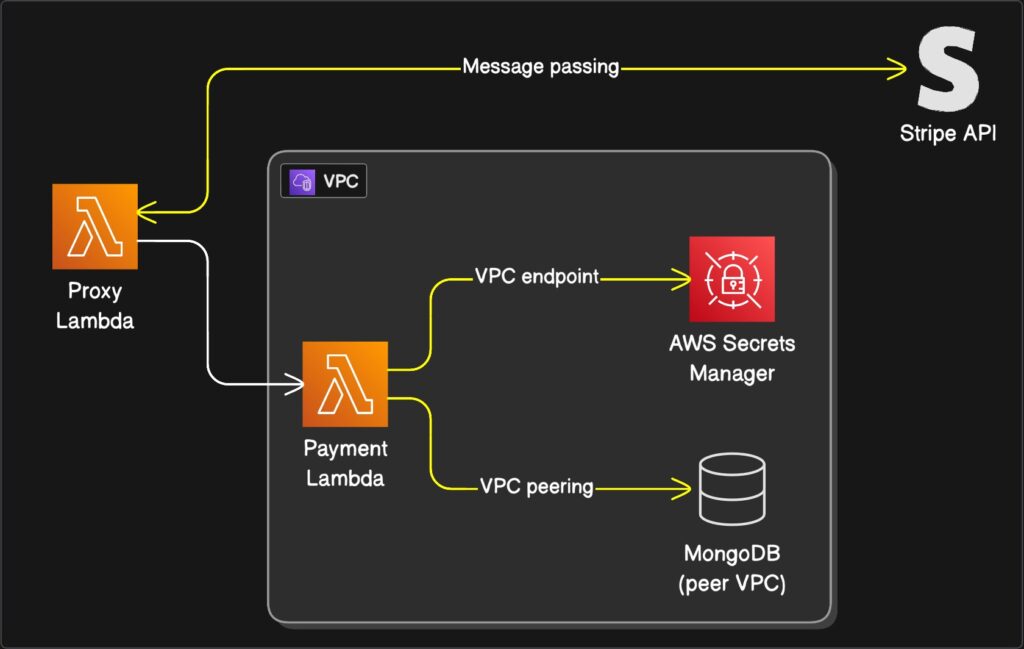
The plan is simple: when The hermit (VPC Lambda) needs something from the internet, it invokes The messenger (Proxy Lambda). It hands it a note: “Please tell Stripe to charge $25.00.” The messenger runs the errand, gets the receipt, and passes it back to The hermit, who then safely logs the result in the database.
It’s a “split personality” architecture.
But is it safe?
I can hear you asking: “Wait. A Lambda with internet access? Isn’t that like leaving your front door wide open for attackers?”
No. And this is the most beautiful part.
A Lambda function, whether in a VPC or not, never gets a public IP address. It can make outbound calls, but nothing from the public internet can initiate a call to it.
It’s like having a phone that can only make calls, not receive them. It’s unreachable. The “Messenger” Lambda is perfectly safe to live outside the VPC, ready to do our bidding.
The secret tunnel system
So, I built it. The hermit. The messenger. I was a genius. I hit “test.”
…timeout.
Of course. I forgot. The hermit is still on house arrest. “Invoking” another Lambda is, itself, an AWS API call. It’s a request that has to leave the VPC to reach the AWS Lambda service. My Lambda couldn’t even call its own lawyer.
This is where the real solution lies. Not in a gateway, but in a series of tunnels.
They’re called VPC Endpoints.
A VPC Endpoint is not a big, expensive, public chaperone. It’s a private, secret tunnel that you build directly from your VPC to a specific AWS service, all within the AWS network.
So, I built two tunnels:
- A tunnel to AWS Secrets Manager: Now my hermit Lambda can get its API keys directly, without ever leaving the house.
- A tunnel to AWS Lambda: Now my hermit Lambda can use its private phone to “invoke” The messenger.
These endpoints have a small hourly cost, but it’s a fraction of a NAT Gateway, and the data processing fee is either tiny or free, depending on the endpoint type. We’ve replaced a $100/mo toll road with a $5/mo private footpath.
(A grumpy side note: annoyingly, some AWS services like Cognito don’t support VPC Endpoints. For those, you still have to use the Messenger proxy pattern. But for most, the tunnels work.)
Our glorious new contraption
Let’s look at our payment handler again. This little function needed to:
- Get API keys from AWS Secrets Manager.
- Call Stripe’s API.
- Write the transaction to MongoDB.
Here is how our new, glorious, Rube Goldberg machine works:
- Step 1: The Payment Lambda (The hermit) gets a request.
- Step 2: It needs keys. It pops over to AWS Secrets Manager through its private tunnel (the VPC Endpoint). No internet needed.
- Step 3: It needs to charge a card. It calls the invoke command, which goes through its other private tunnel to the AWS Lambda service, triggering The messenger.
- Step 4: The messenger (Proxy Lambda), living in the free-range world, makes the outbound call to Stripe. Stripe, delighted, processes the payment and sends a reply.
- Step 5: The messenger passes the success (or failure) response back to The hermit.
- Step 6: The hermit, now holding the result, calmly turns and writes the transaction record to MongoDB via its private VPC Peering connection.
Everything works. Nothing is exposed. And the NAT Gateway bill is 0€.
For those who speak in code
Here is a simplified look at what our two specialist Lambdas are doing.
Payment Lambda (The hermit – INSIDE VPC)
// This Lambda is attached to your VPC
// It needs VPC Endpoints for 'lambda' and 'secretsmanager'

import { InvokeCommand, LambdaClient } from "@aws-sdk/client-lambda";
// ... (imports for Secrets Manager and Mongo)

const lambda = new LambdaClient({});

export const handler = async (event) => {
  try {
    const amountToCharge = 2500; // 25.00

    // 1. Get secrets via VPC Endpoint
    // const apiKeys = await getSecretsFromManager();

    // 2. Prepare to invoke the proxy
    const command = new InvokeCommand({
      FunctionName: process.env.PAYMENT_PROXY_FUNCTION_NAME,
      InvocationType: "RequestResponse",
      Payload: JSON.stringify({
        chargeDetails: { amount: amountToCharge, currency: "usd" },
      }),
    });

    // 3. Invoke the proxy Lambda via VPC Endpoint
    const response = await lambda.send(command);
    const proxyResponse = JSON.parse(
      Buffer.from(response.Payload).toString()
    );

    if (proxyResponse.status === "success") {
      // 4. Write to MongoDB via VPC Peering
      // await writePaymentRecordToMongo(proxyResponse.transactionId);

      return {
        statusCode: 200,
        body: `Payment succeeded! TxID: ${proxyResponse.transactionId}`,
      };
    } else {
      // Handle payment failure
      return { statusCode: 400, body: "Payment failed." };
    }
  } catch (error) {
    console.error(error);
    return { statusCode: 500, body: "Server error" };
  }
};
Proxy Lambda (The messenger – OUTSIDE VPC)
// This Lambda is NOT attached to a VPC
// It has default internet access

// ... (import for your Stripe client)
// const stripe = new Stripe(process.env.STRIPE_SECRET_KEY);

export const handler = async (event) => {
  // 1. Extract the data from the invoking Hermit
  const { chargeDetails } = event.payload;

  try {
    // 2. Call the external Stripe API
    // const stripeResponse = await stripe.charges.create({
    //   amount: chargeDetails.amount,
    //   currency: chargeDetails.currency,
    //   source: "tok_visa", // Example token
    // });

    // Mocking the Stripe call for this example
    const stripeResponse = {
        id: `txn_${Math.random().toString(36).substring(2, 15)}`,
        status: 'succeeded'
    };


    if (stripeResponse.status === 'succeeded') {
      // 3. Return the successful result
      return {
        status: "success",
        transactionId: stripeResponse.id,
      };
    } else {
      return { status: "failed", error: "Stripe decline" };
    }
  } catch (err) {
    // 4. Return any errors
    return {
      status: "failed",
      error: `Error contacting Stripe: ${err.message}`,
    };
  }
};
Was it worth it?
And there it is. A production-grade, secure, and resilient system. Our hermit Lambda is safe in its VPC, talking to the database, our Messenger Lambda is happily running errands on the internet, and our secret tunnels are connecting everything privately.
That said, figuring all this out and integrating it into a production system takes a significant amount of time. This… this contraption of proxies and endpoints is, frankly, a headache.
If you don’t want the headache, sometimes it’s easier to just pay that damn 30€ for a NAT Gateway and move on with your life.
The purpose of this article wasn’t just to save a few bucks. It was to pull back the curtain. To show that the “one true way” isn’t the only way, and to prove that with a little bit of architectural curiosity, you can, in fact, escape the AWS NAT Gateway toll booth.

