Let us talk about healthcare data pipelines. Running high volume payer processing pipelines is a lot like hosting a mandatory potluck dinner for a group of deeply eccentric people with severe and conflicting dietary restrictions. Each payer behaves with maddening uniqueness. One payer bursts through the door, demanding an entire roasted pig, which they intend to consume in three minutes flat. This requires massive, short-lived computational horsepower. Another payer arrives with a single boiled pea and proceeds to chew it methodically for the next five hours, requiring a small but agonizingly persistent trickle of processing power.
On top of this culinary nightmare, there are strict rules of etiquette. You absolutely must digest the member data before you even look at the claims data. Eligibility files must be validated before anyone is allowed to touch the dessert tray of downstream jobs. The workload is not just heavy. It is incredibly uneven and delightfully complicated.
Buying folding chairs for a banquet
On paper, Amazon Web Services managed Auto Scaling Mechanisms should fix this problem. They are designed to look at a growing pile of work and automatically hire more help. But applying generic auto scaling to healthcare pipelines is like a restaurant manager seeing a line out the door and solving the problem by buying fifty identical plastic folding chairs.
The manager does not care that one guest needs a high chair and another requires a reinforced steel bench. Auto scaling reacts to the generic brute force of the system load. It cannot look at a specific payer and tailor the compute shape to fit their weird eating habits. It cannot enforce the strict social hierarchy of job priorities. It scales the infrastructure, but it completely fails to scale the intention.
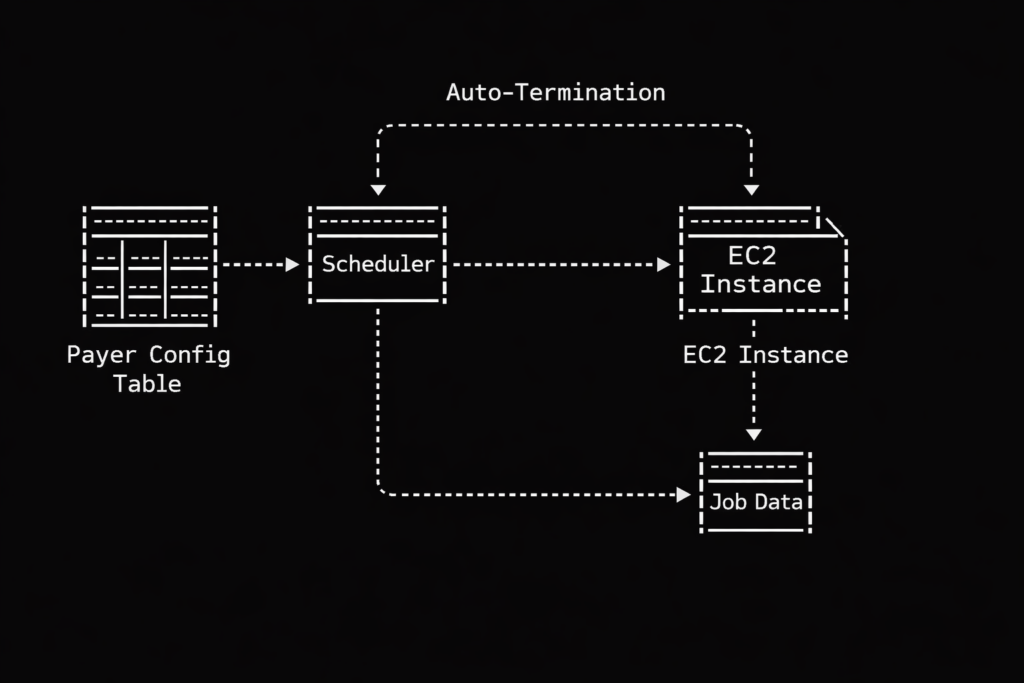
This is why we abandoned the generic approach and built our own dynamic EC2 provisioning system. Instead of maintaining a herd of generic servers waiting around for something to do, we create bespoke servers on demand based on a central configuration table.
The ruthless nightclub bouncer of job scheduling
Let us look at how this actually works regarding prioritization. Our system relies on that central configuration table to dictate order. Think of this table as the guest list at an obnoxiously exclusive nightclub. Our scheduler acts as the ruthless bouncer.
When jobs arrive at the queue, the bouncer checks the list. Member data? Right this way to the VIP lounge, sir. Claims data? Stand on the curb behind the velvet rope until the members are comfortably seated. Generic auto scaling has no native concept of this social hierarchy. It just sees a mob outside the club and opens the front doors wide. Our dynamic approach gives us perfect, tyrannical control over who gets processed first, ensuring our pipelines execute in a beautifully deterministic way. We spin up exactly the compute we specify, exactly when we want it.
Leaving your car running in the garage
Then there is the financial absurdity of warm pools. Standard auto scaling often relies on keeping a baseline of idle instances warm and ready, just in case a payer decides to drop a massive batch of files at two in the morning.
Keeping idle servers running is the technological equivalent of leaving your car engine idling in the closed garage all night just in case you get a sudden craving for a carton of milk at dawn. It is expensive, it is wasteful, and it makes you look a bit foolish when the AWS bill arrives.
Our dynamic system operates with a baseline of zero. We experience one hundred percent burst efficiency because we only pay for the exact compute we use, precisely when we use it. Cost savings happen naturally when you refuse to pay for things that are sitting around doing nothing.
A delightfully brutal server lifecycle
The operational model we ended up with is almost comically simple compared to traditional methods. A generic scaling group requires complex scaling policies, tricky cooldown periods, and endless tweaking of CloudWatch alarms. It is like managing a highly sensitive, moody teenager.
Our dynamic EC2 model is wonderfully ruthless. We create the instance and inject it with a single, highly specific purpose via a startup script. The instance wakes up, processes the healthcare data with absolute precision, and then politely self destructs so it stops billing us. They are the mayflies of the cloud computing world. They live just long enough to do their job, and then they vanish. There are no orphaned instances wandering the cloud.
This dynamic provisioning model has fundamentally altered how we digest payer workloads. We have somehow achieved a weird but perfect holy grail of cloud architecture. We get the granular flexibility of serverless functions, the raw, unadulterated horsepower of dedicated EC2 instances, and the stingy cost efficiency of a pure event-driven design.
If your processing jobs vary wildly from payer to payer, and if you care deeply about enforcing priorities without burning money on idle metal, building a disposable compute army might be exactly what your architecture is missing. We said goodbye to our idle servers, and honestly, we do not miss them at all.
AWS recently announced a small, seemingly boring new feature for EC2 Auto Scaling: the ability to cancel a pending instance refresh. If you squinted, you might have missed it. It sounds like a minor quality-of-life update, something to make a sysadmin’s Tuesday slightly less terrible.
But this isn’t a feature. It’s a gold watch. It’s the pat on the back and the “thanks for your service” speech at the awkward retirement party.
The EC2 Auto Scaling Group (ASG), the bedrock of cloud elasticity, the one tool we all reflexively reached for, is being quietly put out to pasture.
No, AWS hasn’t officially killed it. You can still spin one up, just like you can still technically send a fax. AWS will happily support it. But its days as the default, go-to solution for modern workloads are decisively over. The battle for the future of scaling has ended, and the ASG wasn’t the winner. The new default is serverless containers, hyper-optimized Spot fleets, and platforms so abstract they’re practically invisible.
If you’re still building your infrastructure around the ASG, you’re building a brand-new house with plumbing from 1985. It’s time to talk about why our old friend is retiring and meet the eager new hires who are already measuring the drapes in its office.
So why is the ASG getting the boot?
We loved the ASG. It was a revolutionary idea. But like that one brilliant relative everyone dreads sitting next to at dinner, it was also exhausting. Its retirement was long overdue, and the reasons are the same frustrations we’ve all been quietly grumbling about into our coffee for years.
It promised automation but gave us chores
The ASG’s sales pitch was simple: “I’ll handle the scaling!” But that promise came with a three-page, fine-print addendum of chores.
It was the operational overhead that killed us. We were promised a self-driving car and ended up with a stick-shift that required constant, neurotic supervision. We became part-time Launch Template librarians, meticulously versioning every tiny change. We became health-check philosophers, endlessly debating the finer points of ELB vs. EC2 health checks.
And then… the Lifecycle Hooks.
A “Lifecycle Hook” is a polite, clinical term for a Rube Goldberg machine of desperation. It’s a panic button that triggers a Lambda, which calls a Systems Manager script, which sends a carrier pigeon to… maybe… drain a connection pool before the instance is ruthlessly terminated. Trying to debug one at 3 AM was a rite of passage, a surefire way to lose precious engineering time and a little bit of your soul.
It moves at a glacial pace
The second nail in the coffin was its speed. Or rather, the complete lack of it.
The ASG scales at the speed of a full VM boot. In our world of spiky, unpredictable traffic, that’s an eternity. It’s like pre-heating a giant, industrial pizza oven for 45 minutes just to toast a single slice of bread. By the time your new instance is booted, configured, service-discovered, and finally “InService,” the spike in traffic has already come and gone, leaving you with a bigger bill and a cohort of very annoyed users.
It’s an expensive insurance policy
The ASG model is fundamentally wasteful. You run a “warm” fleet, paying for idle capacity just in case you need it. It’s like paying rent on a 5-bedroom house for your family of three, just in case 30 cousins decide to visit unannounced.
This “scale-up” model was slow, and the “scale-down” was even worse, riddled with fears of terminating the wrong instance and triggering a cascading failure. We ended up over-provisioning to avoid the pain of scaling, which completely defeats the purpose of “auto-scaling.”
The eager interns taking over the desk
So, the ASG has cleared out its desk. Who’s moving in? It turns out there’s a whole line of replacements, each one leaner, faster, and blissfully unconcerned with managing a “fleet.”
1. The appliance Fargate and Cloud Run
First up is the “serverless container”. This is the hyper-efficient new hire who just says, “Give me the Dockerfile. I’ll handle the rest.”
With AWS Fargate or Google’s Cloud Run, you don’t have a fleet. You don’t manage VMs. You don’t patch operating systems. You don’t even think about an instance. You just define a task, give it some CPU and memory, and tell it how many copies you want. It scales from zero to a thousand in seconds.
This is the appliance model. When you buy a toaster, you don’t worry about wiring the heating elements or managing its power supply. You just put in bread and get toast. Fargate is the toaster. The ASG was the “build-your-own-toaster” kit that came with a 200-page manual on electrical engineering.
Just look at the cognitive load. This is what it takes to get a basic ASG running via the CLI:
# The "Old Way": Just one of the many steps...
aws autoscaling create-auto-scaling-group \
    --auto-scaling-group-name my-legacy-asg \
    --launch-template "LaunchTemplateName=my-launch-template,Version='1'" \
    --min-size 1 \
    --max-size 5 \
    --desired-capacity 2 \
    --vpc-zone-identifier "subnet-0571c54b67EXAMPLE,subnet-0c1f4e4776EXAMPLE" \
    --health-check-type ELB \
    --health-check-grace-period 300 \
    --tag "Key=Name,Value=My-ASG-Instance,PropagateAtLaunch=true"
You still need to define the launch template, the subnets, the load balancer, the health checks…
Now, here’s the core of a Fargate task definition. It’s just a simple JSON file:
// The "New Way": A snippet from a Fargate Task Definition
{
  "family": "my-modern-app",
  "containerDefinitions": [
    {
      "name": "my-container",
      "image": "nginx:latest",
      "cpu": 256,
      "memory": 512,
      "portMappings": [
        {
          "containerPort": 80,
          "hostPort": 80
        }
      ]
    }
  ],
  "requiresCompatibilities": ["FARGATE"],
  "cpu": "256",
  "memory": "512"
}
You define what you need, and the platform handles everything else.
2. The extreme couponer Spot fleets
For workloads that are less “instant spike” and more “giant batch job,” we have the “optimized fleet”. This is the high-stakes, high-reward world of Spot Instances.
Spot used to be terrifying. AWS could pull the plug with two minutes’ notice, and your entire workload would evaporate. But now, with Spot Fleets and diversification, it’s the smartest tool in the box. You can tell AWS, “I need 1,000 vCPUs, and I don’t care what instance types you give me, just find the cheapest ones.”
The platform then builds a diversified fleet for you across multiple instance types and Availability Zones, making it incredibly resilient to any single Spot pool termination. It’s perfect for data processing, CI/CD runners, and any batch job that can be interrupted and resumed. The ASG was always too rigid for this kind of dynamic, cost-driven scaling.
3. The paranoid security guard MicroVMs
Then there’s the truly weird stuff: Firecracker. This is the technology that powers AWS Lambda and Fargate. It’s a “MicroVM” that gives you the iron-clad security isolation of a full virtual machine but with the lightning-fast startup speed of a container.
We’re talking boot times of under 125 milliseconds. This is for when you need to run thousands of tiny, separate, untrusted workloads simultaneously without them ever being able to see each other. It’s the ultimate “multi-tenant” dream, giving every user their own tiny, disposable, fire-walled VM in the blink of an eye.
4. The invisible platform Edge runtimes
Finally, we have the platforms that are so abstract they’re “scaled to invisibility”. This is the world of Edge. Think Lambda@Edge or CloudFront Functions.
With these, you’re not even scaling in a region anymore. Your logic, your code, is automatically replicated and executed at hundreds of Points of Presence around the globe, as close to the end-user as possible. The entire concept of a “fleet” or “instance” just… disappears. The logic scales with the request.
Life after the funeral. How to adapt
Okay, the eulogy is over. The ASG is in its rocking chair on the porch. What does this mean for us, the builders? It’s time to sort through the old belongings and modernize the house.
Go full Marie Kondo on your architecture
First, you need to re-evaluate. Open up your AWS console and take a hard look at every single ASG you’re running. Be honest. Ask the tough questions:
Does this workload really need to be stateful?
Do I really need VM-level control, or am I just clinging to it for comfort?
Is this a stateless web app that I’ve just been too lazy to containerize?
If it doesn’t spark joy (or isn’t a snowflake legacy app that’s impossible to change), thank it for its service and plan its migration.
Stop shopping for engines, start shopping for cars
The most important shift is this: Pick the runtime, not the infrastructure.
For too long, our first question was, “What EC2 instance type do I need?” That’s the wrong question. That’s like trying to build a new car by starting at the hardware store to buy pistons.
The right question is, “What’s the best runtime for my workload?”
Is it a simple, event-driven piece of logic? That’s a Function (Lambda).
Is it a stateless web app in a container? That’s a Serverless Container (Fargate).
Is it a massive, interruptible batch job? That’s an Optimized Fleet (Spot).
Is it a cranky, stateful monolith that needs a pet VM? Only then do you fall back to an Instance (EC2, maybe even with an ASG).
Automate logic, not instance counts
Your job is no longer to be a VM mechanic. Your team’s skills need to shift. Stop manually tuning desired_capacity and start designing event-driven systems.
Focus on scaling logic, not servers. Your scaling trigger shouldn’t be “CPU is at 80%.” It should be “The SQS queue depth is greater than 100” or “API latency just breached 200ms”. Let the platform, be it Lambda, Fargate, or a KEDA-powered Kubernetes cluster, figure out how to add more processing power.
Was it really better in the old days?
Of course, this move to abstraction isn’t without trade-offs. We’re gaining a lot, but we’re also losing something.
The gain is obvious: We get our nights and weekends back. We get drastically reduced operational overhead, faster scaling, and for most stateless workloads, a much lower bill.
The loss is control. You can’t SSH into a Fargate container. You can’t run a custom kernel module on Lambda. For those few, truly special, high-customization legacy workloads, this is a dealbreaker. They will be the ASG’s loyal companions in the retirement home.
But for everything else? The ASG is a relic. It was a brilliant, necessary solution for the problems of 2010. But the problems of 2025 and beyond are different. The cloud has evolved to scale logic, functions, and containers, not just nodes.
The king isn’t just dead. The very concept of a throne has been replaced by a highly efficient, distributed, and slightly impersonal serverless committee. And frankly, it’s about time.
It all started with a coffee and a bill. My usual morning routine. But this particular Tuesday, the AWS bill had an extra kick that my espresso lacked. The cost for a handful of m5.large instances had jumped nearly 40% over the past year. I almost spat out my coffee.
I did what any self-respecting Cloud Architect does: I blamed myself. Did I forget to terminate a dev environment? Did I leave a data transfer running to another continent? But no. After digging through the labyrinth of Cost Explorer, the truth was simpler and far more sinister: EC2 was quietly getting more expensive. Spot instances had become as predictable as a cat on a hot tin plate, and my “burstable” CPUs seemed to run out of breath if they had to do more than jog for a few minutes.
EC2, our old, reliable friend. The bedrock of the cloud. It felt like watching your trusty old car suddenly start demanding premium fuel and imported spare parts just to get to the grocery store. Something was off.
And then, it happened. A slip-up in a public Reddit forum. A senior AWS engineer accidentally posted a file named ec2-phaseout-q4–2027.pdf. It was deleted in minutes, but the internet, as we know, has the memory of an elephant with a grudge.
(Disclaimer for the nervous: This PDF is my narrative device. A ghost in the machine. A convenient plot twist. But the trends it points to? The rising costs, the architectural creaks? Those are very, very real. Now, where were we?)
The document was a bombshell. It laid out a plan to deprecate over 80% of current EC2 instance families by the end of 2027, paving the way for a “next-gen compute platform.” Was this real? I made some calls. The first partner laughed it off. The second went quiet, a little too quiet. The third, after I promised to buy them beers for a month, whispered: “We’re already planning the transition for our enterprise clients.”
Bingo.
Why our beloved EC2 is becoming a museum piece
My lead engineer summed it up beautifully last week. “Running real-time ML on today’s EC2,” he sighed, “feels like asking a 2010 laptop to edit 4K video. It’ll do it, but it’ll scream in agony the whole time, and you’d better have a fire extinguisher handy.”
He’s not wrong. For general-purpose apps, EC2 is still a trusty workhorse. But for the demanding, high-performance workloads that are becoming the norm? You can practically see the gray hairs and hear the joints creaking.
This isn’t just about cost. It’s about architecture. EC2 was built for a different era, an era before serverless was cool, before WebAssembly (WASM) was a thing, and before your toaster needed to run a Kubernetes cluster. The cracks are starting to show.
Meet AWS Nucleus, the secret successor
No press release. No re:Invent keynote. But if you’re connected to AWS insiders, you’ve probably heard whispers of a project internally codenamed “Nucleus.” We got access to this stealth-mode compute platform, and it’s unlike anything we’ve used before.
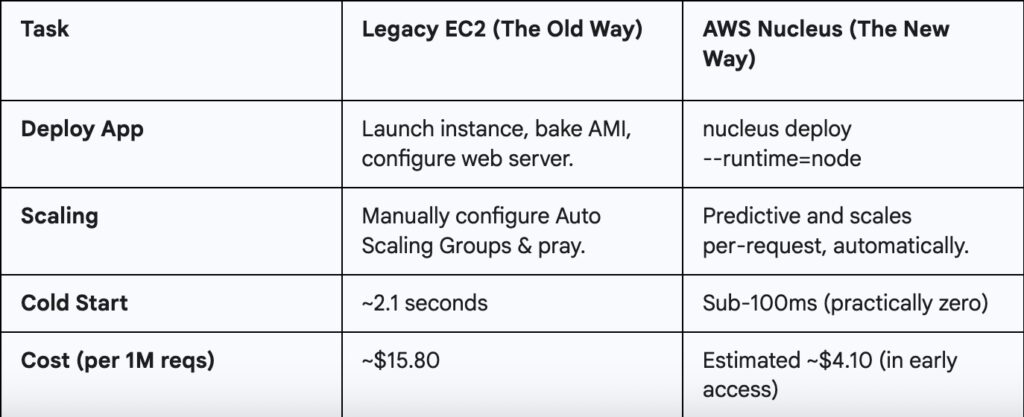
What does it feel like? Think of it this way: if Lambda and Fargate had a baby, and that baby was raised by a bare-metal server with a PhD in performance, you’d get Nucleus. It has the speed and direct hardware access of a dedicated machine, but with the auto-scaling magic of serverless.
Here are some of the early capabilities we’ve observed:
No more cold starts. Unlike Lambda, which can sometimes feel like it’s waking up from a deep nap.
Direct hardware access. Full control over GPU and SSD resources without the usual virtualization overhead.
Predictive autoscaling. It analyzes traffic patterns and scales before the spike hits, not during.
WASM-native runtime. Support for Node.js, Python, Go, and Rust is baked in from the ground up.
It’s not generally available yet, but internal teams and a select few partners are already building on it.
A 30-day head-to-head test
Yes, we triple checked those cost figures. Even if AWS adjusts the pricing after the preview, the efficiency gap is too massive to ignore.
Your survival guide for the coming shift
Let’s be clear, there’s no need to panic and delete all your EC2 instances. But if this memo is even half-right, you don’t want to be caught flat-footed in a few years. Here’s what we’re doing, and what you might want to start experimenting with.
Step 1: Become a cloud whisperer
Start by pinging your AWS Solutions Architect, not directly about “Nucleus,” but something softer:
“Hey, we’re exploring options for more performant, cost-effective compute. Are there any next-gen runtimes or private betas AWS is piloting that we could look into?”
You’ll be surprised what folks share if you ask the right way.
Step 2: test on the shadow platform
Some partners already have early access CLI builds. If you get your hands on one, you’ll notice some familiar patterns.
# Initialize a new service from a template
nucleus init my-api --template=fastapi

# Deploy with a single command
nucleus deploy --env=staging --free-tier
Disclaimer: Not officially available. Use in isolated test environments only. Do not run your production database on this.
Step 3: Run a hybrid setup
If you get preview access, try bridging the old with the new. Here’s a hypothetical Terraform snippet of what that might look like:
# Our legacy EC2 instance for the old monolith
resource "aws_instance" "legacy_worker" {
  ami           = "ami-0b5eea76982371e9" # An old Amazon Linux 2 AMI
  instance_type = "t3.medium"
}

# The new Nucleus service for a microservice
resource "aws_nucleus_service" "new_api" {
  runtime       = "go1.19"
  source_path   = "./app/api"

  # This is the magic part: linking to the old world
  vpc_ec2_links = [aws_instance.legacy_worker.id]
}
We ran a few test loads between legacy workers and the new compute, no regressions, and latency even dropped.
Step 4: Estimate the savings yourself
Even with preview pricing, the gap is noticeable. A simple Python script can give you a rough idea.
# Fictional library to estimate costs
import aws_nucleus_estimator

# Your current monthly bill for a specific workload
current_ec2_cost = 4200

# Estimate based on vCPU hours and memory
# (These numbers are for illustration only)
estimated_nucleus_cost = aws_nucleus_estimator.estimate(
    vcpu_hours=1200,
    memory_gb_hours=2400
)

print(f"Rough monthly savings: ${current_ec2_cost - estimated_nucleus_cost}")
This is bigger than just EC2
Let’s be honest. This shift isn’t just about cutting costs or shrinking cold start times. It’s about redefining what “compute” even means. EC2 isn’t being deprecated because it’s broken. It’s being phased out because modern workloads have evolved, and the old abstractions are starting to feel like training wheels we forgot to take off.
A broader pattern is emerging across the industry. What AWS is allegedly doing with Nucleus mirrors a larger movement:
Google Cloud is reportedly piloting a Cloud Run variant that uses a WASM-based runtime.
Microsoft Azure is quietly testing a system to blur the line between containers and functions.
Oracle, surprisingly, has been sponsoring development tools optimized for WASM-native environments.
The foundational idea is clear: cloud platforms are moving toward fast-boot, auto-scaling, WASM-capable compute that sits somewhere between Lambda and Kubernetes, but without the overhead of either.
Is EC2 the new legacy?
It’s strange to say, but EC2 is starting to feel like “bare metal” did a decade ago: powerful, essential, but something you try to abstract away.
One of our SREs shared this gem the other day:
“A couple of our junior engineers thought EC2 was some kind of disaster recovery tool for Kubernetes.”
That’s from a Fortune 100 company. When your flagship infrastructure service starts raising eyebrows from fresh grads, you know a generational shift is underway.
The cloud is evolving, again. But this isn’t a gentle, planned succession. It’s a Cambrian explosion in real-time. New, bizarre forms of compute are crawling out of the digital ooze, and the old titans, once thought invincible, are starting to look slow and clumsy. They don’t get a gold watch and a retirement party. They become fossils, their skeletons propping up the new world.
EC2 isn’t dying tomorrow. It’s becoming a geological layer. It’s the bedrock, the sturdy but unglamorous foundation upon which nimbler, more specialized predators will hunt. The future isn’t about killing the virtual machine; it’s about making it an invisible implementation detail. In the same way, most of us stopped thinking about the physical server racks in a data center, we’ll soon stop thinking about the VM. We’ll just care about the work that needs doing.
So no, EC2 isn’t dying. It’s becoming a legend. And in the fast-moving world of technology, legends belong in museums, admired from a safe distance.
It was a Tuesday. I did what I’ve done a thousand times: I logged into an Amazon EC2 instance using its public IP, a respectable 52.95.110.21. Routine stuff. Once inside, muscle memory took over, and I typed ip addr to see the network configuration.
And then I blinked.
inet 10.0.10.147/24.
I checked my terminal history. Yes, I had connected to 52.95.110.21. So, where did this 10.0.10.147 character come from? And more importantly, where on earth was the public IP I had just used? For a moment, I felt like a detective at a crime scene where the main evidence had vanished into thin air. I questioned my sanity, my career choice, and the very fabric of the TCP/IP stack.
Suppose you’ve ever felt this flicker of confusion, congratulations. You’ve just stumbled upon one of AWS’s most elegant sleights of hand. The truth is, the public IP doesn’t exist inside the instance. It’s a ghost. A label. A brilliant illusion.
Let’s put on our detective hats and solve this mystery.
Meet the real resident
Every EC2 instance, upon its creation, is handed a private IP address. Please think of this as its legal name, the one on its birth certificate. It’s the address it uses to talk to its neighbors within its cozy, gated community, the Virtual Private Cloud (VPC). This instance, 10.0.10.147, is perfectly happy using this address to get a cup of sugar from the database next door at 10.0.10.200. It’s private, it’s intimate, and frankly, it’s nobody else’s business.
The operating system itself, be it Ubuntu, Amazon Linux, or Windows, is blissfully unaware of any other identity. As far as it’s concerned, its name is 10.0.10.147, and that’s the end of the story. If you check its network configuration, that’s the only IP you’ll see.
# Check the network interface, see only the private IP
$ ip -4 addr show dev eth0 | grep inet
    inet 10.0.10.147/24 brd 10.0.10.255 scope global dynamic eth0
So, if the instance only knows its private name, how does it have a public life on the internet?
The master of disguise
The magic happens outside the instance, at the edge of your VPC. Think of the AWS Internet Gateway as a ridiculously efficient bouncer at an exclusive club. Your instance, wanting to go online, walks up to the bouncer and whispers, “Hey, I’m 10.0.10.147 And I need to fetch a cat picture from the internet.“
The bouncer nods, turns to the vast, chaotic world of the internet, and shouts, “HEY, TRAFFIC FOR 52.95.110.21, COME THIS WAY!”
This translation trick is called 1-to-1 Network Address Translation (NAT). The Internet Gateway maintains a secret map that links the public IP to the private IP. The public IP is just a mask, a public-facing persona. It never actually gets assigned to the instance’s network interface. It’s all handled by AWS behind the scenes, a performance so smooth you never even knew it was happening.
When your instance sends traffic out, the bouncer (Internet Gateway) swaps the private source IP for the public one. When return traffic comes back, the bouncer swaps it back. The instance is none the wiser. It lives its entire life thinking its name is 10.0.10.147, completely oblivious to its international fame as 52.95.110.21.
Interrogating the local gossip
So, the instance is clueless. But what if we, while inside, need to know its public identity? What if we need to confirm our instance’s public IP for a firewall rule somewhere else? We can’t just ask the operating system.
Fortunately, AWS provides a nosy neighbor for just this purpose: the Instance Metadata Service. This is a special, link-local address (169.254.169.254) that an instance can query to learn things about itself, things the operating system doesn’t know. It’s the local gossip line.
To get the public IP, you first have to get a temporary security token (because even gossip has standards these days), and then you can ask your question.
# First, grab a session token. This is good for 6 hours (21600 seconds).
$ TOKEN=$(curl -s -X PUT "http://169.254.169.254/latest/api/token" -H "X-aws-ec2-metadata-token-ttl-seconds: 21600")

# Now, use the token to ask for the public IP
$ curl -s -H "X-aws-ec2-metadata-token: $TOKEN" http://169.254.169.254/latest/meta-data/public-ipv4
52.95.110.21
And there it is. The ghost in the machine, confirmed.
A detective’s field guide
Now that you’re in on the secret, you can avoid getting duped. Here are a few field notes to keep in your detective’s journal.
The clueless security guard. If you’re configuring a firewall inside your instance (like iptables or UFW), remember that it only knows the instance by its private IP. Don’t try to create a rule for your public IP; the firewall will just stare at you blankly. Always use the private IP for internal security configurations.
The persistent twin: What if you need a public IP that doesn’t change every time you stop and start your instance? That’s what an Elastic IP (EIP) is for. But don’t be fooled. An EIP is just a permanent public IP that you own. Behind the scenes, it works the same way: it’s a persistent mask mapped via NAT to your instance’s private IP. The instance remains just as gloriously ignorant as before.
The vanishing act. If you’re not using an Elastic IP, your instance’s public IP is ephemeral. It’s more like a hotel room number than a home address. Stop the instance, and it gives up the IP. Start it again, and it gets a brand new one. This is a classic “gotcha” that has broken countless DNS records and firewall rules.
The case is closed
So, the next time you log into an EC2 instance and see a private IP, don’t panic. You haven’t SSH’d into your smart fridge by mistake. You’re simply seeing the instance for who it truly is. The public IP was never missing; it was just a clever disguise, an elegant illusion managed by AWS so your instance can have a public life without ever having to deal with the paparazzi. The heavy lifting is done for you, leaving your instance to worry about more important things. Like serving those cat pictures.
Accessing EC2 instances used to be a hassle. Bastion hosts, SSH keys, firewall rules, each piece added another layer of complexity and potential security risks. You had to open ports, distribute keys, and constantly manage access. It felt like setting up an intricate vault just to perform simple administrative tasks.
AWS Session Manager changes the game entirely. No exposed ports, no key distribution nightmares, and a complete audit trail of every session. Think of it as replacing traditional keys and doors with a secure, on-demand teleportation system, one that logs everything.
How AWS Session Manager works
Session Manager is part of AWS Systems Manager, a fully managed service that provides secure, browser-based, and CLI-based access to EC2 instances without needing SSH or RDP. Here’s how it works:
An SSM Agent runs on the instance and communicates outbound to AWS Systems Manager.
When you start a session, AWS verifies your identity and permissions using IAM.
Once authorized, a secure channel is created between your local machine and the instance, without opening any inbound ports.
This approach significantly reduces the attack surface. There is no need to open port 22 (SSH) or 3389 (RDP) for bastion hosts. Moreover, since authentication and authorization are managed by IAM policies, you no longer have to distribute or rotate SSH keys.
Setting up AWS Session Manager
Getting started with Session Manager is straightforward. Here’s a step-by-step guide:
1. Ensure the SSM agent is installed
Most modern Amazon Machine Images (AMIs) come with the SSM Agent pre-installed. If yours doesn’t, install it manually using the following command (for Amazon Linux, Ubuntu, or RHEL):
Replace REGION, ACCOUNT_ID, and INSTANCE_ID with your actual values. For best security practices, apply the principle of least privilege by restricting access to specific instances or tags.
3. Connect to your instance
Once the IAM role is attached, you’re ready to connect.
From the AWS Console: Navigate to EC2 > Instances, select your instance, click Connect, and choose Session Manager.
Session Manager doesn’t just improve security, it also enhances compliance and auditing. Every session can be logged to Amazon S3 or CloudWatch Logs, capturing a full record of all executed commands. This ensures complete visibility into who accessed which instance and what actions were taken.
To enable logging, navigate to AWS Systems Manager > Session Manager, configure Session Preferences, and enable logging to an S3 bucket or CloudWatch Log Group.
Why Session Manager is better than traditional methods
Let’s compare Session Manager with traditional access methods:
Feature
Bastion Host & SSH
AWS Session Manager
Open inbound ports
Yes (22, 3389)
No
Requires SSH keys
Yes
No
Key rotation required
Yes
No
Logs session activity
Manual setup
Built-in
Works for on-premises
No
Yes
Session Manager removes unnecessary complexity. No more juggling bastion hosts, no more worrying about expired SSH keys, and no more open ports that expose your infrastructure to unnecessary risks.
Real-World applications and operational Benefits
Session Manager is not just a theoretical improvement, it delivers real-world value in multiple scenarios:
Developers can quickly access production or staging instances without security concerns.
System administrators can perform routine maintenance without managing SSH key distribution.
Security teams gain complete visibility into instance access and command history.
Hybrid cloud environments benefit from unified access across AWS and on-premises infrastructure.
With these advantages, Session Manager aligns perfectly with modern cloud-native security principles, helping teams focus on operations rather than infrastructure headaches.
In summary
AWS Session Manager isn’t just another tool, it’s a fundamental shift in how we access EC2 instances securely. If you’re still relying on bastion hosts and SSH keys, it’s time to rethink your approach.Try it out, configure logging, and experience a simpler, more secure way to manage your instances. You might never go back to the old ways.
There’s a hidden art to placing your EC2 instances in AWS. It’s not just about spinning up machines and hoping for the best, where they land in AWS’s vast infrastructure can make all the difference in performance, resilience, and cost. This is where Placement Groups come in.
You might have deployed instances before without worrying about placement, and for many workloads, that’s perfectly fine. But when your application needs lightning-fast communication, fault tolerance, or optimized performance, Placement Groups become a critical tool in your AWS arsenal.
Let’s break it down.
What are Placement Groups?
AWS Placement Groups give you control over how your EC2 instances are positioned within AWS’s data centers. Instead of leaving it to chance, you can specify how close, or how far apart, your instances should be placed. This helps optimize either latency, fault tolerance, or a balance of both.
There are three types of Placement Groups: Cluster, Spread, and Partition. Each serves a different purpose, and choosing the right one depends on your application’s needs.
Types of Placement Groups and when to use them
Cluster Placement Groups for speed over everything
Think of Cluster Placement Groups like a Formula 1 pit crew. Every millisecond counts, and your instances need to communicate at breakneck speeds. AWS achieves this by placing them on the same physical hardware, minimizing latency, and maximizing network throughput.
This is perfect for: ✅ High-performance computing (HPC) clusters ✅ Real-time financial trading systems ✅ Large-scale data processing (big data, AI, and ML workloads)
⚠️ The Trade-off: While these instances talk to each other at lightning speed, they’re all packed together on the same hardware. If that hardware fails, everything inside the Cluster Placement Group goes down with it.
Spread Placement Groups for maximum resilience
Now, imagine you’re managing a set of VIP guests at a high-profile event. Instead of seating them all at the same table (risking one bad spill ruining their night), you spread them out across different areas. That’s what Spread Placement Groups do, they distribute instances across separate physical machines to reduce the impact of hardware failure.
Best suited for: ✅ Mission-critical applications that need high availability ✅ Databases requiring redundancy across multiple nodes ✅ Low-latency, fault-tolerant applications
⚠️ The Limitation: AWS allows only seven instances per Availability Zone in a Spread Placement Group. If your application needs more, you may need to rethink your architecture.
Partition Placement Groups, the best of both worlds approach
Partition Placement Groups work like a warehouse with multiple sections, each with its power supply. If one section loses power, the others keep running. AWS follows the same principle, grouping instances into multiple partitions spread across different racks of hardware. This provides both high performance and resilience, a sweet spot between Cluster and Spread Placement Groups.
Best for: ✅ Distributed databases like Cassandra, HDFS, or Hadoop ✅ Large-scale analytics workloads ✅ Applications needing both performance and fault tolerance
⚠️ AWS’s Partitioning Rule: The number of partitions you can use depends on the AWS Region, and you must carefully plan how instances are distributed.
How to Configure Placement Groups
Setting up a Placement Group is straightforward, and you can do it using the AWS Management Console, AWS CLI, or an SDK.
🚀 Combine with Multi-AZ Deployments: Placement Groups work within a single Availability Zone, so consider spanning multiple AZs for maximum resilience.
📊 Monitor Network Performance: AWS doesn’t guarantee placement if your instance type isn’t supported or there’s insufficient capacity. Always benchmark your performance after deployment.
💰 Balance Cost and Performance: Cluster Placement Groups give the fastest network speeds, but they also increase failure risk. If high availability is critical, Spread or Partition Groups might be a better fit.
Final thoughts
AWS Placement Groups are a powerful but often overlooked feature. They allow you to maximize performance, minimize downtime, and optimize costs, but only if you choose the right type.
The next time you deploy EC2 instances, don’t just launch them randomly, placement matters. Choose wisely, and your infrastructure will thank you for it.
Picture yourself running a restaurant. Every morning before opening, you would check different things: Are the refrigerators working? Is there power in the building? Does the kitchen equipment function properly? These checks ensure your restaurant can serve customers effectively. Similarly, Amazon Web Services (AWS) performs various checks on your EC2 instances to ensure they’re running smoothly. Let’s break this down in simple terms.
What are EC2 status checks?
Think of EC2 status checks as your instance’s health monitoring system. Just like a doctor checks your heart rate, blood pressure, and temperature, AWS continuously monitors different aspects of your EC2 instances. These checks happen automatically every minute, and best of all, they are free!
The three types of status checks
1. System status checks as the building inspector
System status checks are like a building inspector. They focus on the infrastructure rather than what is happening in your instance. These checks monitor:
The physical server’s power supply
Network connectivity
System software
Hardware components
When a system status check fails, it is usually an issue outside your control. It is akin to when your apartment building loses power – there’s not much you can do personally to fix it. In these cases, AWS is responsible for the repairs.
What can you do if it fails?
Wait for AWS to fix the underlying problem (similar to waiting for the power company to restore electricity).
You can move your instance to a new “building” by stopping and starting it (note: this is different from simply rebooting).
2. Instance status checks as your personal space monitor
Instance status checks are like having a smart home system that monitors what is happening inside your apartment. These checks look at:
Your instance’s operating system
Network configuration
Software settings
Memory usage
File system status
Kernel compatibility
When these checks fail, it typically means there’s an issue you need to address. It is similar to accidentally tripping a circuit breaker in your apartment – the infrastructure is fine, but the problem is within your own space.
How to fix instance status check failures:
Restart your instance (like resetting that tripped circuit breaker).
Review and modify your instance configuration.
Make sure your instance has enough memory.
Check for corrupted file systems and repair them if needed.
3. EBS status checks as your storage guardian
EBS status checks are like monitoring your external storage unit. They monitor the health of your attached storage volumes and can detect issues like:
Hardware problems with the storage system
Connectivity problems between your instance and its storage
Physical host issues affecting storage access
What to do if EBS checks fail:
Restart your instance to try to restore connectivity.
Replace problematic EBS volumes.
Check and fix any connectivity issues.
How to monitor these checks
Monitoring status checks is straightforward, and you have several options:
Using the AWS management console
Open the EC2 console.
Select your instance.
Look at the “Status Checks” tab.
It’s that simple! You’ll see either a green check (passing) or a red X (failing) for each type of check.
Setting up automated monitoring
Now, here’s where things get interesting. You can set up Amazon CloudWatch to alert you if something goes wrong. It is like having a security system that notifies you if there is an issue.
–namespace and –metric-name: These identify the CloudWatch metric you are interested in.
–dimensions: Specifies the instance ID being monitored.
–period and –evaluation-periods: Define how often to check and for how long.
–threshold and –comparison-operator: Set the condition for triggering an alarm.
–alarm-actions: The action to take if the alarm state is triggered, like notifying you via SNS.
You could also set up these alarms through the AWS Management Console, which offers an intuitive UI for configuring CloudWatch.
Best practices for status checks
1. Don’t wait for problems
Set up CloudWatch alarms for all critical instances.
Monitor trends in status check results.
Document common issues and their solutions to improve response times.
2. Automate recovery
Configure automatic recovery actions for system status check failures.
Create automated backup systems and recovery procedures.
Test recovery processes regularly to ensure they work when needed.
3. Keep records
Log all status check failures.
Document steps taken to resolve issues.
Track recurring problems and implement solutions to prevent future failures.
Cost considerations
The good news? Status checks themselves are free! However, some recovery actions might incur costs, such as:
Starting and stopping instances (which might change your public IP).
Data transfer costs during recovery.
Additional EBS volumes if replacements are needed.
Real-World example
Imagine you receive an alert at 3 AM about a failed system status check. Here is how you might handle it:
Check the AWS status page: See if there is a broader AWS issue.
If it is isolated to your instance:
Stop and start the instance (not just reboot).
Check if the issue persists once the instance moves to new hardware.
If the problem continues:
Review instance logs for more clues.
Contact AWS Support if the issue is beyond your expertise or remains unresolved.
Final thoughts
EC2 status checks are your early warning system for potential problems. They are simple to understand but incredibly powerful for keeping your applications running smoothly. By monitoring these checks and setting up appropriate alerts, you can catch and address problems before they impact your users.
Remember: the best problems are the ones you prevent, not the ones you fix. Regular monitoring and proper setup of status checks will help you sleep better at night, knowing your instances are being watched over.
Next time you log into your AWS console, take a moment to check your status checks. They’re like a 24/7 health monitoring system for your cloud infrastructure, ensuring you maintain a healthy, reliable system.
Imagine exploring a vast universe, not of stars and galaxies, but of containers and cloud services. In AWS, this universe is populated by stellar services like ECS, EKS, Fargate, and ECR. Each, with its unique characteristics, serves different purposes, like stars in the constellation of cloud computing.
ECS: The Versatile Heart of AWS, ECS is like an experienced team of astronauts, managing entire fleets of containers efficiently. Picture a global logistics company using ECS to coordinate real-time shipping operations. Each container is a digital package, precisely transported to its destination. The scalability and security of ECS ensure that, even on the busiest days, like Black Friday, everything flows smoothly.
EKS: Kubernetes Orchestration in AWS, Think of EKS as a galactic explorer, harnessing the power of Kubernetes within the AWS cosmos. A university hospital uses EKS to manage electronic medical records. Like an advanced navigation system, EKS directs information through complex routes, maintaining the integrity and security of critical data, even as it expands into new territories of research and treatment.
Fargate: Containers without Server Chains, Fargate is like the anti-gravity of container services: it removes the weight of managing servers. Imagine a TV network using Fargate to broadcast live events. Like a spaceship that automatically adjusts to space conditions, Fargate scales resources to handle millions of viewers without the network having to worry about technical details.
ECR: The Image Warehouse in AWS Space, Finally, ECR can be seen as a digital archive in space, where container images are securely stored. A gaming startup stores versions of its software in ECR, ready to be deployed at any time. Like a well-organized archive, ECR allows this company to quickly retrieve what it needs, ensuring the latest games hit the market faster.
The Elegant Transition: From Complex Orchestration to Streamlined Efficiency
ECS: When Precision and Control Matter, Use ECS when you need fine-grained control over your container orchestration. It’s like choosing a manual transmission over automatic; you get to decide exactly how your containers run, network, and scale. It’s perfect for customized workflows and specific performance needs, much like a tailor-made suit.
EKS: For the Kubernetes Enthusiasts, Opt for EKS when you’re already invested in Kubernetes or when you need its specific features and community-driven plugins. It’s like using a Swiss Army knife; it offers flexibility and a range of tools, ideal for complex applications that require Kubernetes’ extensibility.
Fargate: Simplicity and Efficiency First, Choose Fargate when you want to focus on your application rather than infrastructure. It’s akin to flying autopilot; you define your destination (application), and Fargate handles the journey (server and cluster management). It’s best for straightforward applications where efficiency and ease of use are paramount.
ECR: Enhanced Container Registry for Docker and OCI Images
Leverage ECR for a secure, scalable environment to store and manage not just your Docker images but also OCI (Open Container Initiative) images. Envision ECR as a high-security vault that caters to the most utilized image format in the industry while also embracing the versatility of OCI standards. This dual compatibility ensures seamless integration with ECS and EKS and positions ECR as a comprehensive solution for modern container image management—crucial for organizations committed to security and forward compatibility.
Synthesizing Our Cosmic AWS Voyage
In this expedition through AWS’s container services, we’ve not only explored the distinct capabilities of ECS, EKS, Fargate, and ECR but also illuminated the scenarios where each shines brightest. Like celestial guides in the vast expanse of cloud computing, these services offer tailored paths to stellar solutions.
Choosing between them is less about picking the ‘best’ and more about aligning with your specific mission needs. Whether it’s the tailored precision of ECS, the expansive toolkit of EKS, the streamlined simplicity of Fargate, or the secure repository of ECR, each service is a specialized instrument in our technological odyssey.
Remember, understanding these services is not just about comprehending their technicalities but about appreciating their place in the grand scheme of cloud innovation. They are not just tools; they are the building blocks of modern digital architectures, each playing a pivotal role in scripting the future of technology.