DevSecOps

Trust your images again with Docker Scout

Containers behave perfectly until you check their pockets. Then you find an elderly OpenSSL and a handful of dusty transitive dependencies that they swore they did not know. Docker Scout is the friend who quietly pats them down at the door, lists what they are carrying, and whispers what to swap so the party does not end with a security incident.

This article is a field guide for getting value from Docker Scout without drowning readers in output dumps. It keeps the code light, focuses on practical moves, and uses everyday analogies instead of cosmic prophecy. By the end, you will have a small set of habits that reduce late‑night pages and cut vulnerability noise to size.

Why scanners overwhelm and what to keep

Most scanners are fantastic at finding problems and terrible at helping you fix the right ones first. You get a laundry basket full of CVEs, you sort by severity, and somehow the pile never shrinks. What you actually need is:

  • Context plus action: show the issues and show exactly what to change, especially base images.
  • Comparison across builds: did this PR make things better or worse?
  • A tidy SBOM: not a PDF doorstop, an artifact you can diff and feed into tooling.

Docker Scout leans into those bits. It plugs into the Docker tools you already use, gives you short summaries when you need them, and longer receipts when auditors appear.

What Docker Scout actually gives you

  • Quick risk snapshot with counts by severity and a plain‑language hint if a base image refresh will clear most of the mess.
  • Targeted recommendations that say “move from X to Y” rather than “good luck with 73 Mediums.”
  • Side‑by‑side comparisons so you can fail a PR only when it truly regresses security.
  • SBOM on demand in useful formats for compliance and diffs.

That mix turns CVE management from whack‑a‑mole into something closer to doing the dishes with a proper rack. The plates dry, nothing falls on the floor, and you get your counter space back.

A five-minute tour

Keep this section handy. It is the minimum set of commands that deliver outsized value.

# 1) Snapshot risk and spot low‑hanging fruit
# Tip: use a concrete tag to keep comparisons honest
docker scout quickview acme/web:1.4.2

# 2) See only the work that unblocks a release
# Critical and High issues that already have fixes
docker scout cves acme/web:1.4.2 \
  --only-severities critical,high \
  --only-fixed

# 3) Ask for the shortest path to green
# Often this is just a base image refresh
docker scout recommendations acme/web:1.4.2

# 4) Check whether a PR helps or hurts
# Fail the check only if the new image is riskier
docker scout compare acme/web:1.4.1 --to acme/web:1.4.2

# 5) Produce an SBOM you can diff and archive
docker scout sbom acme/web:1.4.2 --format cyclonedx-json > sbom.json

Pro tip
Run QuickView first, follow it with recommendations, and treat Compare as your gate. This sequence removes bikeshedding from PR reviews.

One small diagram to keep in your head

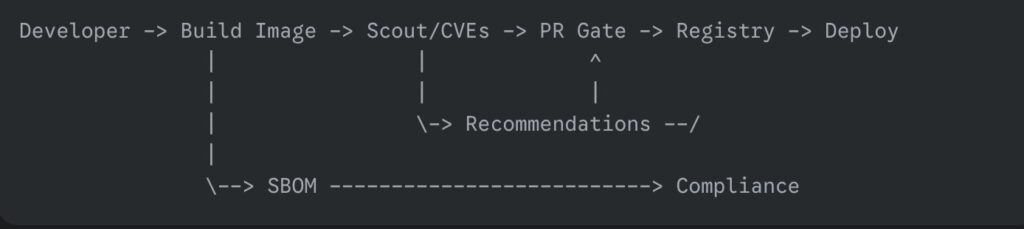
Nothing exotic here. You do not need a new mental model, only a couple of strategic checks where they hurt the least.

A pull request check that is sharp but kind

You want security to act like a seatbelt, not a speed bump. The workflow below uploads findings to GitHub Code Scanning for visibility and uses a comparison gate so PRs only fail when risk goes up.

name: Container Security
on: [pull_request, push]

jobs:
  scout:
    runs-on: ubuntu-latest
    permissions:
      contents: read
      pull-requests: write
      security-events: write   # upload SARIF
    steps:
      - uses: actions/checkout@v4

      - name: Login to Docker Hub
        uses: docker/login-action@v3
        with:
          username: ${{ secrets.DOCKERHUB_USERNAME }}
          password: ${{ secrets.DOCKERHUB_TOKEN }}

      - name: Build image
        run: |
          docker build -t ghcr.io/acme/web:${{ github.sha }} .

      - name: Analyze CVEs and upload SARIF
        uses: docker/scout-action@v1
        with:
          command: cves
          image: ghcr.io/acme/web:${{ github.sha }}
          only-severities: critical,high
          only-fixed: true
          sarif-file: scout.sarif

      - name: Upload SARIF to Code Scanning
        uses: github/codeql-action/upload-sarif@v3
        with:
          sarif_file: scout.sarif

      - name: Compare against latest and fail on regression
        if: github.event_name == 'pull_request'
        uses: docker/scout-action@v1
        with:
          command: compare
          image: ghcr.io/acme/web:${{ github.sha }}
          to-latest: true
          exit-on: vulnerability
          only-severities: critical,high

Why this works:

  • SARIF lands in Code Scanning, so the whole team sees issues inline.
  • The compare step keeps momentum. If the PR makes the risk lower than or equal to, it passes. If it makes things worse at High or Critical, it fails.
  • The gate is opinionated about fixed issues, which are the ones you can actually do something about today.

Triage that scales beyond one heroic afternoon

People love big vulnerability cleanups the way they love moving house. It feels productive for a day, and then you are exhausted, and the boxes creep back in. Try this instead:

Set a simple SLA

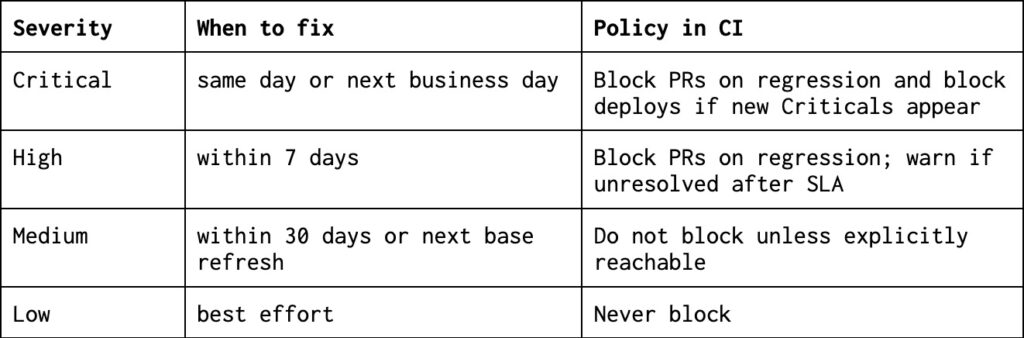
Push on two levers before touching the application code

  1. Refresh the base image suggested by the recommendations. This often clears the noisy majority in minutes.
  2. Switch to a slimmer base if your app allows it. debian:bookworm-slim or a minimal distroless image reduces attack surface, and your scanner reports will look cleaner because there is simply less there.

Use comparisons to stop bikeshedding
Make the conversation about direction rather than absolutes. If each PR is no worse than the baseline, you are winning.

Document exceptions as artifacts
When something is not reachable or is mitigated elsewhere, record it alongside the SBOM or in your tracking system. Invisible exceptions return like unwashed coffee mugs.

Common traps and how to step around them

The base image is doing most of the damage
If your report looks like a fireworks show, run recommendations. If it says “update base” and you ignore it, you are choosing to mop the floor while the tap stays open.

You still run everything as root
Even perfect CVE hygiene will not save you if the container has god powers. If you can, adopt a non‑root user and a slimmer runtime image. A typical multi‑stage pattern looks like this:

# Build stage
FROM golang:1.22 as builder
WORKDIR /src
COPY . .
RUN CGO_ENABLED=0 GOOS=linux go build -o /bin/app ./cmd/api

# Runtime stage
FROM gcr.io/distroless/static:nonroot
COPY --from=builder /bin/app /app
USER nonroot:nonroot
ENTRYPOINT ["/app"]

Now your scanner report shrinks, and your container stops borrowing the keys to the building.

Your scanner finds Mediums you cannot fix today
Save your energy for issues with available fixes or for regressions. Mediums without fixes belong on a to‑do list, not a release gate.

The team treats the scanner as a chore
Keep the feedback quick and visible. Short PR notes, one SBOM per release, and a small monthly base refresh beat quarterly crusades.

Working with registries without drama

Local images work out of the box. For remote registries, enable analysis where you store images and authenticate normally through Docker. If you are using a private registry such as ECR or ACR, link it through the vendor’s integration or your registry settings, then keep using the same CLI commands. The aim is to avoid side channels and keep your workflow boring on purpose.

A lightweight checklist you can adopt this week

  1. Baseline today: run QuickView on your main images and keep the outputs as a reference.
  2. Gate on direction: use compare in PRs with exit-on: vulnerability limited to High and Critical.
  3. Refresh bases monthly: schedule a small chore day where you accept the recommended base image bumps and rebuild.
  4. Keep an SBOM: publish cyclonedx-json or SPDX for every release so audits are not a scavenger hunt.
  5. Write down exceptions: if you decide not to fix something, make the decision discoverable.

Frequently asked questions you will hear in standups

Can we silence CVEs that we do not ship to production
Yes. Focus on fixed Highs and Criticals, and gate only on regressions. Most other issues are housekeeping.

Will this slow our builds?
Not meaningfully when you keep output small and comparisons tight. It is cheaper than a hotfix sprint on Friday.

Do we need another dashboard?
You need visibility where developers live. Upload SARIF to Code Scanning, and you are done. The fewer tabs, the better.

Final nudge

Security that ships beats security that lectures. Start with a baseline, gate on direction, and keep a steady rhythm of base refreshes. In a couple of sprints, you will notice fewer alarms, fewer debates, and release notes that read like a grocery receipt instead of a hostage letter.

If your containers still show up with suspicious items in their pockets, at least now you can point to the pocket, the store it came from, and the cheaper replacement. That tiny bit of provenance is often the difference between a calm Tuesday and a war room with too much pizza.

If you remember nothing else, remember three habits. Run QuickView on your main images once a week. Let compare guard your pull requests. Accept the base refresh that Scout recommends each month. Everything else is seasoning.

Measure success by absence. Fewer “just-one-hotfix” pings at five on Friday. Fewer meetings where severity taxonomies are debated like baby names. More merges that feel like brushing your teeth, brief, boring, done.

Tools will not make you virtuous, but good routines will. Docker Scout shortens the routine and thins the excuses. Baseline today, set the gate, add a tiny chore to the calendar, and then go do something nicer with your afternoon.

Why enterprise DevOps initiatives fail and how to fix them

Getting DevOps right in large companies is tricky. It’s been around for nearly two decades, from developers wanting deployment control. It gained traction around 2011-2015, boosted by Gartner, SAFe, and AWS’s rise, pushing CIOs to learn from agile startups.

Despite this history, many DevOps initiatives stumble. Why? Often, the approach misses fundamental truths about making DevOps work in complex enterprises with multi-cloud setups, legacy systems, and pressure for faster results. Let’s explore common pitfalls and how to get back on track.

Thinking DevOps is just another IT project

This is crucial. DevOps isn’t just new tools or org charts; it’s a cultural shift. It’s about Dev, Ops, Sec, and the business working together smoothly, focused on customer value, agility, and stability.

Treating it like a typical project is like fixing a building’s crumbling foundation by painting the walls, you ignore the deep, structural changes needed. CIOs might focus narrowly on IT implementation, missing the vital cultural shift. Overlooking connections to customer value, security, scaling, and governance is easy but detrimental. Siloing DevOps leads to slower cycles and business disconnects.

How to Fix It: Ensure shared understanding of DevOps/Agile principles. Run workshops for Dev and Ops to map the value stream and find bottlenecks. Forge a shared vision balancing innovation speed and operational stability, the core DevOps tension.

Rushing continuous delivery without solid operations

The allure of CI/CD is strong, but pushing continuous deployment everywhere without robust operations is like building a race car without good brakes or steering, you might crash.

Not every app needs constant updates, nor do users always want them. Does the business grasp the cost of rigorous automated testing required for safe, frequent deployments? Do teams have the operational muscle: solid security, deep observability, mature AIOps, reliable rollbacks? Too often, we see teams compromise quality for speed.

The massive CrowdStrike outage is a stark reminder: pushing changes fast without sufficient safeguards is risky. To keep evolving… without breaking things, we need to test everything. Remember benchmarks: only 18% achieve elite performance (on-demand deploys, <5% failure, <1hr recovery); high performers deploy daily/weekly (<10% failure, <1 day recovery).

How to Fix It: Use a risk-based approach per application. For frequent deployments, demand rigorous testing, deep observability (using SRE principles like SLOs), canary releases, and clear Error Budgets.

Neglecting user and developer experiences

Focusing solely on automation pipelines forgets the humans involved: end-users and developers.

Feature flags, for instance, are often just used as on/off switches. They’re versatile tools for safer rollouts, A/B testing, and resilience, missing this potential is a loss.

Another pitfall: overloading developers by shifting too much infrastructure, testing, and security work “left” without proper support. This creates cognitive overload and kills productivity, imposing a “developer tax”, it’s unrealistic to expect developers to master everything.

How to Fix It: Discuss how DevOps practices impact people. Is the user experience good? Is the developer experience smooth, or are engineers drowning? Define clear roles. Consider a Platform Engineering team to provide self-service tools that reduce developer burden.

Letting tool choices run wild without standards

Empowering teams to choose tools is good, but complete freedom leads to chaos, like builders using incompatible materials. It creates technical debt and fragility.

Platform Engineering helps by providing reusable, self-service components (CI/CD, observability, etc.), creating “paved roads” with embedded standards. Most orgs now have platform teams, boosting productivity and quality. Focusing only on tools without solid architecture causes issues. “Automation can show quick wins… but poor architecture leads to operational headaches”.

How to Fix It: Balance team autonomy with clear standards via Platform Engineering or strong architectural guidance. Define tool adoption processes. Foster collaboration between DevOps, platform, architecture, and delivery teams on shared capabilities.

Expecting teams to magically handle risk

Shifting security “left” doesn’t automatically mean risks are managed effectively. Do teams have the time, expertise, and tools for proactive mitigation? Many orgs lack sufficient security support for all teams.

Thinking security is just managing vulnerability lists is reactive. True DevSecOps builds security in. Data security is also often overlooked, with severe consequences. AI code generation adds another layer requiring rigorous testing.

How to Fix It: Don’t just assume teams handle risk. Require risk mitigation and tech debt on roadmaps. Implement automated security testing, regular security reviews, and threat modeling. Define release management with risk checkpoints. Leverage SRE practices like production readiness reviews (PRRs).

The CIO staying Hands-Off until there’s a crisis

A fundamental mistake CIOs make is fully delegating DevOps and only getting involved during crises. Because DevOps often feels “in the weeds,” it tends to be pushed down the hierarchy. But DevOps is strategic, it’s about delivering value faster and more reliably.

Given DevOps’ evolution, expect varied interpretations. As a CIO, be proactively involved. Shape the culture, engage regularly (not just during crises), champion investments (platforms, training, SRE), and ensure alignment with business needs and risk tolerance.

How to Fix It: Engage early and consistently. Champion the culture shift. Ask about value delivery, risk management, and developer productivity. Sponsor platform/SRE teams. Ensure business alignment. Your active leadership is crucial.

Avoiding these pitfalls isn’t magic, DevOps is a continuous journey. But understanding these traps and focusing on culture, solid operations, user/developer experience, sensible standards, proactive risk management, and engaged leadership significantly boosts your chances of building a DevOps capability that delivers real business value.

How ABAC and Cross-Account Roles Revolutionize AWS Permission Management

Managing permissions in AWS can quickly turn into a juggling act, especially when multiple AWS accounts are involved. As your organization grows, keeping track of who can access what becomes a real headache, leading to either overly permissive setups (a security risk) or endless policy updates. There’s a better approach: ABAC (Attribute-Based Access Control) and Cross-Account Roles. This combination offers fine-grained control, simplifies management, and significantly strengthens your security.

The fundamentals of ABAC and Cross-Account roles

Let’s break these down without getting lost in technicalities.

First, ABAC vs. RBAC. Think of RBAC (Role-Based Access Control) as assigning a specific key to a particular door. It works, but what if you have countless doors and constantly changing needs? ABAC is like having a key that adapts based on who you are and what you’re accessing. We achieve this using tags – labels attached to both resources and users.

  • RBAC: “You’re a ‘Developer,’ so you can access the ‘Dev’ database.” Simple, but inflexible.
  • ABAC: “You have the tag ‘Project: Phoenix,’ and the resource you’re accessing also has ‘Project: Phoenix,’ so you’re in!” Far more adaptable.

Now, Cross-Account Roles. Imagine visiting a friend’s house (another AWS account). Instead of getting a copy of their house key (a user in their account), you get a special “guest pass” (an IAM Role) granting access only to specific rooms (your resources). This “guest pass” has rules (a Trust Policy) stating, “I trust visitors from my friend’s house.”

Finally, AWS Security Token Service (STS). STS is like the concierge who verifies the guest pass and issues a temporary key (temporary credentials) for the visit. This is significantly safer than sharing long-term credentials.

Making it real

Let’s put this into practice.

Example 1: ABAC for resource control (S3 Bucket)

You have an S3 bucket holding important project files. Only team members on “Project Alpha” should access it.

Here’s a simplified IAM policy:

{
  "Version": "2012-10-17",
  "Statement": [
    {
      "Effect": "Allow",
      "Action": [
        "s3:GetObject",
        "s3:PutObject",
        "s3:ListBucket"
      ],
      "Resource": "arn:aws:s3:::your-project-bucket",
      "Condition": {
        "StringEquals": {
          "aws:ResourceTag/Project": "${aws:PrincipalTag/Project}"
        }
      }
    }
  ]
}

This policy says: “Allow actions like getting, putting, and listing objects in ‘your-project-bucketif the ‘Project‘ tag on the bucket matches the ‘Project‘ tag on the user trying to access it.”

You’d tag your S3 bucket with Project: Alpha. Then, you’d ensure your “Project Alpha” team members have the Project: Alpha tag attached to their IAM user or role. See? Only the right people get in.

Example 2: Cross-account resource sharing with ABAC

Let’s say you have a “hub” account where you manage shared resources, and several “spoke” accounts for different teams. You want to let the “DataScience” team from a spoke account access certain resources in the hub, but only if those resources are tagged for their project.

  • Create a Role in the Hub Account: Create a role called, say, DataScienceAccess.
    • Trust Policy (Hub Account): This policy, attached to the DataScienceAccess role, says who can assume the role:
    
    {
      "Version": "2012-10-17",
      "Statement": [
        {
          "Effect": "Allow",
          "Principal": {
            "AWS": "arn:aws:iam::SPOKE_ACCOUNT_ID:root"
          },
          "Action": "sts:AssumeRole",
          "Condition": {
                "StringEquals": {
                    "sts:ExternalId": "DataScienceExternalId"
                }
          }
        }
      ]
    }

    Replace SPOKE_ACCOUNT_ID with the actual ID of the spoke account, and it is a good practice to use an ExternalId. This means, “Allow the root user of the spoke account to assume this role”.

    • Permission Policy (Hub Account): This policy, also attached to the DataScienceAccess role, defines what the role can do. This is where ABAC shines:
    {
      "Version": "2012-10-17",
      "Statement": [
        {
          "Effect": "Allow",
          "Action": [
            "s3:GetObject",
            "s3:ListBucket"
          ],
          "Resource": "arn:aws:s3:::shared-resource-bucket/*",
          "Condition": {
            "StringEquals": {
              "aws:ResourceTag/Project": "${aws:PrincipalTag/Project}"
            }
          }
        }
      ]
    }

    This says, “Allow access to objects in ‘shared-resource-bucket’ only if the resource’s ‘Project’ tag matches the user’s ‘Project’ tag.”

    • In the Spoke Account: Data scientists in the spoke account would have a policy allowing them to assume the DataScienceAccess role in the hub account. They would also have the appropriate Project tag (e.g., Project: Gamma).

      The flow looks like this:

      Spoke Account User -> AssumeRole (Hub Account) -> STS provides temporary credentials -> Access Shared Resource (if tags match)

      Advanced use cases and automation

      • Control Tower & Service Catalog: These services help automate the setup of cross-account roles and ABAC policies, ensuring consistency across your organization. Think of them as blueprints and a factory for your access control.
      • Auditing and Compliance: Imagine needing to prove compliance with PCI DSS, which requires strict data access controls. With ABAC, you can tag resources containing sensitive data with Scope: PCI and ensure only users with the same tag can access them. AWS Config and CloudTrail, along with IAM Access Analyzer, let you monitor access and generate reports, proving you’re meeting the requirements.

      Best practices and troubleshooting

      • Tagging Strategy is Key: A well-defined tagging strategy is essential. Decide on naming conventions (e.g., Project, Environment, CostCenter) and enforce them consistently.
      • Common Pitfalls:
        Inconsistent Tags: Make sure tags are applied uniformly. A typo can break access.
        Overly Permissive Policies: Start with the principle of least privilege. Grant only the necessary access.
      • Tools and Resources:
        – IAM Access Analyzer: Helps identify overly permissive policies and potential risks.
        – AWS documentation provides detailed information.

      Summarizing

      ABAC and Cross-Account Roles offer a powerful way to manage access in a multi-account AWS environment. They provide the flexibility to adapt to changing needs, the security of fine-grained control, and the simplicity of centralized management. By embracing these tools, we can move beyond the limitations of traditional IAM and build a truly scalable and secure cloud infrastructure.

      Avoiding security gaps by limiting IAM Role permissions

      Think about how often we take security for granted. You move into a new apartment and forget to lock the door because nothing bad has ever happened. Then, one day, someone strolls in, helps themselves to your fridge, sits on your couch, and even uses your WiFi. Feels unsettling, right? That’s exactly what happens in AWS when an IAM role is granted far more permissions than it needs, leaving the door wide open for potential security risks.

      This is where the principle of least privilege comes in. It’s a fancy way of saying: “Give just enough permissions for the job to get done, and nothing more.” But how do we figure out exactly what permissions an application needs? Enter AWS CloudTrail and Access Analyzer, two incredibly useful tools that help us tighten security without breaking functionality.

      The problem of overly generous permissions

      Let’s say you have an application running in AWS, and you assign it a role with AdministratorAccess. It can now do anything in your AWS account, from spinning up EC2 instances to deleting databases. Most of the time, it doesn’t even need 90% of these permissions. But if an attacker gets access to that role, you’re in serious trouble.

      What we need is a way to see what permissions the application is actually using and then build a custom policy that includes only those permissions. That’s where CloudTrail and Access Analyzer come to the rescue.

      Watching everything with CloudTrail

      AWS CloudTrail is like a security camera that records every API call made in your AWS environment. It logs who did what, which service they accessed, and when they did it. If you enable CloudTrail for your AWS account, it will capture all activity, giving you a clear picture of which permissions your application uses.

      So, the first step is simple: Turn on CloudTrail and let it run for a while. This will collect valuable data on what the application is doing.

      Generating a Custom Policy with Access Analyzer

      Now that we have a log of the application’s activity, we can use AWS IAM Access Analyzer to create a tailor-made policy instead of guessing. Access Analyzer looks at the CloudTrail logs and automatically generates a policy containing only the permissions that were used.

      It’s like watching a security camera playback of who entered your house and then giving house keys only to the people who actually needed access.

      Why this works so well

      This approach solves multiple problems at once:

      • Precise permissions: You stop giving unnecessary access because now you know exactly what is needed.
      • Automated policy generation: Instead of manually writing a policy full of guesswork, Access Analyzer does the heavy lifting.
      • Better security: If an attacker compromises the role, they get access only to a limited set of actions, reducing damage.
      • Following best practices: Least privilege is a fundamental rule in cloud security, and this method makes it easy to follow.

      Recap

      Instead of blindly granting permissions and hoping for the best, enable CloudTrail, track what your application is doing, and let Access Analyzer craft a custom policy. This way, you ensure that your IAM roles only have the permissions they need, keeping your AWS environment secure without unnecessary exposure.

      Security isn’t about making things difficult. It’s about making sure that only the right people, and applications, have access to the right things. Just like locking your door at night.

      AWS Identity Management – Choosing the right Policy or Role

      Let’s be honest, AWS Identity and Access Management (IAM) can feel like a jungle. You’ve got your policies, your roles, your managed this, and your inline that. It’s easy to get lost, and a wrong turn can lead to a security vulnerability or a frustrating roadblock. But fear not! Just like a curious explorer, we’re going to cut through the thicket and understand this thing. Why? Mastering IAM is crucial to keeping your AWS environment secure and efficient. So, which policy type is the right one for the job? Ever scratched your head over when to use a service-linked role? Stick with me, and we’ll figure it out with a healthy dose of curiosity and a dash of common sense.

      Understanding Policies and Roles

      First things first. Let’s get our definitions straight. Think of policies as rulebooks. They are written in a language called JSON, and they define what actions are allowed or denied on which AWS resources. Simple enough, right?

      Now, roles are a bit different. They’re like temporary access badges. An entity, be it a user, an application, or even an AWS service itself, can “wear” a role to gain specific permissions for a limited time. A user or a service is not granted permissions directly, it’s the role that has the permissions.

      AWS Policy types

      Now, let’s explore the different flavors of policies.

      AWS Managed Policies

      These are like the standard-issue rulebooks created and maintained by AWS itself. You can’t change them, just like you can’t rewrite the rules of physics! But AWS keeps them updated, which is quite handy.

      • Use Cases: Perfect for common scenarios. Need to give someone basic access to S3? There’s probably an AWS-managed policy for that.
      • Pros: Easy to use, always up-to-date, less work for you.
      • Cons: Inflexible, you’re stuck with what AWS provides.

      Customer Managed Policies

      These are your rulebooks. You write them, you modify them, you control them.

      • Use Cases: When you need fine-grained control, like granting access to a very specific resource or creating custom permissions for your application, this is your go-to choice.
      • Pros: Total control, flexible, adaptable to your unique needs.
      • Cons: More responsibility, you need to know what you’re doing. You’ll be in charge of updating and maintaining them.
      {
          "Version": "2012-10-17",
          "Statement": [
              {
                  "Effect": "Allow",
                  "Action": "s3:GetObject",
                  "Resource": "arn:aws:s3:::my-specific-bucket/*"
              }
          ]
      }

      This simple policy allows getting objects only from my-specific-bucket. You have to adapt it to your necessities.

      Inline Policies

      These are like sticky notes attached directly to a user, group, or role. They’re tightly bound and can’t be reused.

      • Use Cases: For precise, one-time permissions. Imagine a developer who needs temporary access to a particular resource for a single task.
      • Pros: Highly specific, good for exceptions.
      • Cons: A nightmare to manage at scale, not reusable.
      {
          "Version": "2012-10-17",
          "Statement": [
              {
                  "Effect": "Allow",
                  "Action": "dynamodb:DeleteItem",
                  "Resource": "arn:aws:dynamodb:us-east-1:123456789012:table/MyTable"
              }
          ]
      }

      This policy is directly embedded within users and permits them to delete items from the MyTable DynamoDB table. It does not apply to other users or resources.

      Service-Linked Roles. The smooth operators

      These are special roles pre-configured by AWS services to interact with other AWS services securely. You don’t create them, the service does.

      • Use Cases: Think of Auto Scaling needing to launch EC2 instances or Elastic Load Balancing managing resources on your behalf. It’s like giving your trusted assistant a special key to access specific rooms in your house.
      • Pros: Simplifies setup, and ensures security best practices are followed. AWS takes care of these roles behind the scenes, so you don’t need to worry about them.
      • Cons: You can’t modify them directly. So, it’s essential to understand what they do.
      aws autoscaling create-auto-scaling-group \ --auto-scaling-group-name my-asg \ --launch-template "LaunchTemplateId=lt-0123456789abcdef0,Version=1" \ --min-size 1 \ --max-size 3 \ --vpc-zone-identifier "subnet-0123456789abcdef0" \ --service-linked-role-arn arn:aws:iam::123456789012:role/aws-service-role/autoscaling.amazonaws.com/AWSServiceRoleForAutoScaling

      This code creates an Auto Scaling group, and the service-linked-role-arn parameter specifies the ARN of the service-linked role for Auto Scaling. It’s usually created automatically by the service when needed.

      Best practices

      • Least Privilege: Always, always, always grant only the necessary permissions. It’s like giving out keys only to the rooms people need to access, not the entire house!
      • Regular Review: Things change. Regularly review your policies and roles to make sure they’re still appropriate.
      • Use the Right Tools: AWS provides tools like IAM Access Analyzer to help you manage this stuff. Use them!
      • Document Everything: Keep track of your policies and roles, their purpose, and why they were created. It will save you headaches later.

      In sum

      The right policy or role depends on the specific situation. Choose wisely, keep things tidy, and you will have a secure and well-organized AWS environment.

      DevOps vs DevSecOps, the Evolution of Software Development Practices

      In the field of software development and IT operations, two methodologies have emerged as pivotal players: DevOps and DevSecOps. While they share common roots, their approaches and focuses differ significantly. As organizations strive to balance speed, efficiency, and security in their development processes, understanding the nuances between these two practices becomes crucial.

      The Coexistence of DevOps and DevSecOps

      The digital age has ushered in an era where software development and deployment need to be faster, more efficient, and increasingly secure. DevOps emerged as a revolutionary approach, breaking down silos between development and operations teams. However, as cyber threats became more sophisticated, the need for integrated security practices gave rise to DevSecOps.

      Both methodologies coexist in the modern tech ecosystem, each serving distinct yet complementary purposes. DevOps focuses on streamlining development and operations, while DevSecOps takes this a step further by embedding security into every phase of the software development lifecycle. Let’s delve into the key differences between these two approaches.

      Speed vs. Security

      The primary distinction between DevOps and DevSecOps lies in their core focus.

      DevOps primarily aims to accelerate software delivery and improve IT service agility. It emphasizes collaboration between development and operations teams to streamline processes, reduce time-to-market, and enhance overall efficiency. The mantra of DevOps is “fail fast, fail often,” encouraging rapid iterations and continuous improvement.

      DevSecOps, on the other hand, places security at the forefront without compromising on speed. While it maintains the agility principles of DevOps, DevSecOps integrates security practices throughout the development pipeline. Its goal is to create a “security as code” culture, where security considerations are baked into every stage of software development.

      Reactive vs. Proactive

      The approach to security marks another significant difference between these methodologies.

      In a DevOps environment, security is often treated as a separate phase, sometimes even an afterthought. Security checks and measures are typically implemented towards the end of the development cycle or after deployment. This can lead to a reactive approach to security, where vulnerabilities are addressed only after they’re discovered in production.

      DevSecOps takes a proactive stance on security. It integrates security practices and tools from the very beginning of the software development lifecycle. This “shift-left” approach to security means that potential vulnerabilities are identified and addressed early in the development process, reducing the risk and cost associated with late-stage security fixes.

      Dual vs. Triad

      Both DevOps and DevSecOps emphasize collaboration, but the scope of this collaboration differs.

      DevOps focuses on bridging the gap between development and operations teams. It fosters a culture of shared responsibility, where developers and operations personnel work together throughout the software lifecycle. This collaboration aims to break down traditional silos and create a more efficient, streamlined workflow.

      DevSecOps expands this collaborative model to include security teams. It creates a triad of development, operations, and security, working in unison from the outset of a project. This approach cultivates a culture where security is everyone’s responsibility, not just that of a dedicated security team.

      Efficiency vs. Comprehensive Security

      While both methodologies leverage automation, their focus and toolsets differ.

      DevOps automation primarily targets efficiency and speed. Tools in a DevOps environment focus on continuous integration and continuous delivery (CI/CD), configuration management, and infrastructure as code. These tools aim to automate build, test, and deployment processes to accelerate software delivery.

      DevSecOps extends this automation to include security tools and practices. In addition to DevOps tools, DevSecOps incorporates security automation tools such as static and dynamic application security testing (SAST/DAST), vulnerability scanners, and compliance monitoring tools. The goal is to automate security checks and integrate them seamlessly into the CI/CD pipeline.

      Agility vs. Secure by Design

      The underlying design principles of these methodologies reflect their different priorities.

      DevOps principles revolve around agility, flexibility, and rapid iteration. It emphasizes practices like microservices architecture, containerization, and infrastructure as code. These principles aim to create systems that are easy to update, scale, and maintain.

      DevSecOps builds on these principles but adds a “secure by design” approach. It incorporates security considerations into architectural decisions from the start. This might include principles like least privilege access, defense in depth, and secure defaults. The goal is to create systems that are not only agile but inherently secure.

      Performance vs. Risk

      The metrics used to measure success in DevOps and DevSecOps reflect their different focuses.

      DevOps typically measures success through metrics related to speed and efficiency. These might include deployment frequency, lead time for changes, mean time to recovery (MTTR), and change failure rate. These metrics focus on how quickly and reliably teams can deliver software.

      DevSecOps incorporates additional security-focused metrics. While it still considers DevOps metrics, it also tracks measures like the number of vulnerabilities detected, time to remediate security issues, and compliance with security standards. These metrics provide a more holistic view of both performance and security posture.

      Illustrating the Difference

      Let’s consider a scenario where a team is developing a new e-commerce platform:

      In a DevOps approach, the team might focus on rapidly developing features and deploying them quickly. They would use CI/CD pipelines to automate testing and deployment, allowing for frequent updates. Security checks might be performed at the end of each sprint or before major releases.

      In a DevSecOps approach, the team would integrate security from the start. They might begin by conducting threat modeling to identify potential vulnerabilities. Security tools would be integrated into the CI/CD pipeline, automatically scanning code for vulnerabilities with each commit. The team would also implement secure coding practices and conduct regular security training. When deploying, they would use infrastructure as code with built-in security configurations (SIaC).

      Complementary Approaches for Modern Software Development

      While DevOps and DevSecOps have distinct focuses and approaches, they are not mutually exclusive. In fact, many organizations are finding that a combination of both methodologies provides the best balance of speed, efficiency, and security.

      DevOps laid the groundwork for faster, more collaborative software development. DevSecOps builds on this foundation, recognizing that in today’s threat landscape, security cannot be an afterthought. By integrating security practices throughout the development lifecycle, DevSecOps aims to create software that is not only delivered rapidly but is also inherently secure.

      As cyber threats continue to evolve, we can expect the principles of DevSecOps to become increasingly important. However, this doesn’t mean DevOps will become obsolete. Instead, we’re likely to see a continued evolution where the speed and efficiency of DevOps are combined with the security-first mindset of DevSecOps.

      Ultimately, whether an organization leans more towards DevOps or DevSecOps should depend on their specific needs, risk profile, and regulatory environment. The key is to foster a culture of continuous improvement, collaboration, and shared responsibility, principles that are at the heart of both DevOps and DevSecOps.

      Kubernetes Annotations – The Overlooked Key to Better DevOps

      In the intricate universe of Kubernetes, where containers and services dance in a meticulously orchestrated ballet of automation and efficiency, there lies a subtle yet potent feature often shadowed by its more conspicuous counterparts: annotations. This hidden layer, much like the cryptic notes in an ancient manuscript, holds the keys to understanding, managing, and enhancing the Kubernetes realm.

      Decoding the Hidden Language

      Imagine you’re an explorer in the digital wilderness of Kubernetes, charting out unexplored territories. Your map is dotted with containers and services, each marked by basic descriptions. Yet, you yearn for more – a deeper insight into the lore of each element. Annotations are your secret script, a way to inscribe additional details, notes, and reminders onto your Kubernetes objects, enriching the story without altering its course.

      Unlike labels, their simpler cousins, annotations are the detailed annotations in the margins of your map. They don’t influence the plot directly but offer a richer narrative for those who know where to look.

      The Craft of Annotations

      Annotations are akin to the hidden annotations in an ancient text, where each note is a key-value pair embedded in the metadata of Kubernetes objects. They are the whispered secrets between the lines, enabling you to tag your digital entities with information far beyond the visible spectrum.

      Consider a weary traveler, a Pod named ‘my-custom-pod’, embarking on a journey through the Kubernetes landscape. It carries with it hidden wisdom:

      apiVersion: v1
      kind: Pod
      metadata:
        name: my-custom-pod
        annotations:
          # Custom annotations:
          app.kubernetes.io/component: "frontend" # Identifies the component that the Pod belongs to.
          app.kubernetes.io/version: "1.0.0" # Indicates the version of the software running in the Pod.
          # Example of an annotation for configuration:
          my-application.com/configuration: "custom-value" # Can be used to store any kind of application-specific configuration.
          # Example of an annotation for monitoring information:
          my-application.com/last-update: "2023-11-14T12:34:56Z" # Can be used to track the last time the Pod was updated.
      

      These annotations are like the traveler’s diary entries, invisible to the untrained eye but invaluable to those who know of their existence.

      The Purpose of Whispered Words

      Why whisper these secrets into the ether? The reasons are as varied as the stars:

      • Chronicles of Creation: Annotations hold tales of build numbers, git hashes, and release IDs, serving as breadcrumbs back to their origins.
      • Secret Handshakes: They act as silent signals to controllers and tools, orchestrating behavior without direct intervention.
      • Invisible Ink: Annotations carry covert instructions for load balancers, ingress controllers, and other mechanisms, directing actions unseen.

      Tales from the Annotations

      The power of annotations unfolds in their stories. A deployment annotation may reveal the saga of its version and origin, offering clarity in the chaos. An ingress resource, tagged with a special annotation, might hold the key to unlocking a custom authentication method, guiding visitors through hidden doors.

      Guardians of the Secrets

      With great power comes great responsibility. The guardians of these annotations must heed the ancient wisdom:

      • Keep the annotations concise and meaningful, for they are not scrolls but whispers on the wind.
      • Prefix them with your domain, like marking your territory in the digital expanse.
      • Document these whispered words, for a secret known only to one is a secret soon lost.

      In the sprawling narrative of Kubernetes, where every object plays a part in the epic, annotations are the subtle threads that weave through the fabric, connecting, enhancing, and enriching the tale. Use them, and you will find yourself not just an observer but a master storyteller, shaping the narrative of your digital universe.