Let us talk about healthcare data pipelines. Running high volume payer processing pipelines is a lot like hosting a mandatory potluck dinner for a group of deeply eccentric people with severe and conflicting dietary restrictions. Each payer behaves with maddening uniqueness. One payer bursts through the door, demanding an entire roasted pig, which they intend to consume in three minutes flat. This requires massive, short-lived computational horsepower. Another payer arrives with a single boiled pea and proceeds to chew it methodically for the next five hours, requiring a small but agonizingly persistent trickle of processing power.
On top of this culinary nightmare, there are strict rules of etiquette. You absolutely must digest the member data before you even look at the claims data. Eligibility files must be validated before anyone is allowed to touch the dessert tray of downstream jobs. The workload is not just heavy. It is incredibly uneven and delightfully complicated.
Buying folding chairs for a banquet
On paper, Amazon Web Services managed Auto Scaling Mechanisms should fix this problem. They are designed to look at a growing pile of work and automatically hire more help. But applying generic auto scaling to healthcare pipelines is like a restaurant manager seeing a line out the door and solving the problem by buying fifty identical plastic folding chairs.
The manager does not care that one guest needs a high chair and another requires a reinforced steel bench. Auto scaling reacts to the generic brute force of the system load. It cannot look at a specific payer and tailor the compute shape to fit their weird eating habits. It cannot enforce the strict social hierarchy of job priorities. It scales the infrastructure, but it completely fails to scale the intention.
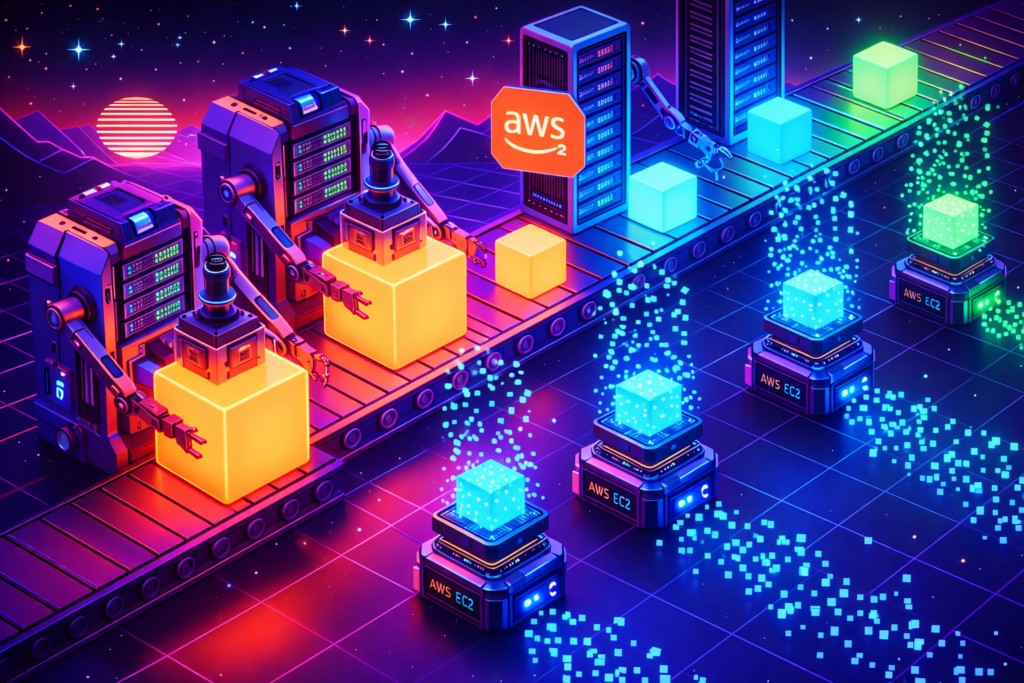
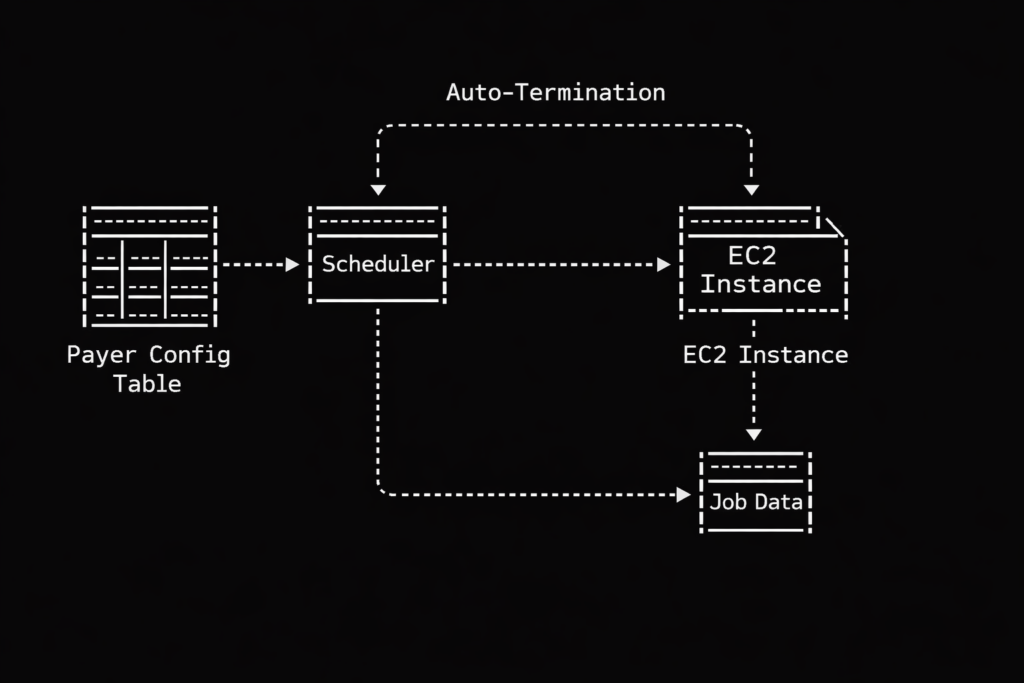
This is why we abandoned the generic approach and built our own dynamic EC2 provisioning system. Instead of maintaining a herd of generic servers waiting around for something to do, we create bespoke servers on demand based on a central configuration table.
The ruthless nightclub bouncer of job scheduling
Let us look at how this actually works regarding prioritization. Our system relies on that central configuration table to dictate order. Think of this table as the guest list at an obnoxiously exclusive nightclub. Our scheduler acts as the ruthless bouncer.
When jobs arrive at the queue, the bouncer checks the list. Member data? Right this way to the VIP lounge, sir. Claims data? Stand on the curb behind the velvet rope until the members are comfortably seated. Generic auto scaling has no native concept of this social hierarchy. It just sees a mob outside the club and opens the front doors wide. Our dynamic approach gives us perfect, tyrannical control over who gets processed first, ensuring our pipelines execute in a beautifully deterministic way. We spin up exactly the compute we specify, exactly when we want it.
Leaving your car running in the garage
Then there is the financial absurdity of warm pools. Standard auto scaling often relies on keeping a baseline of idle instances warm and ready, just in case a payer decides to drop a massive batch of files at two in the morning.
Keeping idle servers running is the technological equivalent of leaving your car engine idling in the closed garage all night just in case you get a sudden craving for a carton of milk at dawn. It is expensive, it is wasteful, and it makes you look a bit foolish when the AWS bill arrives.
Our dynamic system operates with a baseline of zero. We experience one hundred percent burst efficiency because we only pay for the exact compute we use, precisely when we use it. Cost savings happen naturally when you refuse to pay for things that are sitting around doing nothing.
A delightfully brutal server lifecycle
The operational model we ended up with is almost comically simple compared to traditional methods. A generic scaling group requires complex scaling policies, tricky cooldown periods, and endless tweaking of CloudWatch alarms. It is like managing a highly sensitive, moody teenager.
Our dynamic EC2 model is wonderfully ruthless. We create the instance and inject it with a single, highly specific purpose via a startup script. The instance wakes up, processes the healthcare data with absolute precision, and then politely self destructs so it stops billing us. They are the mayflies of the cloud computing world. They live just long enough to do their job, and then they vanish. There are no orphaned instances wandering the cloud.
This dynamic provisioning model has fundamentally altered how we digest payer workloads. We have somehow achieved a weird but perfect holy grail of cloud architecture. We get the granular flexibility of serverless functions, the raw, unadulterated horsepower of dedicated EC2 instances, and the stingy cost efficiency of a pure event-driven design.
If your processing jobs vary wildly from payer to payer, and if you care deeply about enforcing priorities without burning money on idle metal, building a disposable compute army might be exactly what your architecture is missing. We said goodbye to our idle servers, and honestly, we do not miss them at all.
I was staring at our AWS bill at two in the morning, nursing my third cup of coffee, when I realized something that should have been obvious months earlier. We were paying more to distribute our traffic than to process it. Our Application Load Balancer, that innocent-looking service that simply forwards packets from point A to point B, was consuming $3,900 every month. That is $46,800 a year. For a traffic cop. A very expensive traffic cop that could not even handle our peak loads without breaking into a sweat.
The particularly galling part was that we had accepted this as normal. Everyone uses AWS load balancers, right? They are the standard, the default, the path of least resistance. It is like paying rent for an apartment you only use to store your shoes. Technically functional, financially absurd.
So we did what any reasonable engineering team would do at that hour. We started googling. And that is how we discovered IPVS, a technology so old that half our engineering team had not been born when it was first released. IPVS stands for IP Virtual Server, which sounds like something from a 1990s hacker movie, and honestly, that is not far off. It was written in 1998 by a fellow named Wensong Zhang, who presumably had no idea that twenty-eight years later, a group of bleary-eyed engineers would be using his code to save more than forty-six thousand dollars a year.
The expensive traffic cop
To understand why we were so eager to jettison our load balancer, you need to understand how AWS pricing works. Or rather, how it accumulates like barnacles on the hull of a ship, slowly dragging you down until you wonder why you are moving so slowly.
An Application Load Balancer costs $0.0225 per hour. That sounds reasonable, about sixteen dollars a month. But then there are LCUs, or Load Balancer Capacity Units, which charge you for every new connection, every rule evaluation, every processed byte. It is like buying a car and then discovering you have to pay extra every time you turn the steering wheel.
In practice, this meant our ALB was consuming fifteen to twenty percent of our entire infrastructure budget. Not for compute, not for storage, not for anything that actually creates value. Just for forwarding packets. It was the technological equivalent of paying a butler to hand you the remote control.
The ALB also had some architectural quirks that made us scratch our heads. It terminated TLS, which sounds helpful until you realize we were already terminating TLS at our ingress. So we were decrypting traffic, then re-encrypting it, then decrypting it again. It was like putting on a coat to go outside, then taking it off and putting on another identical coat, then finally going outside. The security theater was strong with this one.
A trip to 1999
I should confess that when we started this project, I had no idea what IPVS even stood for. I had heard it mentioned in passing by a colleague who used to work at a large Chinese tech company, where apparently everyone uses it. He described it with the kind of reverence usually reserved for vintage wine or classic cars. “It just works,” he said, which in engineering terms is the highest possible praise.
IPVS, I learned, lives inside the Linux kernel itself. Not in a container, not in a microservice, not in some cloud-managed abstraction. In the actual kernel. This means when a packet arrives at your server, the kernel looks at it, consults its internal routing table, and forwards it directly. No context switches, no user-space handoffs, no “let me ask my manager” delays. Just pure, elegant packet forwarding.
The first time I saw it in action, I felt something I had not felt in years of cloud engineering. I felt wonder. Here was code written when Bill Clinton was president, when the iPod was still three years away, when people used modems to connect to the internet. And it was outperforming a service that AWS charges thousands of dollars for. It was like discovering that your grandfather’s pocket watch keeps better time than your smartwatch.
How the magic happens
Our setup is almost embarrassingly simple. We run a DaemonSet called ipvs-router on dedicated, tiny nodes in each Availability Zone. Each pod does four things, and it does them with the kind of efficiency that makes you question everything else in your stack.
First, it claims an Elastic IP using kube-vip, a CNCF project that lets Kubernetes pods take ownership of spare EIPs. No AWS load balancer required. The pod simply announces “this IP is mine now”, and the network obliges. It feels almost rude how straightforward it is.
Second, it programs IPVS in the kernel. IPVS builds an L4 load-balancing table that forwards packets at line rate. No proxies, no user-space hops. The kernel becomes your load balancer, which is a bit like discovering your car engine can also make excellent toast. Unexpected, but delightful.
Third, it syncs with Kubernetes endpoints. A lightweight controller watches for new pods, and when one appears, IPVS adds it to the rotation in less than a hundred milliseconds. Scaling feels instantaneous because, well, it basically is.
But the real trick is the fourth thing. We use something called Direct Server Return, or DSR. Here is how it works. When a request comes in, it travels from the client to IPVS to the pod. But the response goes directly from the pod back to the client, bypassing the load balancer entirely. The load balancer never sees response traffic. That is how we get ten times the throughput. It is like having a traffic cop who only directs cars into the city but does not care how they leave.
The code that makes it work
Here is what our DaemonSet looks like. I have simplified it slightly for readability, but this is essentially what runs in our production cluster:
The key here is hostNetwork: true, which gives the pod direct access to the host’s network stack. Combined with the NET_ADMIN capability, this allows IPVS to manipulate the kernel’s routing tables directly. It requires a certain level of trust in your containers, but then again, so does running a load balancer in the first place.
We also use a custom controller to sync Kubernetes endpoints with IPVS. Here is the core logic:
# Simplified endpoint sync logic
def sync_endpoints(service_name, namespace):
    # Get current endpoints from Kubernetes
    endpoints = k8s_client.list_namespaced_endpoints(
        namespace=namespace,
        field_selector=f""metadata.name={service_name}""
    )

    # Extract pod IPs
    pod_ips = []
    for subset in endpoints.items[0].subsets:
        for address in subset.addresses:
            pod_ips.append(address.ip)

    # Build IPVS rules using ipvsadm
    for ip in pod_ips:
        subprocess.run([
            ""ipvsadm"", ""-a"", ""-t"",
            f""{VIP}:443"", ""-r"", f""{ip}:443"", ""-g""
        ])

    # The -g flag enables Direct Server Return (DSR)
    return len(pod_ips)
The numbers that matter
Let me tell you about the math, because the math is almost embarrassing for AWS. Our old ALB took about five milliseconds to set up a new connection. IPVS takes less than half a millisecond. That is not an improvement. That is a different category of existence. It is the difference between walking to the shops and being teleported there.
While our ALB would start getting nervous around one hundred thousand concurrent connections, IPVS just does not. It could handle millions. The only limit is how much memory your kernel has, which in our case meant we could have hosted the entire internet circa 2003 without breaking a sweat.
In terms of throughput, our ALB topped out around 2.5 gigabits per second. IPVS saturates the 25-gigabit NIC on our c7g.medium instances. That is ten times the throughput, for those keeping score at home. The load balancer stopped being the bottleneck, which was refreshing because previously it had been like trying to fill a swimming pool through a drinking straw.
But the real kicker is the cost. Here is the breakdown. We run one c7g.medium spot instance per availability zone, three zones total. Each costs about $0.017 per hour. That is $0.051 per hour for compute. We also have three Elastic IPs at $0.005 per hour each, which is $0.015 per hour. With Direct Server Return, outbound transfer costs are effectively zero because responses bypass the load balancer entirely.
The total? A mere $0.066 per hour. Divide that among three availability zones, and you’re looking at roughly $0.009 per hour per zone. That’s nine-tenths of a cent per hour. Let’s not call it optimization, let’s call it a financial exorcism. We went from shelling out $3,900 a month to a modest $48. The savings alone could probably afford a very capable engineer’s caffeine habit.
But what about L7 routing
At this point, you might be raising a valid objection. IPVS is dumb L4. It does not inspect HTTP headers, it does not route based on gRPC metadata, and it does not care about your carefully crafted REST API conventions. It just forwards packets based on IP and port. It is the postal worker of the networking world. Reliable, fast, and utterly indifferent to what is in the envelope.
This is where we layer in Envoy, because intelligence should live where it makes sense. Here is how the request flow works. A client connects to one of our Elastic IPs. IPVS forwards that connection to a random healthy pod. Inside that pod, an Envoy sidecar inspects the HTTP/2 headers or gRPC metadata and routes to the correct internal service.
The result is L4 performance at the edge and L7 intelligence at the pod. We get the speed of kernel-level packet forwarding combined with the flexibility of modern service mesh routing. It is like having a Formula 1 engine in a car that also has comfortable seats and a good sound system. Best of both worlds. Our Envoy configuration looks something like this:
I should mention that our first attempt did not go smoothly. In fact, it went so poorly that we briefly considered pretending the whole thing had never happened and going back to our expensive ALBs.
The problem was DNS. We pointed our api.ourcompany.com domain at the new Elastic IPs, and then we waited. And waited. And nothing happened. Traffic was still going to the old ALB. It turned out that our DNS provider had a TTL of one hour, which meant that even after we updated the record, most clients were still using the old IP address for, well, an hour.
But that was not the real problem. The real problem was that we had forgotten to update our health checks. Our monitoring system was still pinging the old ALB’s health endpoint, which was now returning 404s because we had deleted the target group. So our alerts were going off, our pagers were buzzing, and our on-call engineer was having what I can only describe as a difficult afternoon.
We fixed it, of course. Updated the health checks, waited for DNS to propagate, and watched as traffic slowly shifted to the new setup. But for about thirty minutes, we were flying blind, which is not a feeling I recommend to anyone who values their peace of mind.
Deploying this yourself
If you are thinking about trying this yourself, the good news is that it is surprisingly straightforward. The bad news is that you will need to know your way around Kubernetes and be comfortable with the idea of pods manipulating kernel networking tables. If that sounds terrifying, perhaps stick with your ALB. It is expensive, but it is someone else’s problem.
Here is the deployment process in a nutshell. First, deploy the DaemonSet. Then allocate some spare Elastic IPs in your subnet. There is a particular quirk in AWS networking that can ruin your afternoon: the source/destination check. By default, EC2 instances are configured to reject traffic that does not match their assigned IP address. Since our setup explicitly relies on handling traffic for IP addresses that the instance does not technically ‘own’ (our Virtual IPs), AWS treats this as suspicious activity and drops the packets. You must disable the source/destination check on any instance running these router pods. It is a simple checkbox in the console, but forgetting it is the difference between a working load balancer and a black hole. The pods will auto-claim them using kube-vip. Also, ensure your worker node IAM roles have permission to reassociate Elastic IPs, or your pods will shout into the void without anyone listening. Update your DNS to point at the new IPs, using latency-based routing if you want to be fancy. Then watch as your ALB target group drains, and delete the ALB next week after you are confident everything is working.
The whole setup takes about three hours the first time, and maybe thirty minutes if you do it again. Three hours of work for $46,000 per year in savings. That is $15,000 per hour, which is not a bad rate by anyone’s standards.
What we learned about Cloud computing
Three months after we made the switch, I found myself at an AWS conference, listening to a presentation about their newest managed load balancing service. It was impressive, all machine learning and auto-scaling and intelligent routing. It was also, I calculated quietly, about four hundred times more expensive than our little IPVS setup.
I did not say anything. Some lessons are better learned the hard way. And as I sat there, sipping my overpriced conference coffee, I could not help but smile.
AWS managed services are built for speed of adoption and lowest-common-denominator use cases. They are not built for peak efficiency, extreme performance, or cost discipline. For foundational infrastructure like load balancing, a little DIY unlocks exponential gains.
The embarrassing truth is that we should have done this years ago. We were so accustomed to reaching for managed services that we never stopped to ask whether we actually needed them. It took a 2 AM coffee-fueled bill review to make us question the assumptions we had been carrying around.
Sometimes the future of cloud computing looks a lot like 1999. And honestly, that is exactly what makes it beautiful. There is something deeply satisfying about discovering that the solution to your expensive modern problem was solved decades ago by someone working on a much simpler internet, with much simpler tools, and probably much more sleep.
Wensong Zhang, wherever you are, thank you. Your code from 1998 is still making engineers happy in 2026. That is not a bad legacy for any piece of software.
The author would like to thank his patient colleagues who did not complain (much) during the DNS propagation incident, and the kube-vip maintainers who answered his increasingly desperate questions on Slack.
Your team ships a brilliant release. The dashboards glow a satisfying, healthy green. The celebratory GIFs echo through the Slack channels. For a few glorious days, you are a master of the universe, a conductor of digital symphonies.
And then it shows up. The AWS invoice doesn’t knock. It just appears in your inbox with the silent, judgmental stare of a Victorian governess who caught you eating dessert before dinner. You shipped performance, yes. You also shipped a small fleet of x86 instances that are now burning actual, tangible money while you sleep.
Engineers live in a constant tug-of-war between making things faster and making them cheaper. We’re told the solution is another coupon code or just turning off a few replicas over the weekend. But real, lasting savings don’t come from tinkering at the edges. They show up when you change the underlying math. In the world of AWS, that often means changing the very silicon running the show.
Enter a family of servers that look unassuming on the console but quietly punch far above their weight. Migrate the right workloads, and they do the same work for less money. Welcome to AWS Graviton.
What is this Graviton thing anyway?
Let’s be honest. The first time someone says “ARM-based processor,” your brain conjures images of your phone, or maybe a high-end Raspberry Pi. The immediate, skeptical thought is, “Are we really going to run our production fleet on that?”
Well, yes. And it turns out that when you own the entire datacenter, you can design a chip that’s ridiculously good at cloud workloads, without the decades of baggage x86 has been carrying around. Switching to Graviton is like swapping that gas-guzzling ’70s muscle car for a sleek, silent electric skateboard that somehow still manages to tow your boat. It feels wrong… until you see your fuel bill. You’re swapping raw, hot, expensive grunt for cool, cheap efficiency.
Amazon designed these chips to optimize the whole stack, from the physical hardware to the hypervisor to the services you click on. This control means better performance-per-watt and, more importantly, a better price for every bit of work you do.
The lineup is simple:
Graviton2: The reliable workhorse. Great for general-purpose and memory-hungry tasks.
Graviton3: The souped-up model. Faster cores, better at cryptography, and sips memory bandwidth through a wider straw.
Graviton3E: The specialist. Tuned for high-performance computing (HPC) and anything that loves vector math.
This isn’t some lab experiment. Graviton is already powering massive production fleets. If your stack includes common tools like NGINX, Redis, Java, Go, Node.js, Python, or containers on ECS or EKS, you’re already walking on paved roads.
The real numbers behind the hype
The headline from AWS is tantalizing. “Up to 40 percent better price-performance.” “Up to,” of course, are marketing’s two favorite words. It’s the engineering equivalent of a dating profile saying they enjoy “adventures.” It could mean anything.
But even with a healthy dose of cynicism, the trend is hard to ignore. Your mileage will vary depending on your code and where your bottlenecks are, but the gains are real.
Here’s where teams often find the gold:
Web and API services: Handling the same requests per second at a lower instance cost.
CI/CD Pipelines: Faster compile times for languages like Go and Rust on cheaper build runners.
Data and Streaming: Popular engines like NGINX, Envoy, Redis, Memcached, and Kafka clients run beautifully on ARM.
Batch and HPC: Heavy computational jobs get a serious boost from the Graviton3E chips.
There’s also a footprint bonus. Better performance-per-watt means you can hit your ESG (Environmental, Social, and Governance) goals without ever having to create a single sustainability slide deck. A win for engineering, a win for the planet, and a win for dodging boring meetings.
But will my stuff actually run on it?
This is the moment every engineer flinches. The suggestion of “recompiling for ARM” triggers flashbacks to obscure linker errors and a trip down dependency hell.
The good news? The water’s fine. For most modern workloads, the transition is surprisingly anticlimactic. Here’s a quick compatibility scan:
You compile from source or use open-source software? Very likely portable.
Using closed-source agents or vendor libraries? Time to do some testing and maybe send a polite-but-firm support ticket.
Running containers? Fantastic. Multi-architecture images are your new best friend.
What about languages? Java, Go, Node.js, .NET 6+, Python, Ruby, and PHP are all happy on ARM on Linux.
C and C++? Just recompile and link against ARM64 libraries.
The easiest first wins are usually stateless services sitting behind a load balancer, sidecars like log forwarders, or any kind of queue worker where raw throughput is king.
A calm path to migration
Heroic, caffeine-fueled weekend migrations are for rookies. A calm, boring checklist is how professionals do it.
Phase 1: Test in a safe place
Launch a Graviton sibling of your current instance family (e.g., a c7g.large instead of a c6i.large). Replay production traffic to it or run your standard benchmarks. Compare CPU utilization, latency, and error rates. No surprises allowed.
Phase 2: Build for both worlds
It’s time to create multi-arch container images. docker buildx is the tool for the job. This command builds an image for both chip architectures and pushes them to your registry under a single tag.
# Build and push an image for both amd64 and arm64 from one command
docker buildx build \
  --platform linux/amd64,linux/arm64 \
  --tag $YOUR_ACCOUNT.dkr.ecr.$[REGION.amazonaws.com/my-web-app:v1.2.3](https://REGION.amazonaws.com/my-web-app:v1.2.3) \
  --push .
Phase 3: Canary and verify
Slowly introduce the new instances. Route just 5% of traffic to the Graviton pool using weighted target groups. Stare intently at your dashboards. Your “golden signals”, latency, traffic, errors, and saturation, should look identical across both pools.
Here’s a conceptual Terraform snippet of what that weighting looks like:
If the canary looks healthy, gradually increase traffic: 25%, 50%, then 100%. Keep the old x86 pool warm for a day or two, just in case. It’s your escape hatch. Once it’s done, go show the finance team the new, smaller bill. They love that.
Common gotchas and easy fixes
Here are a few fun ways to ruin your Friday afternoon, and how to avoid them.
The sneaky base image: You built your beautiful ARM application… on an x86 foundation. Your FROM amazonlinux:2023 defaulted to the amd64 architecture. Your container dies instantly. The fix: Explicitly pin your base images to an ARM64 version, like FROM –platform=linux/arm64 public.ecr.aws/amazonlinux/amazonlinux:2023.
The native extension puzzle: Your Python, Ruby, or Node.js app fails because a native dependency couldn’t be built. The fix: Ensure you’re building on an ARM machine or using pre-compiled manylinux wheels that support aarch64.
The lagging agent: Your favorite observability tool’s agent doesn’t have an official ARM64 build yet. The fix: Check if they have a containerized version or gently nudge their support team. Most major vendors are on board now.
A shift in mindset
For decades, we’ve treated the processor as a given, an unchangeable law of physics in our digital world. The x86 architecture was simply the landscape on which we built everything. Graviton isn’t just a new hill on that landscape; it’s a sign the tectonic plates are shifting beneath our feet. This is more than a cost-saving trick; it’s an invitation to question the expensive assumptions we’ve been living with for years.
You don’t need a degree in electrical engineering to benefit from this, though it might help you win arguments on Hacker News. All you really need is a healthy dose of professional curiosity and a good benchmark script.
So here’s the experiment. Pick one of your workhorse stateless services, the ones that do the boring, repetitive work without complaining. The digital equivalent of a dishwasher. Build a multi-arch image for it. Cordon off a tiny, five-percent slice of your traffic and send it to a Graviton pool. Then, watch. Treat your service like a lab specimen. Don’t just glance at the CPU percentage; analyze the cost-per-million-requests. Scrutinize the p99 latency.
If the numbers tell a happy story, you haven’t just tweaked a deployment. You’ve fundamentally changed the economics of that service. You’ve found a powerful new lever to pull. If they don’t, you’ve lost a few hours and gained something more valuable: hard data. You’ve replaced a vague “what if” with a definitive “we tried that.”
Either way, you’ve sent a clear message to that smug monthly invoice. You’re paying attention. And you’re getting smarter. Doing the same work for less money isn’t a stunt. It’s just good engineering.
The first time I heard the term “sustainability smell,” I rolled my eyes. It sounded like a fluffy marketing phrase dreamed up to make cloud infrastructure sound as wholesome as a farmers’ market. Eco-friendly Terraform? Right. Next, you’ll tell me my data center is powered by happy thoughts and unicorn tears.
But then it clicked. The term wasn’t about planting trees with every terraform apply. It was about that weird feeling you get when you open a legacy repository. It’s the code equivalent of opening a Tupperware container you found in the back of the fridge. You don’t know what’s inside, but you’re pretty sure it’s going to be unpleasant.
Turns out, I’d been smelling these things for years without knowing what to call them. According to HashiCorp’s 2024 survey, a staggering 70% of infrastructure teams admit to over-provisioning resources. It seems we’re all building mansions for guests who never arrive. That, my friend, is the smell. It’s the scent of money quietly burning in the background.
What exactly is that funny smell in my code
A “sustainability smell” isn’t a bug. It won’t trigger a PagerDuty alert at 3 AM. It’s far more insidious. It’s a bad habit baked into your Terraform configuration that silently drains your budget and makes future maintenance a soul-crushing exercise in digital archaeology.
The most common offender is the legendary main.tf file that looks more like an epic novel. You know the one. It’s a sprawling, thousand-line behemoth where VPCs, subnets, ECS clusters, IAM roles, and that one S3 bucket from a forgotten 2021 proof-of-concept all live together in chaotic harmony. Trying to change one small thing in that file is like playing Jenga with a live grenade. You pull out one block, and suddenly three unrelated services start weeping.
I’ve stumbled through enough of these digital haunted houses to recognize the usual ghosts:
The over-provisioned powerhouse: An RDS instance with enough horsepower to manage the entire New York Stock Exchange, currently tasked with serving a blog that gets about ten visits a month. Most of them are from the author’s mom.
The zombie load balancer: Left behind after a one-off traffic spike, it now spends its days blissfully idle, forwarding zero traffic but diligently charging your account for the privilege of existing.
Hardcoded horrors: Instance sizes and IP addresses sprinkled directly into the code like cheap confetti. Need to scale? Good luck. You’ll be hunting down those values for the rest of the week.
The phantom snapshot: That old EBS snapshot you swore you deleted. It’s still there, lurking in the dark corners of your AWS account, accumulating charges with the quiet persistence of a glacier.
The silent killers that sink your budget
Let’s be honest, no one’s idea of a perfect Friday afternoon involves becoming a private investigator whose only client is a rogue t3.2xlarge instance that went on a very expensive vacation without permission. It’s tempting to just ignore it. It’s just one instance, right?
Wrong. These smells are the termites of your cloud budget. You don’t notice them individually, but they are silently chewing through your financial foundations. That “tiny” overcharge joins forces with its zombie friends, and suddenly your bill isn’t just creeping up; it’s sprinting.
But the real horror is for the next person who inherits your repo. They were promised the Terraform dream: a predictable, elegant blueprint. Instead, they get a haunted house. Every terraform apply becomes a jump scare, a game of Russian roulette where they pray they don’t awaken some ancient, costly beast.
Becoming a cloud cost detective
So, how do you hunt these ghosts? While tools like Checkov, tfsec, and terrascan are your trusty guard dogs, they’ll bark if you leave the front door wide open; they won’t notice that you’re paying the mortgage on a ten-bedroom mansion when you only live in the garage. For that, you need to do some old-fashioned detective work.
My ghost-hunting toolkit is simple:
Cross-Reference with reality: Check your declared instance sizes against their actual usage in CloudWatch. If your CPU utilization has been sitting at a Zen-like 2% for the past six months, you have a prime suspect.
Befriend the terraform plan command: Run it often. Run it before you even think about changing code. Treat it like a paranoid glance over your shoulder. It’s your best defense against unintended consequences.
Dig for treasure in AWS cost explorer: This is where the bodies are buried. Filter by service, by tag (you are tagging everything, right?), and look for the quiet, consistent charges. That weird $30 “other” charge that shows up every month? I’ve been ambushed by forgotten Route 53 hosted zones more times than I care to admit.
Your detective gadgets
Putting your budget directly into your code is a power move. It’s like putting a security guard inside the bank vault.
Here’s an aws_budgets_budget resource that will scream at you via SNS if you start spending too frivolously on your EC2 instances.
And for those phantom snapshots? Perform an exorcism with lifecycle rules. This little block of code tells S3 to act like a self-cleaning oven.
resource "aws_s3_bucket" "log_archive" {
  bucket = "my-app-log-archive-bucket"

  lifecycle_rule {
    id      = "log-retention-policy"
    enabled = true

    # Move older logs to a cheaper storage class
    transition {
      days          = 30
      storage_class = "STANDARD_IA"
    }

    # And then get rid of them entirely after a year
    expiration {
      days = 365
    }
  }
}
An exorcist’s guide to cleaner code
You can’t eliminate smells forever, but you can definitely keep them from taking over your house. There’s no magic spell, just a few simple rituals:
Embrace modularity: Stop building monoliths. Break your infrastructure into smaller, logical modules. It’s the difference between remodeling one room and having to rebuild the entire house just to change a light fixture.
Variables are your friends: Hardcoding an instance size is a crime against your future self. Use variables. It’s a tiny effort now that saves you a world of pain later.
Tag everything. No, really: Tagging feels like a chore, but it’s a lifesaver. When you’re hunting for the source of a mysterious charge, a good tagging strategy is your map and compass. Tag by project, by team, by owner, heck, tag it with your favorite sandwich. Just tag it.
Schedule a cleanup day: If it’s not on the calendar, it doesn’t exist. Dedicate a few hours every quarter to go ghost-hunting. Review idle resources, question oversized instances, and delete anything that looks dusty.
Your Terraform code is the blueprint for your infrastructure. And just like a real blueprint, any coffee stains, scribbled-out notes, or vague “we’ll figure this out later” sections get built directly into the final structure. If the plan calls for gold-plated plumbing in a closet that will never be used, that’s exactly what you’ll get. And you’ll pay for it. Every single month. These smells aren’t the spectacular, three-alarm fires that get everyone’s attention. They’re the slow, silent drips from a faucet in the basement. It’s just a dollar here for a phantom snapshot, five dollars there for an oversized instance. It’s nothing, right? But leave those drips unchecked long enough, and you don’t just get a high water bill. You come back to find you’ve cultivated a thriving mold colony and the floorboards are suspiciously soft. Ultimately, a clean repository isn’t just about being tidy. It’s about financial hygiene. So go on, open up that old repo. Be brave. The initial smell might be unpleasant, but it’s far better than the stench of a budget that has mysteriously evaporated into thin air.
Let’s be honest. For the better part of a decade, the public cloud has been the charismatic, free-spending friend who gets you out of any jam. Need to throw a last-minute party for a million users? They’ve got the hardware. Need to scale an app overnight? They’re already warming up the car. It was fast, it was elastic, and it saved you from the tedious, greasy work of racking your own servers. The only price was a casual, “You can pay me back later.”
Well, it’s later. The bill has arrived, and it has more cryptic line items than a forgotten ancient language. The finance department is calling, and they don’t sound happy.
This isn’t an angry stampede for the exits. Nobody is burning their AWS credits in protest. It’s more of a pragmatic reshuffle, a collective moment of clarity. Teams are looking at their sprawling digital estates and asking a simple question: Does everything really need to live in this expensive, all-inclusive resort? The result is a new normal where the cloud is still essential, just not universal.
The financial hangover
The cloud is wonderfully elastic. Elastic things, by their nature, bounce. So do monthly statements. Teams that scaled at lightning speed are now waking up to a familiar financial hangover with four distinct symptoms. First, there’s the billing complexity. Your monthly invoice isn’t a bill; it’s a mystery novel written by a sadist. Thousands of line items, tiered pricing, and egress charges transform the simple act of “moving data” into a budget-devouring monster.
-- A query that looks innocent but costs a fortune in data egress
SELECT
    event_id,
    user_id,
    payload
FROM
    user_events_production.events_archive
WHERE
    event_date BETWEEN '2025-07-01' AND '2025-07-31'
    AND region != 'eu-central-1'; -- Oh, you wanted to move 5TB across continents? That'll be extra.
Second is the unpredictable demand. A few busy weeks, a successful marketing campaign, or a minor viral event can undo months of careful savings plans. You budget for a quiet month, and suddenly you’re hosting the Super Bowl.
Then come the hidden multipliers. These are the gremlins of your infrastructure. Tiny, seemingly insignificant charges for cross-AZ traffic, managed service premiums, and per-request pricing that quietly multiply in the dark, feasting on your budget.
Finally, there’s the convenience tax. You paid a premium to turn the pain of operations into someone else’s problem. But for workloads that are steady, predictable, and bandwidth-heavy, that convenience starts to look suspiciously like setting money on fire. Those workloads are starting to look much cheaper on hardware you own or lease, where capital expenditure and depreciation replace the tyranny of per-hour-everything.
The gilded cage of convenience
Cloud providers don’t lock you in with malice. They seduce you with helpfulness. They offer a proprietary database so powerful, an event bus so seamless, an identity layer so integrated that before you know it, your application is woven into the very fabric of their ecosystem.
Leaving isn’t a migration; it’s a full-scale renovation project. It’s like living in a luxury hotel. They don’t forbid you from leaving, but once you’re used to the 24/7 room service, are you really going to go back to cooking for yourself?
Faced with this gilded cage, smart teams are now insisting on a kind of technological prenuptial agreement. It’s not about a lack of trust; it’s about preserving future freedom. Where practical, they prefer:
Open databases or engines with compatible wire protocols.
Kubernetes with portable controllers over platform-specific orchestration.
OpenTelemetry for metrics and traces that can travel.
Terraform or Crossplane to describe infrastructure in a way that isn’t tied to one vendor.
This isn’t purity theater. It simply reduces the penalty for changing your mind later.
# A portable infrastructure module
# It can be pointed at AWS, GCP, or even an on-prem vSphere cluster
# with the right provider.

resource "kubernetes_namespace" "app_namespace" {
  metadata {
    name = "my-awesome-app"
  }
}

resource "helm_release" "app_database" {
  name       = "app-postgres"
  repository = "https://charts.bitnami.com/bitnami"
  chart      = "postgresql"
  namespace  = kubernetes_namespace.app_namespace.metadata[0].name

  values = [
    "${file("values/postgres-prod.yaml")}"
  ]
}
A new menu of choices
The choice is no longer just between a hyperscaler and a dusty server cupboard under the stairs. The menu has expanded:
Private cloud: Using platforms like OpenStack or Kubernetes on bare metal in a modern colocation facility.
Alternative clouds: A growing number of providers are offering simpler pricing and less lock-in.
Hybrid models: Keeping sensitive data close to home while bursting to public regions for peak demand.
Edge locations: For workloads that need to be physically close to users and hate round-trip latency.
The point isn’t to flee the public cloud. The point is workload fitness. You wouldn’t wear hiking boots to a wedding, so why run a predictable, data-heavy analytics pipeline on a platform optimized for spiky, uncertain web traffic?
A personality test for your workload
So, how do you decide what stays and what goes? You don’t need a crystal ball. You just need to give each workload a quick personality test. Ask these six questions:
Is its demand mostly steady or mostly spiky? Is it a predictable workhorse or a temperamental rock star?
Is its data large and chatty or small and quiet?
Is latency critical? Does it need instant responses or is a few dozen milliseconds acceptable?
Are there strict data residency or compliance rules?
Does it rely on a proprietary managed service that would be a nightmare to replace?
Can we measure its unit economics? Do we know the cost per request, per user, or per gigabyte processed?
Steady and heavy often wins on owned or leased hardware. Spiky and uncertain still loves the elasticity of the hyperscalers. Regulated and locality-bound prefer the control of a private or hybrid setup. And if a workload gets its superpowers from a proprietary managed service, you either keep it where its powers live or make peace with a less super version of your app.
What does this mean for you, Architect
If you’re a DevOps engineer or a Cloud Architect, congratulations. Your job description just grew a new wing. You are no longer just a builder of digital infrastructure; you are now part financial planner, part supply chain expert, and part treaty negotiator.
Your playbook now includes:
FinOps literacy: The ability to connect design choices to money in a way the business understands and trusts.
Portability patterns: Designing services that can move without a complete rewrite.
Hybrid networking: Weaving together different environments without creating a haunted house of routing tables and DNS entries.
Observability without borders: Using vendor-neutral signals to see what’s happening from end to end.
Procurement fluency: The skill to make apples-to-apples comparisons between amortized hardware, managed services, and colocation contracts.
Yes, it’s time to carry a pocket calculator again, at least metaphorically.
The unsexy path to freedom
The journey back from the cloud is paved with unglamorous but essential work. It’s not a heroic epic; it’s a series of small, carefully planned steps. The risks are real. You have to account for the people cost of patching and maintaining private platforms, the lead times for hardware, and the shadow dependencies on convenient features you forgot you were using.
The antidote is small steps, honest metrics, and boringly detailed runbooks. Start with a proof-of-concept, create a migration plan that moves slices, not the whole cake, and have rollback criteria that a non-engineer can understand.
This is just a course correction
The Great Cloud Exit is less a rebellion and more a rationalization. Think of it as finally cleaning out your closet after a decade-long shopping spree. The public cloud gave us a phenomenal decade of speed, and we bought one of everything. Now, we’re sorting through the pile. That spiky, unpredictable web service? It still looks great in the elastic fabric of a hyperscaler. That massive, steady-state analytics database? It’s like a heavy wool coat that was never meant for the tropics; it’s time to move it to a more suitable climate, like your own data center. And that experimental service you spun up in 2019 and forgot about? That’s the impulse buy sequin jacket you’re never going to wear. Time to donate it.
Treating workload placement as a design problem instead of a loyalty test is liberating. It’s admitting you don’t need a Swiss Army knife when all you have to do is turn a single screw. Choosing the right environment for the job results in a system that costs less and complains less. It performs better because it’s not being forced to do something it was never designed for.
This leads to the most important outcome: options. In a landscape that changes faster than we can update our résumés, flexibility is the only superpower that truly matters. The ability to move, to adapt, and to choose without facing a punishing exit fee or a six-month rewrite, that’s the real prize. The cloud isn’t the destination anymore; it’s just one very useful stop on the map.
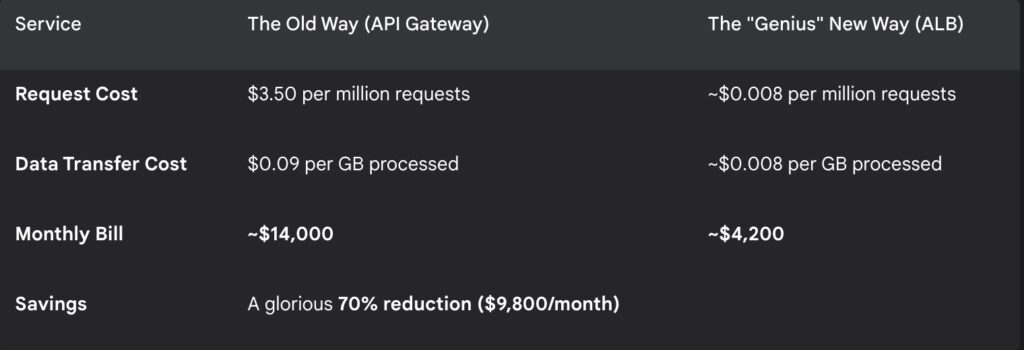
That number wasn’t on a spreadsheet for a new car or a down payment on a house. It was the line item from our AWS bill simply labeled “API Gateway.” It stared back at me from the screen, judging my life choices. For $14,000, you could hire a small team of actual gateway guards, probably with very cool sunglasses and earpieces. All we had was a service. An expensive, silent, and, as we would soon learn, incredibly competent service.
This is the story of how we, in a fit of brilliant financial engineering, decided to fire our expensive digital bouncer and replace it with what we thought was a cheaper, more efficient swinging saloon door. It’s a tale of triumph, disaster, sleepless nights, and the hard-won lesson that sometimes, the most expensive feature is the one you don’t realize you’re using until it’s gone.
Our grand cost-saving gamble
Every DevOps engineer has had this moment. You’re scrolling through the AWS Cost Explorer, and you spot it: a service that’s drinking your budget like it’s happy hour. For us, API Gateway was that service. Its pricing model felt… punitive. You pay per request, and you pay for the data that flows through it. It’s like paying a toll for every car and then an extra fee based on the weight of the passengers.
Then, we saw the alternative: the Application Load Balancer (ALB). The ALB was the cool, laid-back cousin. Its pricing was simple, based on capacity units. It was like paying a flat fee for an all-you-can-eat buffet instead of by the gram.
The math was so seductive it felt like we were cheating the system.
We celebrated. We patted ourselves on the back. We had slain the beast of cloud waste! The migration was smooth. Response times even improved slightly, as an ALB adds less overhead than the feature-rich API Gateway. Our architecture was simpler. We had won.
Or so we thought.
When reality crashes the party
API Gateway isn’t just a toll booth. It’s a fortress gate with a built-in, military-grade security detail you get for free. It inspects IDs, pats down suspicious characters, and keeps a strict count of who comes and goes. When we swapped it for an ALB, we essentially replaced that fortress gate with a flimsy screen door. And then we were surprised when the bugs got in.
The trouble didn’t start with a bang. It started with a whisper.
Week 1: The first unwanted visitor. A script kiddie, probably bored in their parents’ basement, decided to poke our new, undefended endpoint with a classic SQL injection probe. It was the digital equivalent of someone jiggling the handle on your front door. With API Gateway, its built-in Web Application Firewall (WAF) would have spotted the malicious pattern and drop-kicked the request into the void before it ever reached our application. With the ALB, the request sailed right through. Our application code was robust enough to reject it, but the fact that it got to knock on the application’s door at all was a bad sign. We dismissed it. “An amateur,” we scoffed.
Week 3: The client who drank too much. A bug in a third-party client integration caused it to get stuck in a loop. A very, very fast loop. It began hammering one of our endpoints with 10,000 requests per second. The servers, bless their hearts, tried to keep up. Alarms started screaming. The on-call engineer, who was attempting to have a peaceful dinner, saw his phone light up like a Christmas tree. API Gateway’s built-in rate limiting would have calmly told the misbehaving client, “You’ve had enough, buddy. Come back later.” It would have throttled the requests automatically. We had to scramble, manually blocking the IP while the system groaned under the strain.
Week 6: The full-blown apocalypse. This was it. The big one. A proper Distributed Denial-of-Service (DDoS) attack. It wasn’t sophisticated, just a tidal wave of garbage traffic from thousands of hijacked machines. Our ALB, true to its name, diligently balanced this flood of garbage across all our servers, ensuring that every single one of them was completely overwhelmed in a perfectly distributed fashion. The site went down. Hard.
The next 72 hours were a blur of caffeine, panicked Slack messages, and emergency calls with our new best friends at Cloudflare. We had saved $9,800 on our monthly bill, but we were now paying for it with our sanity and our customers’ trust.
Waking up to the real tradeoff
The hidden cost wasn’t just the emergency WAF setup or the premium support plan. It was the engineering hours. The all-nighters. The “I’m so sorry, it won’t happen again” emails to customers.
We had made a classic mistake. We looked at API Gateway’s price tag and saw a cost. We should have seen an itemized receipt for services rendered:
Built-in WAF: Free bouncer that stops common attacks.
Rate Limiting: A Free bartender who cuts off rowdy clients.
Request Validation: Free doorman that checks for malformed IDs (JSON).
Authorization: Free security guard that validates credentials (JWTs/OAuth).
An ALB does none of this. It just balances the load. That’s its only job. Expecting it to handle security is like expecting the mailman to guard your house. It’s not what he’s paid for.
Building a smarter hybrid fortress
After the fires were out and we’d all had a chance to sleep, we didn’t just switch back. That would have been too easy (and an admission of complete defeat). We came back wiser, like battle-hardened veterans of the cloud wars. We realized that not all traffic is created equal.
We landed on a hybrid solution, the architectural equivalent of having both a friendly greeter and a heavily-armed guard.
1. Let the ALB handle the easy stuff. For high-volume, low-risk traffic like serving images or tracking pixels, the ALB is perfect. It’s cheap, fast, and the security risk is minimal. Here’s how we route the “dumb” traffic in serverless.yml:
# serverless.yml
functions:
  handleMedia:
    handler: handler.alb  # A simple handler for media
    events:
      - alb:
          listenerArn: arn:aws:elasticloadbalancing:us-east-1:123456789012:listener/app/my-main-alb/a1b2c3d4e5f6a7b8
          priority: 100
          conditions:
            path: /media/*  # Any request for images, videos, etc.
2. Protect the crown jewels with API Gateway. For anything critical, user authentication, data processing, and payment endpoints, we put it back behind the fortress of API Gateway. The extra cost is a small price to pay for peace of mind.
# serverless.yml
functions:
  handleSecureData:
    handler: handler.auth  # A handler with business logic
    events:
      - httpApi:
          path: /secure/v2/{proxy+}
          method: any
3. Add the security we should have had all along. This was non-negotiable. We layered on security like a paranoid onion.
AWS WAF on the ALB: We now pay for a WAF to protect our “dumb” endpoints. It’s an extra cost, but cheaper than an outage.
Cloudflare: Sits in front of everything, providing world-class DDoS protection.
Custom Rate Limiting: For nuanced cases, we built our own rate limiter. A Lambda function checks a Redis cache to track request counts from specific IPs or API keys.
Here’s a conceptual Python snippet for what that Lambda might look like:
# A simplified Lambda function for rate limiting with Redis
import redis
import os

# Connect to Redis
redis_client = redis.Redis(
    host=os.environ['REDIS_HOST'],
    port=6379,
    db=0
)

RATE_LIMIT_THRESHOLD = 100  # requests
TIME_WINDOW_SECONDS = 60    # per minute

def lambda_handler(event, context):
    # Get an identifier, e.g., from the source IP or an API key
    client_key = event['requestContext']['identity']['sourceIp']

    # Increment the count for this key
    current_count = redis_client.incr(client_key)

    # If it's a new key, set an expiration time
    if current_count == 1:
        redis_client.expire(client_key, TIME_WINDOW_SECONDS)

    # Check if the limit is exceeded
    if current_count > RATE_LIMIT_THRESHOLD:
        # Return a "429 Too Many Requests" error
        return {
            "statusCode": 429,
            "body": "Rate limit exceeded. Please try again later."
        }

    # Otherwise, allow the request to proceed to the application
    return {
        "statusCode": 200,
        "body": "Request allowed"
    }
The final scorecard
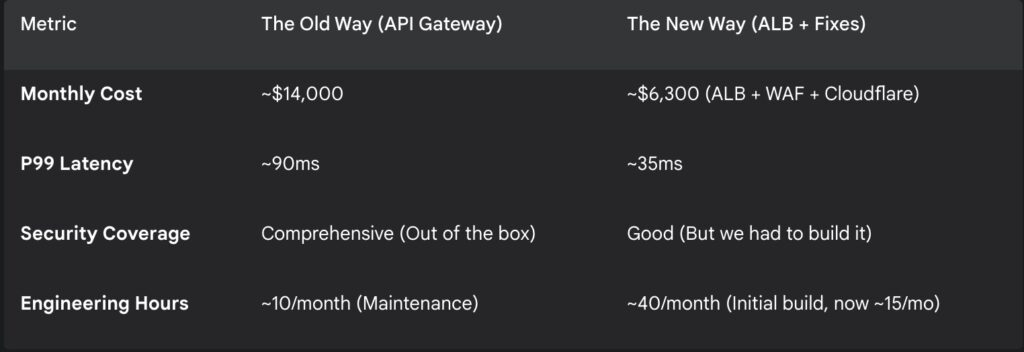
So, after all that drama, was it worth it? Let’s look at the final numbers.
Verdict: For us, yes, it was ultimately worth it. Our traffic profile justified the complexity. But we traded money for time and complexity. We saved cash on the AWS bill, but the initial investment in engineering hours was massive. My DevOps dignity took a hit, but it has since recovered, scarred but wiser.
Your personal sanity check
Before you follow in our footsteps, do yourself a favor and perform an audit. Don’t let a shiny, low price tag lure you onto the rocks.
1. Calculate your break-even point. First, figure out what API Gateway is costing you.
# Get your usage data from API Gateway
aws apigateway get-usage \ --usage-plan-id your_plan_id_here \
   --start-date 2024-01-01
   --end-date 2024-01-31 \
   --query 'items'
Then, estimate your ALB costs based on request volume.
2. Test your defenses (or lack thereof). Don’t wait for a real attack. Simulate one. Tools like Burp Suite or sqlmap can show you just how exposed you are.
# A simple sqlmap test against a vulnerable parameter
sqlmap -u "https://api.yoursite.com/endpoint?id=1" --batch
If you switch to an ALB without a WAF, you might be horrified by what you find.
In the end, choosing between API Gateway and an ALB isn’t just a technical decision. It’s a business decision about risk, and one that goes far beyond the monthly bill. It’s about calculating the true Total Cost of Ownership (TCO), where the “O” includes your engineers’ time, your customers’ trust, and your sleep schedule. Are you paying with dollars on an invoice, or are you paying with 3 AM incident calls and the slow erosion of your team’s morale?
Peace of mind has a price tag. For us, we discovered its value was around $7,700 a month. We just had to get DDoS’d to learn how to read the receipt. Don’t make the same mistake. Look at your architecture not just for what it costs, but for what it protects. Because the cheapest option on paper can quickly become the most expensive one in reality.
Amazon ElastiCache is a fully managed, in-memory caching service that helps you boost your application performance by retrieving information from fast, managed, in-memory caches, instead of relying solely on slower disk-based databases. Until now, you’ve had a couple of main choices for your caching engine: Memcached and Redis. Memcached is the simple, no-frills option, while Redis is the powerful, feature-rich one. Many companies, including mine, skip Memcached entirely due to its limitations. Now, there’s a new kid on the block: Valkey. And it’s not here to replace either of them but to give us more options. So, what’s the big deal?
What’s the deal with Valkey and why should we care?
Valkey is essentially a fork of Redis, meaning it branched off from the Redis codebase. It’s open-source, under the BSD 3-Clause license, and developed by a community of developers. Think of it like this: Redis was a popular open-source project, but its licensing changed slightly. So, a group of folks decided to take the core idea and continue developing it with a more open and community-focused approach. That’s Valkey in a nutshell. Importantly, Valkey uses the same protocol as Redis. This means you can use the same Redis clients to interact with Valkey, making it easy to switch or try out.
Now, you might be thinking, “Another caching engine? Why bother?”. Well, the interesting part about Valkey is that it claims to be just as powerful as Redis, but potentially more cost-effective. This is achieved by focusing on performance and resource usage. While Valkey has similarities with Redis, its community is putting in effort to improve some internal aspects. The end goal is to offer performance comparable to Redis but with better resource utilization. This can lead to significant cost savings in the long term. Also, being open source means no hefty licensing fees, unlike some commercial versions of Redis. This makes Valkey a compelling option, especially for applications that rely heavily on caching.
Valkey vs. Redis? As powerful as Redis but with a better price tag
This is where things get interesting. Valkey is designed to be compatible with the Redis protocol. This is crucial because it means migrating from Redis to Valkey should be relatively straightforward. You can keep using your existing Redis client libraries, which is a huge plus.
Now, when it comes to speed, early benchmarks suggest that Valkey can go toe-to-toe with Redis, and sometimes even surpass it, depending on the workload. This could be due to some clever optimizations under the hood in how Valkey handles memory or manages data structures.
But the real kicker is the potential for cost savings. How does Valkey achieve this? It boils down to efficiency. It seems that Valkey might be able to do more with less. For example, it could potentially store more data in the same instance size compared to Redis, meaning you pay less for the same amount of cached data. Or, it might use less CPU power for the same workload, allowing you to choose smaller, cheaper instances.
Why choose Valkey on ElastiCache? The key benefits
Let’s break down the main advantages of using Valkey:
Cost reduction: This is probably the biggest draw. Valkey’s efficiency, combined with its open-source nature, can lead to a smaller AWS bill. Imagine needing fewer or smaller instances to handle the same caching load. That’s money back in your pocket.
Scalable performance: Valkey is built to scale horizontally, just like Redis. You can add more nodes to your cluster to handle increased demand, ensuring your application remains snappy even under heavy load. It supports replication and high availability, so your data is safe and your application keeps running smoothly.
Flexibility and control: Because Valkey is open source, you have more transparency and control over the software you’re using. You can peek under the hood, understand how it works, and even contribute to its development if you’re so inclined.
Active community: Valkey is driven by a passionate community. This means continuous development, quick bug fixes, and a wealth of shared knowledge. It’s like having a global team of experts working to make the software better.
So, when should you pick Valkey over Redis?
Valkey seems particularly well-suited for a few scenarios:
Cost-sensitive applications: If you’re looking to optimize your infrastructure costs without sacrificing performance, Valkey is worth considering.
High-Throughput workloads: Applications that do a lot of reading and writing to the cache can benefit from Valkey’s efficiency.
Open source preference: Companies that prefer using open-source software for philosophical or practical reasons will find Valkey appealing.
Of course, it’s important to remember that Valkey is relatively new. While it’s showing great promise, it’s always a good idea to keep an eye on its development and adoption within the industry. Redis remains a solid, battle-tested option, so the choice ultimately depends on your specific needs and priorities.
The bottom line
Adding Valkey to ElastiCache is like getting a new, potentially more efficient tool in your toolbox. It doesn’t replace Redis, but it gives you another option, one that could save you money while delivering excellent performance. So, why not give Valkey a try on ElastiCache and see if it’s the right fit for your application? You might be pleasantly surprised. Remember, the best way to know is to test it yourself and see those cost savings firsthand.
Let’s talk buffets. You’ve got your “all-access” pass. The one that lets you roam freely, sampling a bit of everything the dining hall offers. That’s your “regional” pass. Then you’ve got the “specialist” pass, unlimited servings, but only at that one table with the perfectly cooked prime rib. This, my friends, is the heart of the matter when we’re talking about Regional and Zonal Reserved Instances (RIs) in the world of Amazon Web Services (AWS). Let’s break it down.
Think of Reserved Instances (RIs) as pre-paid meal tickets for your cloud computing needs. You commit to using a certain amount of computing power for a year or three, and in return, Amazon gives you a hefty discount compared to paying by the hour (on-demand pricing). It’s like saying, “Hey Amazon, I’m gonna need a lot of computing power. Can you give me a better price if I promise to use it?”
Now, within this world of RIs, you have two main flavors: Regional and Zonal.
Regional RIs the flexible diners
These are your “roam around the buffet” passes. They’re not tied to a specific table (Availability Zone or AZ, in AWS lingo).
AZ flexibility: You can use your computing power in any AZ within a specific region. If one table is full, no problem, just move to another. If your application can work in any part of the region, it’s all good.
Instance size flexibility: This is like saying you can use your meal ticket for a large plate, a medium one, or even just a small snack, as long as it’s from the same food group (instance family). A t3.large reservation, for instance, can be used as a t3.medium or even a t3.xlarge, it uses a normalization factor to do it.
Automatic discount: The discount applies automatically to any instance in the region that matches the attributes of your RI. You don’t have to do any special configurations.
But there’s a catch (isn’t there always?). Regional RIs don’t guarantee you a seat at any specific table. If it’s a popular buffet (a busy AZ), and you need a seat there, you might be out of luck.
Zonal RIs the reserved table crowd
These are for those who know exactly what they want and where they want it.
Capacity reservation in a specific AZ: You’re reserving a specific table at the buffet. You’re guaranteed to have a seat (computing power) in that particular AZ.
No size flexibility: You need to choose exactly your plate size. Your reservation only applies to the exact instance type and size you picked. If you reserved a table for roast beef, you can’t use it for the pasta, sadly.
Discount locked to your AZ: Your discount only works at your reserved table, in the specific AZ you’ve chosen.
So, when do you pick one over the other?
Go Regional when:
Your app is flexible: It can run happily in any AZ within a region. You care more about the discount than about being tied to a specific location. You like flexibility.
You want maximum savings: You want to squeeze every penny of savings by taking advantage of instance size flexibility.
You like things simple: Easier management, no need to juggle reservations across different AZs.
Use cases: Think web applications with load balancing, development, and testing environments, or batch processing jobs. They don’t care too much where they are located, just that they have the power to do what they have to do.
Go Zonal when:
You need guaranteed capacity: You absolutely, positively need computing power in a specific AZ. For example, maybe your app needs to be close to your users in a certain area of the world.
Your app is picky about location: Some apps need to be in a specific AZ for latency, compliance, or architectural reasons. Maybe you have a database that needs to be super close to your application server.
You know your needs: You have a good handle on your future computing needs in that specific AZ.
Use cases: Think primary databases that need to be close to the application layer, mission-critical applications that demand high availability in a single AZ.
A real example to chew on
Imagine you’re running a popular online game. Your player base is spread across a whole region. You use Regional RIs for your game servers because they’re load-balanced and can handle players connecting from anywhere in the region. You take advantage of the Regional flexibility.
But your game’s main database? That needs to be rock-solid and always available in a specific AZ for the lowest latency. For that, you’d use a Zonal RI, reserving capacity to ensure it’s always there when your players need it.
The Bottom Line
Choosing between Regional and Zonal RIs is about understanding your application’s needs and your priorities. It’s like choosing between a flexible buffet pass or a reserved table. Both can be great, it just depends on what you’re hungry for. If you want flexibility and maximum savings, go Regional. If you need guaranteed capacity in a specific location, go Zonal.
So, there you have it. Hopefully, this makes the world of AWS Reserved Instances a bit clearer, and perhaps a bit more appetizing. Now, if you’ll excuse me, all this talk of food has made me hungry. I’m off to find a buffet… I mean, to optimize some cloud instances. 🙂
One of the most exciting aspects of cloud computing is the promise of scalability, the ability to expand or contract resources to meet demand. But how do you design an architecture that can handle unexpected traffic spikes without breaking the bank during quieter periods? This question often comes up in AWS Solution Architect interviews, and for good reason. It’s a core challenge that many businesses face when moving to the cloud. Let’s explore some AWS services and strategies that can help you achieve both scalability and cost efficiency.
Building a Dynamic and Cost-Aware AWS Architecture
Imagine your application is like a bustling restaurant. During peak hours, you need a full staff and all tables ready. But during off-peak times, you don’t want to be paying for idle resources. Here’s how we can translate this concept into a scalable AWS architecture:
Auto Scaling Groups (ASGs): Think of ASGs as your restaurant’s staffing manager. They automatically adjust the number of EC2 instances (your servers) based on predefined rules. If your website traffic suddenly spikes, ASGs will spin up additional instances to handle the load. When traffic dies down, they’ll scale back, saving you money. You can even combine ASGs with Spot Instances for even greater cost savings.
Amazon EC2 Spot Instances: These are like the temporary staff you might hire during a particularly busy event. Spot Instances let you take advantage of unused EC2 capacity at a much lower cost. If your demand is unpredictable, Spot Instances can be a great way to save money while ensuring you have enough resources to handle peak loads.
Amazon Lambda: Lambda is your kitchen staff that only gets paid when they’re cooking, and they’re really good at their job, they can whip up a dish in under 15 minutes! It’s a serverless compute service that runs your code in response to events (like a new file being uploaded or a database change). You only pay for the compute time you actually use, making it ideal for sporadic or unpredictable workloads.
AWS Fargate: Fargate is like having a catering service handle your entire kitchen operation. It’s a serverless compute engine for containers, meaning you don’t have to worry about managing the underlying servers. Fargate automatically scales your containerized applications based on demand, and you only pay for the resources your containers consume.
How the Pieces Fit Together
Now, let’s see how these services can work together in harmony:
Core Application on EC2 with Auto Scaling: Your main application might run on EC2 instances within an Auto Scaling Group. You can configure this group to monitor the CPU utilization of your servers and automatically launch new instances if the average CPU usage reaches a threshold, such as 75% (this is known as a Target Tracking Scaling Policy). This ensures you always have enough servers running to handle the current load, even during unexpected traffic spikes.
Spot Instances for Cost Optimization: To save costs, you could configure your Auto Scaling Group to use Spot Instances whenever possible. This allows you to take advantage of lower prices while still scaling up when needed. Importantly, you’ll also want to set up a recovery policy within your Auto Scaling Group. This policy ensures that if Spot Instances are not available (due to high demand or price fluctuations), your Auto Scaling Group will automatically launch On-Demand Instances instead. This way, you can reliably meet your application’s resource needs even when Spot Instances are unavailable.
Lambda for Event-Driven Tasks: Lambda functions excel at handling event-driven tasks that don’t require a constantly running server. For example, when a new image is uploaded to your S3 bucket, you can trigger a Lambda function to automatically resize it or convert it to a different format. Similarly, Lambda can be used to send notifications to users when certain events occur in your application, such as a new order being placed or a payment being processed. Since Lambda functions are only active when triggered, they can significantly reduce your costs compared to running dedicated EC2 instances for these tasks.
Fargate for Containerized Microservices: If your application is built using microservices, you can run them in containers on Fargate. This eliminates the need to manage servers and allows you to scale each microservice independently. By decoupling your microservices and using Amazon Simple Queue Service (SQS) queues for communication, you can ensure that even under heavy load, all requests will be handled and none will be lost. For applications where the order of operations is critical, such as financial transactions or order processing, you can use FIFO (First-In-First-Out) SQS queues to maintain the exact order of messages.
Monitoring and Optimization: Imagine having a restaurant manager who constantly monitors how busy the restaurant is, how much food is being wasted, and how satisfied the customers are. This is what Amazon CloudWatch does for your AWS environment. It provides detailed metrics and alarms, allowing you to fine-tune your scaling policies and optimize your resource usage. With CloudWatch, you can visualize the health and performance of your entire AWS infrastructure at a glance through intuitive dashboards and graphs. These visualizations make it easy to identify trends, spot potential issues, and make informed decisions about resource allocation and optimization.
The Outcome, A Satisfied Customer and a Healthy Bottom Line
By combining these AWS services and strategies, you can build a cloud architecture that is both scalable and cost-effective. This means your application can gracefully handle unexpected traffic spikes, ensuring a smooth user experience even during peak demand. At the same time, you won’t be paying for idle resources during quieter periods, keeping your cloud costs under control.
Final Analysis
Designing for scalability and cost efficiency is a fundamental aspect of cloud architecture. By leveraging AWS services like Auto Scaling, EC2 Spot Instances, Lambda, and Fargate, you can create a dynamic and responsive environment that adapts to your application’s needs. Remember, the key is to understand your workload patterns and choose the right tools for the job. With careful planning and the right AWS services, you can build a cloud architecture that is both powerful and cost-effective, setting your business up for success in the cloud and in the restaurant. 😉