There’s a hidden art to placing your EC2 instances in AWS. It’s not just about spinning up machines and hoping for the best, where they land in AWS’s vast infrastructure can make all the difference in performance, resilience, and cost. This is where Placement Groups come in.
You might have deployed instances before without worrying about placement, and for many workloads, that’s perfectly fine. But when your application needs lightning-fast communication, fault tolerance, or optimized performance, Placement Groups become a critical tool in your AWS arsenal.
Let’s break it down.
What are Placement Groups?
AWS Placement Groups give you control over how your EC2 instances are positioned within AWS’s data centers. Instead of leaving it to chance, you can specify how close, or how far apart, your instances should be placed. This helps optimize either latency, fault tolerance, or a balance of both.
There are three types of Placement Groups: Cluster, Spread, and Partition. Each serves a different purpose, and choosing the right one depends on your application’s needs.
Types of Placement Groups and when to use them
Cluster Placement Groups for speed over everything
Think of Cluster Placement Groups like a Formula 1 pit crew. Every millisecond counts, and your instances need to communicate at breakneck speeds. AWS achieves this by placing them on the same physical hardware, minimizing latency, and maximizing network throughput.
This is perfect for: ✅ High-performance computing (HPC) clusters ✅ Real-time financial trading systems ✅ Large-scale data processing (big data, AI, and ML workloads)
⚠️ The Trade-off: While these instances talk to each other at lightning speed, they’re all packed together on the same hardware. If that hardware fails, everything inside the Cluster Placement Group goes down with it.
Spread Placement Groups for maximum resilience
Now, imagine you’re managing a set of VIP guests at a high-profile event. Instead of seating them all at the same table (risking one bad spill ruining their night), you spread them out across different areas. That’s what Spread Placement Groups do, they distribute instances across separate physical machines to reduce the impact of hardware failure.
Best suited for: ✅ Mission-critical applications that need high availability ✅ Databases requiring redundancy across multiple nodes ✅ Low-latency, fault-tolerant applications
⚠️ The Limitation: AWS allows only seven instances per Availability Zone in a Spread Placement Group. If your application needs more, you may need to rethink your architecture.
Partition Placement Groups, the best of both worlds approach
Partition Placement Groups work like a warehouse with multiple sections, each with its power supply. If one section loses power, the others keep running. AWS follows the same principle, grouping instances into multiple partitions spread across different racks of hardware. This provides both high performance and resilience, a sweet spot between Cluster and Spread Placement Groups.
Best for: ✅ Distributed databases like Cassandra, HDFS, or Hadoop ✅ Large-scale analytics workloads ✅ Applications needing both performance and fault tolerance
⚠️ AWS’s Partitioning Rule: The number of partitions you can use depends on the AWS Region, and you must carefully plan how instances are distributed.
How to Configure Placement Groups
Setting up a Placement Group is straightforward, and you can do it using the AWS Management Console, AWS CLI, or an SDK.
🚀 Combine with Multi-AZ Deployments: Placement Groups work within a single Availability Zone, so consider spanning multiple AZs for maximum resilience.
📊 Monitor Network Performance: AWS doesn’t guarantee placement if your instance type isn’t supported or there’s insufficient capacity. Always benchmark your performance after deployment.
💰 Balance Cost and Performance: Cluster Placement Groups give the fastest network speeds, but they also increase failure risk. If high availability is critical, Spread or Partition Groups might be a better fit.
Final thoughts
AWS Placement Groups are a powerful but often overlooked feature. They allow you to maximize performance, minimize downtime, and optimize costs, but only if you choose the right type.
The next time you deploy EC2 instances, don’t just launch them randomly, placement matters. Choose wisely, and your infrastructure will thank you for it.
While everyone else is busy wrapping presents and baking cookies, we’re going to unwrap something even more exciting: the world of AWS Step Functions. Now, I know what you might be thinking: “Step Functions? That sounds about as fun as getting socks for Christmas.” But trust me, this is way cooler than it sounds.
Imagine you’re Santa Claus for a second. You’ve got this massive list of kids, a whole bunch of elves, and a sleigh full of presents. How do you make sure everything gets done on time? You need a plan, a workflow. You wouldn’t just tell the elves, “Go do stuff!” and hope for the best, right? No, you’d say, “First, check the list. Then, build the toys. Next, wrap the presents. Finally, load up the sleigh.”
That’s essentially what AWS Step Functions does for your code in the cloud. It’s like a super-organized Santa Claus for your computer programs, ensuring everything happens in the right order, at the right time.
Why use AWS Step Functions? Because even Santa needs a plan
What are Step Functions anyway?
Think of AWS Step Functions as a flowchart on steroids. It’s a service that lets you create visual workflows for your applications. These workflows, called “state machines,” are made up of different steps, or “states,” that tell your application what to do and when to do it. These steps can be anything from simple tasks to complex operations, and they often involve our little helpers called AWS Lambda functions.
A quick chat about AWS Lambda
Before we go further, let’s talk about Lambdas. Imagine you have a tiny robot that’s really good at one specific task, like tying bows on presents. That’s a Lambda function. It’s a small piece of code that does one thing and does it well. You can have lots of these little robots, each doing their own thing, and Step Functions helps you organize them into a productive team. They are like the Christmas elves of the cloud!
Why orchestrate multiple Lambdas?
Now, you might ask, “Why not just have one big, all-knowing Lambda function that does everything?” Well, you could, but it would be like having one giant elf try to build every toy, wrap every present, and load the sleigh all by themselves. It would be chaotic, and hard to manage, and if that elf gets tired (or your code breaks), everything grinds to a halt.
Having specialized elves (or Lambdas) for each task is much better. One is for checking the list, one is for building toys, one is for wrapping, and so on. This way, if one elf needs a break (or a code update), the others can keep working. That’s the beauty of breaking down complex tasks into smaller, manageable steps.
Our scenario Santa’s data dilemma
Let’s imagine Santa has a modern problem. He’s got a big list of kids and their gift requests, but it’s all in a digital file (a JSON file, to be precise) stored in a magical cloud storage called S3 (Simple Storage Service). His goal is to read this list, make sure it’s not corrupted, add some extra Christmas magic to each request (like a “Ho Ho Ho” stamp), and then store the updated list back in S3. Finally, he wants a little notification to make sure everything went smoothly.
Breaking down the task with multiple lambdas
Here’s how we can break down Santa’s task into smaller, Lambda-sized jobs:
Validation Lambda: This little helper checks the list to make sure it’s in the right format and that no naughty kids are trying to sneak extra presents onto the list.
Transformation Lambda: This is where the magic happens. This Lambda adds that special “Ho Ho Ho” to each gift request, making sure every kid gets a personalized touch.
Notification Lambda: This is our town crier. Once everything is done, this Lambda shouts “Success!” (or sends a more sophisticated message) to let Santa know the job is complete.
Step Functions Santa’s master plan
This is where Step Functions comes in. It’s the conductor of our Lambda orchestra. It makes sure each Lambda function runs in the right order, passing the list from one Lambda to the next like a relay race.
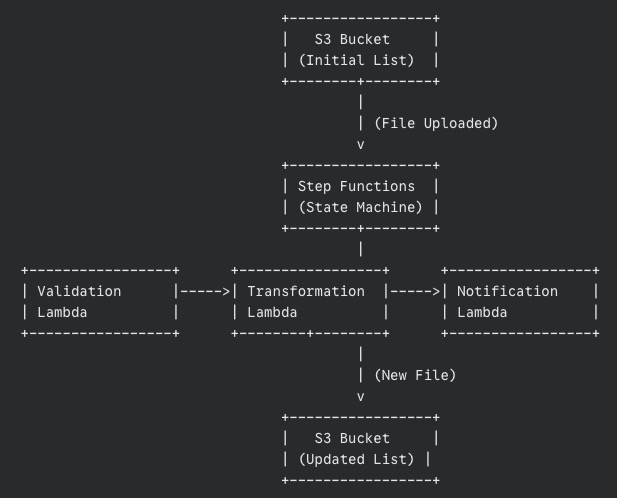
Our High-Level architecture
Let’s draw a simple picture of what’s happening (even Santa loves a good diagram):
The data’s journey
The list (JSON file) lands in an S3 bucket.
This triggers our Step Functions workflow.
The Validation Lambda grabs the list, checks it, and passes the validated list to the Transformation Lambda.
The Transformation Lambda works its magic, adds the “Ho Ho Ho,” and saves the new list to another S3 bucket.
Finally, the Notification Lambda sends out a message confirming success.
The secret sauce passing data between steps
Step Functions automatically passes the output from each step as input to the next. It’s like each elf handing the partially completed present to the next elf in line. This is a crucial part of what makes Step Functions so powerful.
A look at each Lambda function
Let’s peek inside each of our Lambda functions. Don’t worry; we’ll keep it simple.
The list checker validation Lambda
This Lambda, written in Python (a very friendly programming language), does the following:
Downloads the list from S3.
Checks if the list is in the correct format (like making sure it’s actually a list and not a drawing of a reindeer).
If something’s wrong, it raises an error (handled gracefully by Step Functions).
If everything’s good, it returns the validated list.
Adding Christmas magic with the transformation Lambda
This Lambda receives the validated list and:
Adds that special “Ho Ho Ho” to each gift request.
Saves the new, transformed list to a new file in S3.
Returns the location of the newly created file.
Spreading the news with the notification Lambda
This Lambda gets the path to the transformed file and:
Could send a message to Santa’s phone, write “Success!” in the snow, or simply print a message in the cloud logs.
Marks the end of our workflow.
Configuring the state machine
Now, how do we tell Step Functions what to do? We use something called the Amazon States Language (ASL), which is just a fancy way of describing our workflow in a JSON format. Here’s a simplified snippet:
Don’t be scared by the code! It’s just a structured way of saying:
Start with “ValidateData.”
Then go to “TransformData.”
Finally, go to “Notify” and we’re done.
Each “Resource” is the address of our Lambda function in the AWS world.
Error handling for dropped tasks
What happens if an elf drops a present? Step Functions can handle that! We can tell it to retry the step or go to a special “Fix It” state if something goes wrong.
Passing output between steps
Remember how we talked about passing data between steps? Here’s a simplified example of how we tell Step Functions to do that:
This tells the “TransformData” step to take the “validatedData” from the previous step’s output and put its output in “transformedData.”
Making sure everything works before the big day
Before we unleash our workflow on the world (or Santa’s list), we need to make absolutely sure it works as expected. Testing is like a dress rehearsal for Christmas Eve, ensuring every elf knows their part and Santa’s sleigh is ready to fly.
Two levels of testing
We’ll approach testing in two ways:
Testing each Lambda individually (Local tests):
Think of this as quality control for each elf. Before they join the assembly line, we need to make sure each Lambda function does its job correctly in isolation.
We can do this right from the AWS Management Console. Simply find your Lambda function, and look for a “Test” tab or button.
You’ll be able to create test events, which are like sample inputs for your Lambda. For example, for our Validation Lambda, you could create a test event with a well-formatted JSON and another with a deliberately incorrect JSON to see if the Lambda catches the error.
Run the test and check the output. Did the Lambda behave as expected? Did it return the correct data or the proper error message?
Alternatively, if you’re comfortable with the command line, you can use the AWS CLI (Command Line Interface) to invoke your Lambdas with test data. This offers more flexibility for advanced testing.
It is very important to test each Lambda with different types of inputs to make sure it behaves well under diverse circumstances.
Testing the entire workflow (End-to-End test):
This is the grand rehearsal, where we test the whole process from start to finish.
First, prepare a sample JSON file that represents a typical Santa’s list. Make it realistic but simple enough for easy testing.
Upload this file to your designated S3 bucket. This should automatically trigger your Step Functions workflow.
Now, head over to the Step Functions section in the AWS Management Console. Find your state machine and look for the execution history. You should see a new execution that corresponds to your test.
Click on the execution. You’ll see a visual diagram of your workflow, with each step highlighted as it’s executed. This is like tracking Santa’s sleigh in real time!
Pay close attention to each step. Did it succeed? Did it take roughly the amount of time you expected? If a step fails, the diagram will show you where the problem occurred.
Once the workflow is complete, check your output S3 bucket. Is the transformed file there? Is it correctly modified according to your Transformation Lambda’s logic?
Finally, verify that your Notification Lambda did its job. Did it log the success message? Did it send a notification if that’s how you configured it?
Why both types of testing matter
You might wonder, “Why do we need both local and end-to-end tests?” Here’s the deal:
Local tests help you catch problems early on, at the individual component level. It’s much easier to fix a problem with a single Lambda than to debug a complex workflow with multiple failing parts.
End-to-end tests ensure that all the components work together seamlessly. They verify that the data is passed correctly between steps and that the overall workflow produces the desired outcome.
Debugging tips
If a step fails during the end-to-end test, click on the failed step in the Step Functions execution diagram. You’ll often see an error message that can help you pinpoint the issue.
Check the CloudWatch Logs for your Lambda functions. These logs contain valuable information about what happened during the execution, including any error messages or debug output you’ve added to your code.
Iterate and refine
Testing is not a one-time thing. As you develop your workflow, you’ll likely make changes and improvements. Each time you make a significant change, repeat your tests to ensure everything still works as expected. Remember: a well-tested workflow is a reliable workflow. By thoroughly testing our Step Functions workflow, we’re making sure that Santa’s list (and our application) is in good hands. Now, let’s get testing!
Step Functions or single Lambdas?
Maintainability and visibility
Step Functions makes it super easy to see what’s happening in your workflow. It’s like having a map of Santa’s route on Christmas Eve. This makes it much easier to find and fix problems.
Complexity
For simple tasks, a single Lambda might be enough. But as soon as you have multiple steps that need to happen in a specific order, Step Functions is your best friend.
Beyond Christmas Eve
Key takeaways
Step Functions is a powerful way to chain together Lambda functions in a visual, trackable, and error-tolerant workflow. It’s like having a super-organized Santa Claus for your cloud applications.
Potential improvements
We could add more steps, like extra validation or an automated email to parents. We could use other AWS services like SNS (Simple Notification Service) for more advanced notifications or DynamoDB for storing even more data.
Final words
This was a simple example, but the same ideas apply to much more complex, real-world applications. Step Functions can handle massive workflows with thousands of steps, making it a crucial tool for any aspiring cloud architect.
So, there you have it! You’ve now seen how AWS Step Functions can orchestrate AWS Lambdas to complete a task, just like Santa orchestrates his elves on Christmas Eve. And hopefully, it was a bit more exciting than getting socks for Christmas. 😊
Efficiently managing networks in the cloud can feel like solving a puzzle. But what if there was a simpler way to connect everything? Let’s explore AWS Transit Gateway and see how it can clear up the confusion, making your cloud network feel less like a maze and more like a well-oiled machine.
What is AWS Transit Gateway?
Imagine you’ve got a bunch of towns (your VPCs and on-premises networks) that need to talk to each other. You could build roads connecting each town directly, but that would quickly become a tangled web. Instead, you create a central hub, like a giant roundabout, where every town can connect through one easy point. That’s what AWS Transit Gateway does. It acts as the central hub that lets your VPCs and networks chat without all the chaos.
The key components
Let’s break down the essential parts that make this work:
Attachments: These are the roads linking your VPCs to the Transit Gateway. Each attachment connects one VPC to the hub.
MTU (Maximum Transmission Unit): This is the largest truck that can fit on the road. It defines the biggest data packet size that can travel smoothly across your network.
Route Table: This map provides data on which road to take. It’s filled with rules for how to get from one VPC to another.
Associations: Are like traffic signs connecting the route tables to the right attachments.
Propagation: Here’s the automatic part. Just like Google Maps updates routes based on real-time traffic, propagation updates the Transit Gateway’s route tables with the latest paths from the connected VPCs.
How AWS Transit Gateway works
So, how does all this come together? AWS Transit Gateway works like a virtual router, connecting all your VPCs within one AWS account, or even across multiple accounts. This saves you from having to set up complex configurations for each connection. Instead of multiple point-to-point setups, you’ve got a single control point, it’s like having a universal remote for your network.
Why You’d want to use AWS Transit Gateway
Now, why bother with this setup? Here are some big reasons:
Centralized control: Just like a traffic controller manages all the routes, Transit Gateway lets you control your entire network from one place.
Scalability: Need more VPCs? No problem. You can easily add them to your network without redoing everything.
Security policies: Instead of setting up rules for every VPC separately, you can apply security policies across all connected networks in one go.
When to Use AWS Transit Gateway
Here’s where it shines:
Multi-VPC connectivity: If you’re dealing with multiple VPCs, maybe across different accounts or regions, Transit Gateway is your go-to tool for managing that web of connections.
Hybrid cloud architectures: If you’re linking your on-premises data centers with AWS, Transit Gateway makes it easy through VPNs or Direct Connect.
Security policy enforcement: When you need to keep tight control over network segmentation and security across your VPCs, Transit Gateway steps in like a security guard making sure everything is in place.
AWS NAT Gateway and its role
Now, let’s not forget the AWS NAT Gateway. It’s like the bouncer for your private subnet. It allows instances in a private subnet to access the internet (or other AWS services) while keeping them hidden from incoming internet traffic.
How does NAT Gateway work with AWS Transit Gateway?
You might be wondering how these two work together. Here’s the breakdown:
Traffic routing: NAT Gateway handles your internet traffic, while Transit Gateway manages the VPC-to-VPC and on-premise connections.
Security: The NAT Gateway protects your private instances from direct exposure, while Transit Gateway provides a streamlined routing system, keeping your network safe and organized.
Cost efficiency: Instead of deploying a NAT Gateway in every VPC, you can route traffic from multiple VPCs through one NAT Gateway, saving you time and money.
When to use NAT Gateway with AWS Transit Gateway
If your private subnet instances need secure outbound access to the internet in a multi-VPC setup, you’ll want to combine the two. Transit Gateway will handle the internal traffic, while NAT Gateway manages outbound traffic securely.
A simple demonstration
Let’s see this in action with a step-by-step walkthrough. Here’s what you’ll need:
An AWS Account
IAM Permissions: Full access to Amazon VPC and Amazon EC2
Now, let’s create two VPCs, connect them using Transit Gateway, and test the network connectivity between instances.
Step 1: Create your first VPC with:
CIDR block: 10.10.0.0/16
1 Public and 1 Private Subnet
NAT Gateway in 1 Availability Zone
Step 2: Create the second VPC with:
CIDR block: 10.20.0.0/16
1 Private Subnet
Step 3: Create the Transit Gateway and name it tgw-awesometgw-1-tgw.
Step 4: Attach both VPCs to the Transit Gateway by creating attachments for each one.
Step 5: Configure the Transit Gateway Route Table to route traffic between the VPCs.
Step 6: Update the VPC route tables to use the Transit Gateway.
Step 7: Finally, launch some EC2 instances in each VPC and test the network connectivity using SSH and ping.
If everything is set up correctly, your instances will be able to communicate through the Transit Gateway and route outbound traffic through the NAT Gateway.
Wrapping It Up
AWS Transit Gateway is like the mastermind behind a well-organized network. It simplifies how you connect multiple VPCs and on-premise networks, all while providing central control, security, and scalability. By adding NAT Gateway into the mix, you ensure that your private instances get the secure internet access they need, without exposing them to unwanted traffic.
Next time you’re feeling overwhelmed by your network setup, remember that AWS Transit Gateway is there to help untangle the mess and keep things running smoothly.
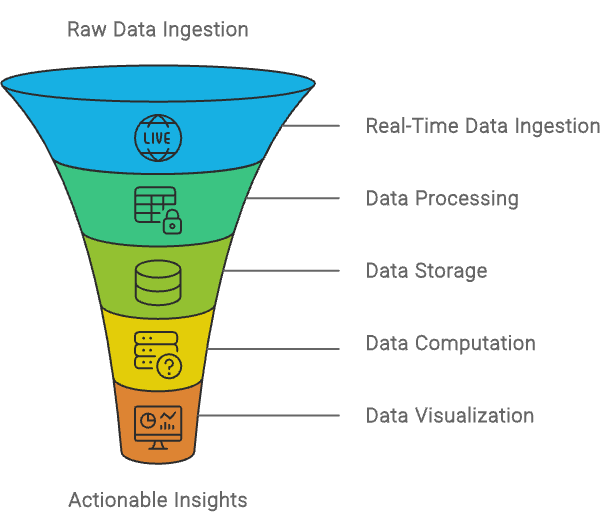
In the era of data-driven decision-making, organizations must efficiently handle and analyze immense volumes of data in real-time to maintain a competitive edge. As an AWS Solutions Architect, one of the critical tasks you may encounter is designing an architecture that can efficiently handle the ingestion, processing, and analysis of large datasets as they stream in from various sources. The goal is to ensure that the solution is scalable and capable of delivering high performance consistently, regardless of the data volume.
Building the Foundation. Real-Time Data Ingestion
The journey begins with the ingestion of data. When data streams continuously from multiple sources, such as application logs, user interactions, and IoT devices, it’s essential to use a service that can handle this flow with minimal latency. Amazon Kinesis Data Streams is the ideal choice here. Kinesis is engineered to handle real-time data ingestion at scale, allowing you to capture and process data as it arrives, with low latency. Its ability to scale dynamically ensures that your system remains robust no matter the surge in data volume.
Processing Data in Real-Time. The Power of Serverless
Once the data is ingested, the next step is real-time processing. This is where AWS Lambda shines. Lambda allows you to run code in response to events without provisioning or managing servers. As data flows through Kinesis, Lambda can be triggered to process each chunk of data, applying necessary transformations, filtering, and even enriching the data on the fly. The serverless nature of Lambda means it automatically scales with your data, processing millions of records without any manual intervention, which is crucial for maintaining a seamless and responsive architecture.
After processing, the transformed data needs to be stored in a way that it is both durable and easily accessible for future analysis. Amazon S3 is the backbone of storage in this architecture. With its virtually unlimited storage capacity and high durability, S3 ensures that your data is safe and readily available. For those more complex analytical queries, Amazon Redshift serves as a powerful data warehouse. Redshift allows for efficient querying of large datasets, enabling quick insights from your processed data. By separating storage (S3) and compute (Redshift), the architecture leverages the best of both worlds: cost-effective storage and powerful analytics.
Visualizing Data. Turning Insights into Action
Data, no matter how well processed, is only valuable when it can be turned into actionable insights. Amazon QuickSight provides an intuitive platform for stakeholders to interact with the data through dashboards and visualizations. QuickSight seamlessly integrates with Redshift and S3, making it easy to visualize data in real-time. This empowers decision-makers to monitor key metrics, observe trends, and respond to changes with agility.
Optimizing for Scalability and Cost-Efficiency
Scalability is a cornerstone of this architecture. By leveraging AWS’s built-in scaling features, services like Amazon Kinesis and Redshift can automatically adjust to fluctuations in data volume. For Amazon Kinesis, enabling Kinesis Data Streams On-Demand ensures that the architecture scales out to handle higher loads during peak times and scales in during quieter periods, optimizing costs without manual intervention. Similarly, Amazon Redshift uses Concurrency Scaling to handle spikes in query load by adding additional compute resources as needed, and Elastic Resize allows the infrastructure to dynamically adjust storage and compute capacity. These auto-scaling mechanisms ensure that the infrastructure remains both cost-effective and high-performing, regardless of the data throughput.
How the Services Work Together
The true strength of this architecture lies in the seamless integration of AWS services, each contributing to a robust, scalable, and efficient big data solution. The journey begins with Amazon Kinesis Data Streams, which captures and ingests data in real-time from various sources. This real-time ingestion ensures that data flows into the system with minimal latency, ready for immediate processing.
AWS Lambda steps in next, automatically processing this data as it arrives. Lambda’s serverless nature allows it to scale dynamically with the incoming data, applying necessary transformations, filtering, and enrichment. This immediate processing ensures that the data is in the right format and enriched with relevant information before moving on to the next stage.
The processed data is then stored in Amazon S3, which serves not only as a scalable and durable storage solution but also as the foundation of a Data Lake. In a big data architecture, a Data Lake on S3 acts as a centralized repository where both raw and processed data can be stored, regardless of format or structure. This flexibility allows for diverse datasets to be ingested, stored, and analyzed over time. By leveraging S3 as a Data Lake, the architecture supports long-term storage and future-proofing, enabling advanced analytics and machine learning applications on historical data.
Amazon Redshift integrates seamlessly with this Data Lake, pulling in the processed data from S3 for complex analytical queries. The synergy between S3 and Redshift ensures that data can be accessed and analyzed efficiently, with Redshift providing the computational power needed for deep dives into large datasets. This capability allows organizations to derive meaningful insights from their data, turning raw information into actionable business intelligence.
Finally, Amazon QuickSight adds a layer of accessibility to this architecture. By connecting directly to both S3 and Redshift, QuickSight enables real-time data visualization, allowing stakeholders to interact with the data through intuitive dashboards. This visualization is not just the final step in the data pipeline but a crucial component that transforms data into strategic insights, driving informed decision-making across the organization.
Basically
The architecture designed here showcases the power and flexibility of AWS in handling big data challenges. By utilizing services like Kinesis, Lambda, S3, Redshift, and QuickSight, you can build a solution that not only processes and analyzes data in real-time but also scales automatically to meet the demands of any situation. This design empowers organizations to make data-driven decisions faster, providing a competitive edge in today’s fast-paced environment. With AWS, the possibilities for innovation in big data are endless.
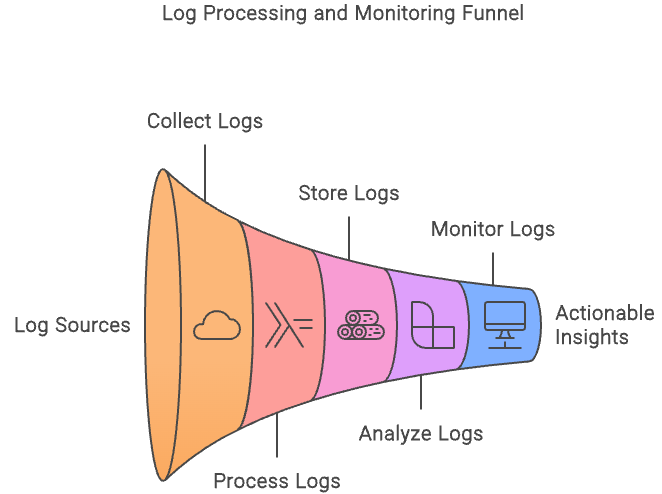
In the world of cloud computing, logs serve as the breadcrumbs of system activity. They provide invaluable insights into the health, performance, and security of your applications and infrastructure. However, as your AWS environment grows, managing logs scattered across various services can become a daunting task. This is where a centralized log management solution comes into play. We will explore how to design such a solution in AWS, ensuring that you can effectively collect, store, analyze, and monitor your logs from a single vantage point.
Building Blocks of Centralized Log Management
Log Collection. The First Mile
The journey begins with collecting logs from their diverse origins. Amazon CloudWatch Logs acts as the initial repository, capturing logs generated by various AWS services like EC2 instances, Lambda functions, and RDS databases. For logs residing outside of AWS or within custom applications, we enlist the help of AWS Lambda. These lightweight functions act as log forwarders, gathering logs from their sources and sending them to CloudWatch Logs.
Storage. A Safe Haven for Logs
Once collected, logs need a durable and cost-effective storage solution. Amazon S3, the Simple Storage Service, fits the bill perfectly. S3 offers virtually unlimited storage capacity, allowing you to retain logs for extended periods to meet compliance or auditing requirements. S3’s storage classes, such as S3 Standard, S3 Infrequent Access, and S3 Glacier, allow you to optimize costs by storing data based on how frequently it needs to be accessed. Lifecycle policies can be configured to automatically transition logs to lower-cost storage classes or even delete them after a certain period, aligning with data retention policies.
Analysis. Unveiling Insights
Raw logs are like unrefined ore, valuable, but not readily usable. To extract meaningful insights, we employ Amazon Elasticsearch Service (OpenSearch Service). This managed service provides a powerful search and analytics engine capable of indexing, searching, and visualizing vast amounts of log data. Kibana, the companion visualization tool, empowers you to create interactive dashboards and charts that bring your log data to life.
Monitoring and Alerting. Staying Vigilant
A centralized log management solution isn’t just about historical analysis; it’s also about real-time monitoring. CloudWatch Metrics and Alarms enable you to define thresholds and trigger alerts when log patterns deviate from the norm. This proactive approach lets you detect and respond to potential issues before they escalate. These alarms can trigger automated responses, such as invoking Lambda functions to remediate issues or sending notifications through Amazon SNS (Simple Notification Service) to alert the appropriate team members, ensuring that incidents are handled promptly.
Security and Retention. Protecting Your Assets
Logs often contain sensitive information. AWS Identity and Access Management (IAM) policies ensure that only authorized individuals or services can access your log data. Additionally, S3 lifecycle policies automate the transition of logs to lower-cost storage tiers or their eventual deletion, helping you optimize storage costs and comply with data retention policies.
Connecting the Dots
The true power of this solution lies in the seamless integration of its components. CloudWatch Logs serves as the central hub, receiving logs from various sources. Lambda functions act as bridges, connecting disparate log sources to CloudWatch Logs. S3 provides long-term storage, while Elasticsearch Service and Kibana transform raw logs into actionable insights. CloudWatch Metrics and Alarms keep a watchful eye, alerting you to potential anomalies. IAM policies and S3 lifecycle policies ensure data security and cost optimization.
Basically
A well-designed centralized log management solution gives you a holistic view of your AWS environment. By consolidating logs from various sources, you can streamline troubleshooting, enhance security monitoring, and facilitate compliance audits. The combination of AWS services like CloudWatch Logs, Lambda, S3, Elasticsearch Service, and Kibana provides a robust and scalable foundation for managing logs at any scale. Effective log management is not just a best practice; it’s a strategic imperative in the cloud era.
Large development teams often face the challenge of working on complex projects without interfering with each other’s work. Additionally, companies must ensure that their testing environments do not accidentally affect their production systems. Today, we will look into the fascinating world of AWS architecture and explore how to create a secure, scalable, and isolated development and testing environment.
The Challenge at Hand
Imagine you’re tasked with creating a playground for a team of developers. This playground must be secure enough to protect sensitive data, flexible enough to accommodate various projects, and isolated enough to prevent any accidental impacts on production systems. Sounds like a tall order. But fear not, with the power of AWS, we can create just such an environment.
Building Our AWS Sandbox
Let’s break down this complex task into smaller, more manageable pieces. Think of it as building a house, we’ll start with the foundation and work our way up.
1. Separate AWS Accounts. Our Foundation
Just as you wouldn’t build a house on shaky ground, we won’t build our development environment without a solid foundation. In AWS, this foundation comes in the form of separate accounts for development, testing, and production.
Why separate accounts? Well, imagine you’re cooking in your kitchen. You wouldn’t want your experimental fusion cuisine to accidentally end up on the plates of paying customers in a restaurant, would you? The same principle applies here. Separate accounts ensure that what happens in development, stays in development.
2. Virtual Private Cloud (VPC). Our Plot of Land
With our foundation in place, it’s time to define our plot of land. In AWS, this is done through Virtual Private Clouds (VPCs). Think of a VPC as a virtual data center in the cloud. We’ll create separate VPCs for each environment, complete with public and private subnets.
Why the distinction between public and private? Well, it’s like having a front yard and a backyard. Your front yard (public subnet) is where you interact with the outside world, while your backyard (private subnet) is where you keep things you don’t want everyone to see.
3. Access Control. Our Security System
Now that we have our land, we need to secure it. Enter AWS Identity and Access Management (IAM). IAM is like a sophisticated security system for your AWS environment. It allows us to define who can enter which rooms (resources) and what they can do once they’re inside.
We’ll use IAM to create roles and policies that ensure only authorized users and services can access each environment. It’s like giving out different keys to different people, the gardener doesn’t need access to your safe, after all.
4. Infrastructure Automation. Our Blueprint
Here’s where things get exciting. Instead of building our house brick by brick, we’re going to use a magical blueprint that constructs everything for us. This magic comes in the form of AWS CloudFormation. (I know, we could use Terraform, but in this case, let’s use CloudFormation).
CloudFormation allows us to define our entire infrastructure as code. It’s like having a set of LEGO instructions that anyone can follow to build a replica of our environment. This not only makes it easy to replicate our setup but also ensures consistency across different projects.
5. Continuous Integration and Continuous Deployment (CI/CD). Our Assembly Line
The final piece of our puzzle is setting up an efficient way to move our code from development to testing to production. This is where CI/CD comes in, and AWS has just the tools for the job: CodePipeline, CodeBuild, and CodeDeploy.
Think of this as an assembly line for your code. CodePipeline orchestrates the overall process, CodeBuild compiles and tests your code, and CodeDeploy, well, deploys it. This automated pipeline ensures that code changes are thoroughly tested before they ever reach production, reducing the risk of errors and improving overall software quality.
Putting It All Together
Now, let’s take a step back and look at how all these pieces fit together. Our separate AWS accounts provide isolation between environments. Within each account, we have VPCs that further segment our resources. IAM ensures that only the right people have access to the right resources. CloudFormation allows us to quickly and consistently create and update our infrastructure. And our CI/CD pipeline automates the process of moving code through our environments.
It’s like a well-oiled machine, where each component plays a crucial role in creating a secure, scalable, and efficient development environment.
Final Words
Implementing this architecture, we’ve created a sandbox where developers can play freely without fear of breaking anything important. The isolation between environments prevents accidental impacts on production systems. The automation in place ensures consistency and reduces the potential for human error. The CI/CD pipeline streamlines the development process, allowing for faster iterations and higher-quality software.
The key to understanding complex systems like this is to break them down into smaller, more manageable pieces. Each component we’ve discussed, from separate AWS accounts to CI/CD pipelines, serves a specific purpose in creating a robust development environment.