
While everyone else is busy wrapping presents and baking cookies, we’re going to unwrap something even more exciting: the world of AWS Step Functions. Now, I know what you might be thinking: “Step Functions? That sounds about as fun as getting socks for Christmas.” But trust me, this is way cooler than it sounds.
Imagine you’re Santa Claus for a second. You’ve got this massive list of kids, a whole bunch of elves, and a sleigh full of presents. How do you make sure everything gets done on time? You need a plan, a workflow. You wouldn’t just tell the elves, “Go do stuff!” and hope for the best, right? No, you’d say, “First, check the list. Then, build the toys. Next, wrap the presents. Finally, load up the sleigh.”
That’s essentially what AWS Step Functions does for your code in the cloud. It’s like a super-organized Santa Claus for your computer programs, ensuring everything happens in the right order, at the right time.
Why use AWS Step Functions? Because even Santa needs a plan
What are Step Functions anyway?
Think of AWS Step Functions as a flowchart on steroids. It’s a service that lets you create visual workflows for your applications. These workflows, called “state machines,” are made up of different steps, or “states,” that tell your application what to do and when to do it. These steps can be anything from simple tasks to complex operations, and they often involve our little helpers called AWS Lambda functions.
A quick chat about AWS Lambda
Before we go further, let’s talk about Lambdas. Imagine you have a tiny robot that’s really good at one specific task, like tying bows on presents. That’s a Lambda function. It’s a small piece of code that does one thing and does it well. You can have lots of these little robots, each doing their own thing, and Step Functions helps you organize them into a productive team. They are like the Christmas elves of the cloud!
Why orchestrate multiple Lambdas?
Now, you might ask, “Why not just have one big, all-knowing Lambda function that does everything?” Well, you could, but it would be like having one giant elf try to build every toy, wrap every present, and load the sleigh all by themselves. It would be chaotic, and hard to manage, and if that elf gets tired (or your code breaks), everything grinds to a halt.
Having specialized elves (or Lambdas) for each task is much better. One is for checking the list, one is for building toys, one is for wrapping, and so on. This way, if one elf needs a break (or a code update), the others can keep working. That’s the beauty of breaking down complex tasks into smaller, manageable steps.
Our scenario Santa’s data dilemma
Let’s imagine Santa has a modern problem. He’s got a big list of kids and their gift requests, but it’s all in a digital file (a JSON file, to be precise) stored in a magical cloud storage called S3 (Simple Storage Service). His goal is to read this list, make sure it’s not corrupted, add some extra Christmas magic to each request (like a “Ho Ho Ho” stamp), and then store the updated list back in S3. Finally, he wants a little notification to make sure everything went smoothly.
Breaking down the task with multiple lambdas
Here’s how we can break down Santa’s task into smaller, Lambda-sized jobs:
- Validation Lambda: This little helper checks the list to make sure it’s in the right format and that no naughty kids are trying to sneak extra presents onto the list.
- Transformation Lambda: This is where the magic happens. This Lambda adds that special “Ho Ho Ho” to each gift request, making sure every kid gets a personalized touch.
- Notification Lambda: This is our town crier. Once everything is done, this Lambda shouts “Success!” (or sends a more sophisticated message) to let Santa know the job is complete.
Step Functions Santa’s master plan
This is where Step Functions comes in. It’s the conductor of our Lambda orchestra. It makes sure each Lambda function runs in the right order, passing the list from one Lambda to the next like a relay race.
Our High-Level architecture
Let’s draw a simple picture of what’s happening (even Santa loves a good diagram):
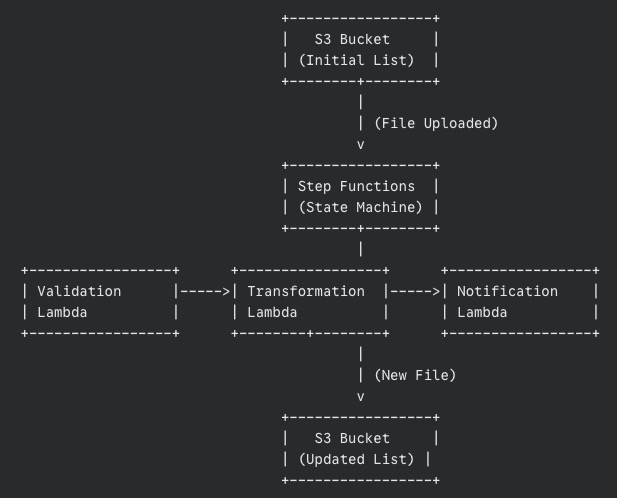
The data’s journey
- The list (JSON file) lands in an S3 bucket.
- This triggers our Step Functions workflow.
- The Validation Lambda grabs the list, checks it, and passes the validated list to the Transformation Lambda.
- The Transformation Lambda works its magic, adds the “Ho Ho Ho,” and saves the new list to another S3 bucket.
- Finally, the Notification Lambda sends out a message confirming success.
The secret sauce passing data between steps
Step Functions automatically passes the output from each step as input to the next. It’s like each elf handing the partially completed present to the next elf in line. This is a crucial part of what makes Step Functions so powerful.
A look at each Lambda function
Let’s peek inside each of our Lambda functions. Don’t worry; we’ll keep it simple.
The list checker validation Lambda
This Lambda, written in Python (a very friendly programming language), does the following:
- Downloads the list from S3.
- Checks if the list is in the correct format (like making sure it’s actually a list and not a drawing of a reindeer).
- If something’s wrong, it raises an error (handled gracefully by Step Functions).
- If everything’s good, it returns the validated list.
Adding Christmas magic with the transformation Lambda
This Lambda receives the validated list and:
- Adds that special “Ho Ho Ho” to each gift request.
- Saves the new, transformed list to a new file in S3.
- Returns the location of the newly created file.
Spreading the news with the notification Lambda
This Lambda gets the path to the transformed file and:
- Could send a message to Santa’s phone, write “Success!” in the snow, or simply print a message in the cloud logs.
- Marks the end of our workflow.
Configuring the state machine
Now, how do we tell Step Functions what to do? We use something called the Amazon States Language (ASL), which is just a fancy way of describing our workflow in a JSON format. Here’s a simplified snippet:
{
  "StartAt": "ValidateData",
  "States": {
    "ValidateData": {
      "Type": "Task",
      "Resource": "arn:aws:lambda:region:123456789012:function:ValidateData",
      "Next": "TransformData"
    },
    "TransformData": {
      "Type": "Task",
      "Resource": "arn:aws:lambda:region:123456789012:function:TransformData",
      "Next": "Notify"
    },
    "Notify": {
      "Type": "Task",
      "Resource": "arn:aws:lambda:region:123456789012:function:Notify",
      "End": true
    }
  }
}
Don’t be scared by the code! It’s just a structured way of saying:
- Start with “ValidateData.”
- Then go to “TransformData.”
- Finally, go to “Notify” and we’re done.
Each “Resource” is the address of our Lambda function in the AWS world.
Error handling for dropped tasks
What happens if an elf drops a present? Step Functions can handle that! We can tell it to retry the step or go to a special “Fix It” state if something goes wrong.
Passing output between steps
Remember how we talked about passing data between steps? Here’s a simplified example of how we tell Step Functions to do that:
"TransformData": {
  "Type": "Task",
  "Resource": "arn:aws:lambda:region:123456789012:function:TransformData",
  "InputPath": "$.validatedData",
  "OutputPath": "$.transformedData",
  "Next": "Notify"
}
This tells the “TransformData” step to take the “validatedData” from the previous step’s output and put its output in “transformedData.”
Making sure everything works before the big day
Before we unleash our workflow on the world (or Santa’s list), we need to make absolutely sure it works as expected. Testing is like a dress rehearsal for Christmas Eve, ensuring every elf knows their part and Santa’s sleigh is ready to fly.
Two levels of testing
We’ll approach testing in two ways:
- Testing each Lambda individually (Local tests):
- Think of this as quality control for each elf. Before they join the assembly line, we need to make sure each Lambda function does its job correctly in isolation.
- We can do this right from the AWS Management Console. Simply find your Lambda function, and look for a “Test” tab or button.
- You’ll be able to create test events, which are like sample inputs for your Lambda. For example, for our Validation Lambda, you could create a test event with a well-formatted JSON and another with a deliberately incorrect JSON to see if the Lambda catches the error.
- Run the test and check the output. Did the Lambda behave as expected? Did it return the correct data or the proper error message?
- Alternatively, if you’re comfortable with the command line, you can use the AWS CLI (Command Line Interface) to invoke your Lambdas with test data. This offers more flexibility for advanced testing.
- It is very important to test each Lambda with different types of inputs to make sure it behaves well under diverse circumstances.
- Testing the entire workflow (End-to-End test):
- This is the grand rehearsal, where we test the whole process from start to finish.
- First, prepare a sample JSON file that represents a typical Santa’s list. Make it realistic but simple enough for easy testing.
- Upload this file to your designated S3 bucket. This should automatically trigger your Step Functions workflow.
- Now, head over to the Step Functions section in the AWS Management Console. Find your state machine and look for the execution history. You should see a new execution that corresponds to your test.
- Click on the execution. You’ll see a visual diagram of your workflow, with each step highlighted as it’s executed. This is like tracking Santa’s sleigh in real time!
- Pay close attention to each step. Did it succeed? Did it take roughly the amount of time you expected? If a step fails, the diagram will show you where the problem occurred.
- Once the workflow is complete, check your output S3 bucket. Is the transformed file there? Is it correctly modified according to your Transformation Lambda’s logic?
- Finally, verify that your Notification Lambda did its job. Did it log the success message? Did it send a notification if that’s how you configured it?
Why both types of testing matter
You might wonder, “Why do we need both local and end-to-end tests?” Here’s the deal:
- Local tests help you catch problems early on, at the individual component level. It’s much easier to fix a problem with a single Lambda than to debug a complex workflow with multiple failing parts.
- End-to-end tests ensure that all the components work together seamlessly. They verify that the data is passed correctly between steps and that the overall workflow produces the desired outcome.
Debugging tips
- If a step fails during the end-to-end test, click on the failed step in the Step Functions execution diagram. You’ll often see an error message that can help you pinpoint the issue.
- Check the CloudWatch Logs for your Lambda functions. These logs contain valuable information about what happened during the execution, including any error messages or debug output you’ve added to your code.
Iterate and refine
Testing is not a one-time thing. As you develop your workflow, you’ll likely make changes and improvements. Each time you make a significant change, repeat your tests to ensure everything still works as expected. Remember: a well-tested workflow is a reliable workflow. By thoroughly testing our Step Functions workflow, we’re making sure that Santa’s list (and our application) is in good hands. Now, let’s get testing!
Step Functions or single Lambdas?
Maintainability and visibility
Step Functions makes it super easy to see what’s happening in your workflow. It’s like having a map of Santa’s route on Christmas Eve. This makes it much easier to find and fix problems.
Complexity
For simple tasks, a single Lambda might be enough. But as soon as you have multiple steps that need to happen in a specific order, Step Functions is your best friend.
Beyond Christmas Eve
Key takeaways
Step Functions is a powerful way to chain together Lambda functions in a visual, trackable, and error-tolerant workflow. It’s like having a super-organized Santa Claus for your cloud applications.
Potential improvements
We could add more steps, like extra validation or an automated email to parents. We could use other AWS services like SNS (Simple Notification Service) for more advanced notifications or DynamoDB for storing even more data.
Final words
This was a simple example, but the same ideas apply to much more complex, real-world applications. Step Functions can handle massive workflows with thousands of steps, making it a crucial tool for any aspiring cloud architect.
So, there you have it! You’ve now seen how AWS Step Functions can orchestrate AWS Lambdas to complete a task, just like Santa orchestrates his elves on Christmas Eve. And hopefully, it was a bit more exciting than getting socks for Christmas. 😊